Figura 2
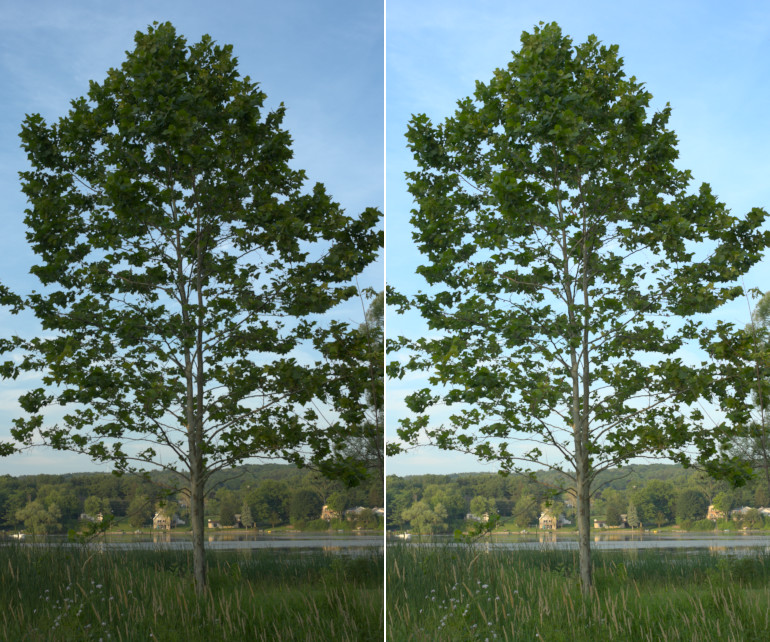
Ús de l'operació Exposició del GIMP amb gran profunditat de bits per aclarir el terra amb un sol diafragma sense eliminar parts del cel.
-
Esquerra: la imatge original, un fitxer de fotografia RAW interpolada que es va subexposar deliberadament a la càmera per a evitar que s'esborrés el cel. Pot semblar que no és el cas, però aquesta imatge ja està molt a prop de tenir valors de canal RGB fora de gamma en el cel, i un simple «Auto estendre el contrast» no il·luminarà gens la imatge.
-
Dreta: la mateixa imatge després d'utilitzar l'operació Exposició del Gimp amb gran profunditat de bits a 32 bits de precisió lineal en punt flotant per a afegir un diafragma de compensació positiva d'exposició. Per a conservar les àrees brillants es va utilitzar una màscara a escala de grisos inversa.
Aquest exemple pas a pas proporciona una imatge de mostra que es desglossa en cinc passos, començant per la baixada de la imatge. Els passos 3, 4 i 5 descriuen el procediment real.
-
Descarregueu-vos tree.png, que és una imatge sRGB en enters de 16- bits. El GIMP de gran profunditat de bits és de fet un editor d'imatges «només sRGB», de manera que millor és no intentar editar-lo en altres espais de treball RGB.
-
Obre tree.png amb el GIMP i assigna el perfil sRGB integrat al GIMP (els colors de la imatge no canviaran gens). A continuació, convertiu la imatge a precisió lineal en punt flotant de 32 bits: seleccioneu → → , i en el diàleg Conversió de codificació, seleccioneu Llum lineal (això assegura que el mode de barreja Normal produeix resultats radiomètricament correctes).
-
Feu una còpia de la capa «tree.png» a través de → o → , i etiqueteu-la com a «+1 diafragma d'exposició». A continuació, utilitzeu → per afegir un diafragma de compensació d'exposició positiva. La figura 3 de sota mostra els paràmetres adequats per al diàleg d'operació Exposició, i la figura 4 mostra el resultat:
Figura 3
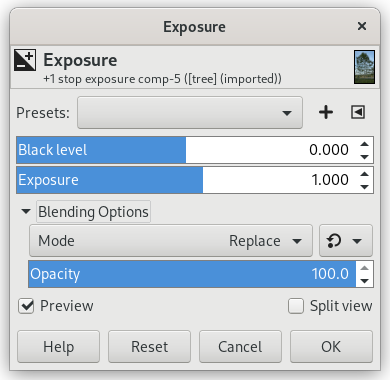
Ús de l'operació Exposició per a afegir un diafragma de compensació d'exposició positiva.
Quan utilitzeu l'operació Exposició per a afegir un diafragma de compensació d'exposició positiva, assegureu-vos que la imatge estigui realment en una precisió de punt flotant, perquè la precisió dels enters permetrà eliminar els tons clars.
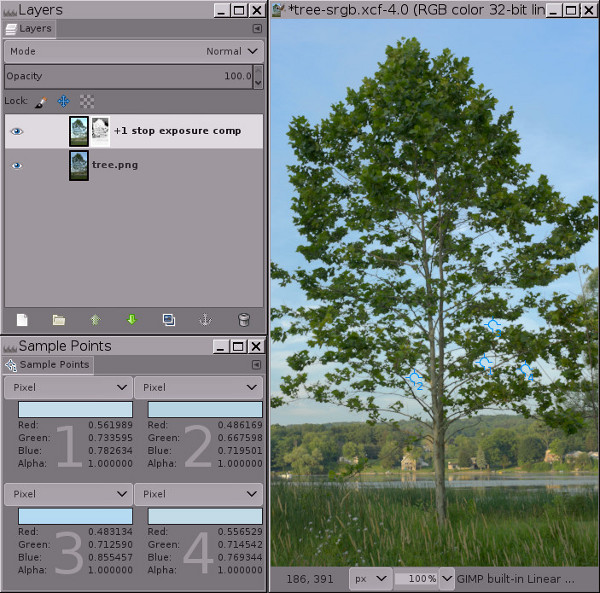
Figura 4
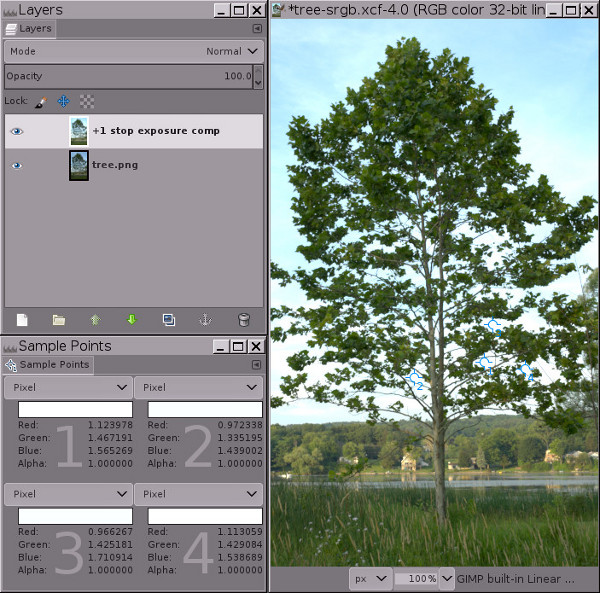
En la precisió del punt flotant, l'operació Exposició del GIMP no té límits. Això significa que podeu utilitzar l'operació Exposició per a afegir una compensació de l'exposició positiva sense deixar de banda les zones lluminoses.
Observeu els valors del canal RGB dels quatre punts d'exemple: la informació del canal que s'hauria esborrat utilitzant la precisió dels enters es codifica mitjançant valors de canal superiors a 1,0 punt flotant.
La imatge de la figura 4 ha esborrat netament les zones clares del cel. Però el contingut d'aquestes zones clares no ha desaparegut (és a dir, reduït a 1,0 en un o més canals). En canvi, la informació de les zones clares encara hi és, però els valors del canal RGB queden fora de l'interval 0.0f a 1.0f indica el valor del canal. El quadre de diàleg dels punts de mostra de la figura 4 anterior exposa quatre punts de mostra que tenen valors de canal RGB superiors a 1,0. Com es mostra a la figura 5 següent, afegir-hi una màscara us permet recuperar aquests punts clars tornant-los a l'interval de visualització.
Si haguéssiu utilitzat la precisió en enters en lloc del punt flotant, la informació de les zones clares hauria desaparegut. Els punts de mostra tindrien valors màxims de canals de 255, 65535 o 4294967295, segons la profunditat de bits. I l'emmagatzematge només recuperaria una extensió uniforme de grisos, mancat de detalls (proveu-ho vosaltres mateixos i observeu què passa).
-
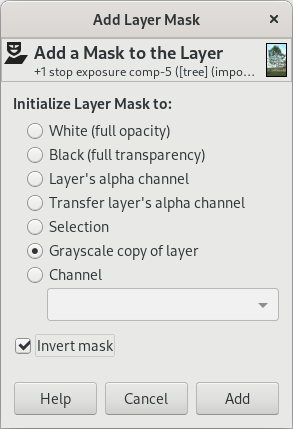
Afegeix una màscara de capa en escala de grisos inversa: feu clic- dret sobre la capa i seleccioneu → → , i quan aparegui el diàleg Afegeix màscara de capa, trieu Còpia en escala de grisos de la capa i marqueu la casella Inverteix la màscara.
Tal com es mostra a la figura 5 de sota, en aquest punt els tons clars es retornen a l'interval de visualització, això significa que tots els valors del canal RGB estan entre 0.0f i 1.0f. Però la imatge probablement sembla una mica estranya (nuvolosa i plana), i depenent de la imatge, les zones més clares poden tenir taques fosques: no us preocupeu! Això és temporal.
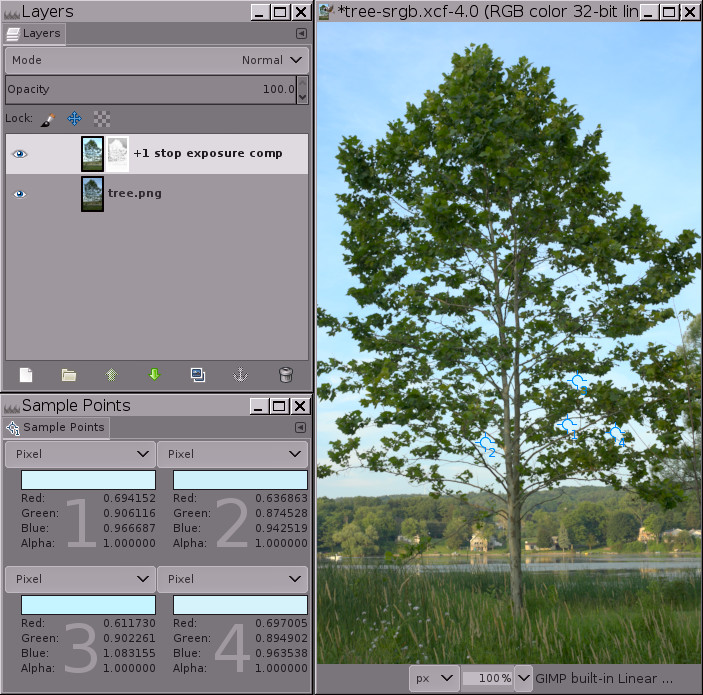
Figura 5
El resultat d'afegir una màscara de capa en escala de grisos inversa per a tornar a posar els tons clars a l'interval de visualització.
Afegint una màscara de capa d'escala de grisos inversa retorna les zones lluminoses a l'interval de visualització, però en aquest punt la majoria de les imatges apareixen planes i nuvoloses, i algunes imatges tindran taques fosques en els punts més clars. El següent pas, «Auto/Estira el contrast» sobre la màscara, solucionarà el problema.
-
Feu clic a la màscara de capa per seleccionar-la i editar-la, a continuació seleccioneu → → :
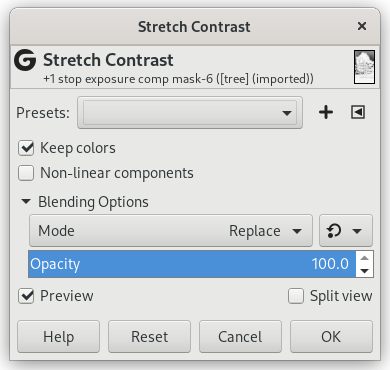
S'hauria de comprovar l'opció «Conserveu els colors» (tot i que no importa amb imatges en escala de grisos com ara les màscares de capa).
La Figura 6 següent mostra el resultat final:
Si feu → → a la màscara de capa, elimina l'aspecte «ennuvolat» deixant una imatge ben il·luminada amb zones clares intactes.
→ → sobre la màscara és necessari perquè igual que la capa d'imatge té valors de canal RGB fora de gamma, la màscara d'escala de grisos invertida conté fora de gamma valors d'escala de grisos. → → retorna tots els valors de l'escala de grisos de la màscara en l'interval de visualització, permetent que la màscara compensi proporcionalment els valors del canal RGB de la capa que altrament estan fora de gamma, emmascarant més en els tons clars de la capa i menys o gens en els tons foscos i mitjos de la imatge.
Adoneu-vos que un dels punts de mostra té un valor de canal RGB blau lleugerament fora de gamma. La manera més fàcil de tractar amb això és → i arrossegueu el triangle lliscant del mig per a fer un ajust de gamma de 0,45 a la màscara, no sobre la capa d'imatge real. Podeu fer aquest ajust de gamma a tota la màscara (funciona bé, menys esforç). O bé podeu fer l'ajust només sobre les ombres de la màscara (que corresponen als ressaltats de la capa), en aquest cas haureu de carregar la màscara com a selecció, invertir la selecció i fer l'ajust de la gamma. O si els valors restants del canal fora de la gamma només ho estan una mica, feu una capa «Nova des de visible» i després → → el resultat per retornar els valors restants del canal a la gamma.
Aquest és tot el procediment per a utilitzar l'operació Exposició per tal d'afegir un diafragma de compensació d'exposició positiva als tons foscos sense afectar les zones clares. Ara podeu polir la màscara, o simplement fer una capa «Nova des de visible» i continuar modificant la imatge ja ben aclarida. Depenent de la imatge i també de les vostres intencions artístiques, potser no cal polir la màscara. Però ben sovint voldreu modificar la distribució tonal resultant fent una correcció de la gamma, o potser una operació de Corbes a la màscara, o bé pintant directament sobre la màscara. I de vegades, voldreu difuminar la màscara per a restablir el micro contrast restaura micro contrast.


