The “Welcome Dialog” is shown when starting GIMP, unless you have disabled that. After updating to a new version, it will first show the Welcome page. After that first time, it will start with the Create page opened. This allows you to quickly continue with what you were working on before.

The Welcome Dialog consists of five pages that you can switch between by clicking on their name at the top of the dialog. The most important ones are Personalize, which allows you to quickly adjust some settings; and Create, to select which images you want to open when starting GIMP.
The following pages are part of the dialog.
- Welcome
-
This is the first page shown after you have updated your version of GIMP. It shows the exact version that you just installed.
Below it are important links to GIMP's main website, tutorials, documentation, how to contribute, and making donations to support the development of GIMP.
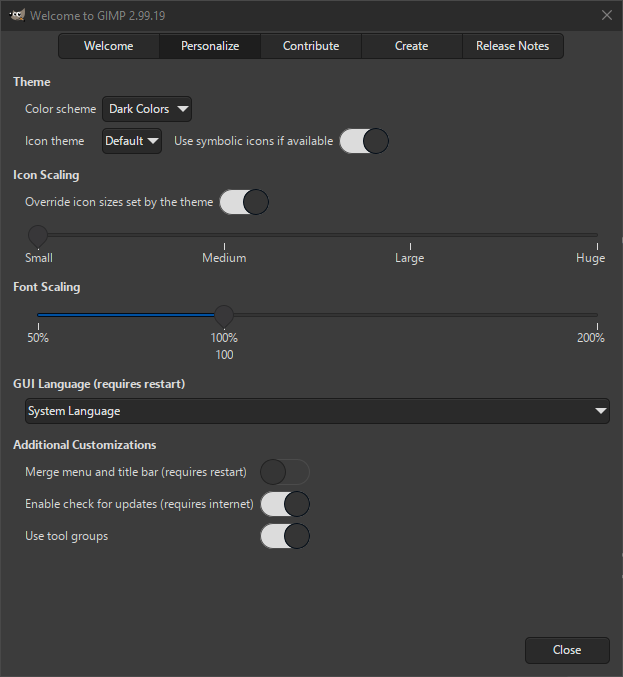
- Personalize
-
The Personalize page gives you quick access to a selection of settings that you may find useful to adjust to your personal preferences. All of these settings can also be accessed from the Preferences Dialog.
These settings are divided in several groups, which will be explained below. The settings in the first three groups take effect immediately, which allows you to preview the changes.
- 테마
-
The settings here allow you to adjust the colors and icons used in GIMP to your liking. See also Theme and Icon settings in the Preferences Dialog.
- Color scheme
-
This allows you to choose which color scheme to use for the current theme in GIMP's interface. Our own themes have a choice between Light Colors, Middle Gray, Dark Colors and System Colors. The latter setting will try to follow your OS theme preference regarding dark mode, if that setting is available on your system.
- Icon Theme
-
This allows you to choose which icon theme to use in GIMP's interface. By default, there is a choice between Default and Legacy. The Legacy icons are here for backwards compatibility. They are generally not well suited to higher resolution screens and are only available in a colored variant.
If you have installed custom themes, they will show up in this list too.
- Use symbolic icons if available
-
This allows you to choose whether you prefer the symbolic variant of the icon theme (if available). The symbolic version is a grayscale flat variant, while the non-symbolic variant has colored icons.
Note that this setting will only take effect if the icon theme supports a symbolic variant.
- Icon Scaling
-
This group allows you to adjust the size of the icons.
- Override icon sizes set by theme
-
Usually each icon theme sets the size of the icons. By enabling this, you can override the size set by the icon theme and adjust it with the setting below.
- Icon sizes
-
This slider allows you to adjust the size of the icons in several steps between small and huge.
- Font Scaling
-
This allows you to adjust the size of the fonts.
- Font sizes
-
This slider allows you to adjust the size of the fonts used in GIMP's interface between 50% and 200%, where 100% is the default size set by the theme.
- GUI Language
-
This drop-down list allows you to select the interface language used in GIMP. Note that this change will only take effect after restarting GIMP.
- Additional Customizations
-
These additional settings allow you to adjust several unrelated preferences.
- Merge menu and titlebar
-
When enabled the titlebar and the menu will be shown together in one bar. This can be useful to save some vertical space on your screen. This requires a restart before it takes effect.
See also Image Windows preferences.
- Enable check for updates
-
This setting is not available when GIMP is installed as a package that is automatically updated.
This requires a working internet connection. When enabled GIMP will regularly check its website to see if a new version is available. If there is, you will be notified, and can decide whether you want to update or not. No personal info is shared with our website.
See also System Resources, Network Access preferences.
- Use tool groups
-
By default, tools in the toolbox are grouped together to save space. A different tool in a group can be selected by hovering or long-clicking on a group. When you prefer to have all tools available directly, instead of in groups, you can disable this setting here.
See also Toolbox preferences.
- Contribute
-
The contribute page has helpful links if you want to report bugs, help improving GIMP's code, translate the interface of GIMP, or if you want to donate money to help with the development of GIMP.
- Create
-
The Create page allows you to quickly open one or more of your last used images, to continue where you left off.
From this page you can also choose to a new image, or the file dialog to look for a different image.
If you just want to open one of your recently used images, you can double-click the image in the list. To open multiple images, select the ones you want in the list, then click the button below the list.
At the bottom of this page you will see the Show On Start setting. By default this page is shown every time you start GIMP. You can disable this by unchecking this option. After that you can always enable it again by opening this dialog from the Help menu and going to the Create page.
- Release Notes
-
This page shows a list of the most important changes in the latest version of GIMP.
The changes that have a triangle icon in front of them can be clicked to show where these changes can be found. Clicking the triangle starts a short animation that highlights the locations in the interface related to the change.