This command pastes the clipboard contents. Of course, you must use the “Copy” command before, so that you have something in the clipboard.
There is no way to empty the clipboard.
The submenu offers several ways to paste the clipboard contents:
The command creates a new layer in the active image and pastes the clipboard contents into it.
If the data are not rectangular or square in shape, any regions that do not extend to the edge of the canvas are left transparent (an Alpha channel is automatically created). Of course, you have to copy your selection before you use this command.
The command creates a new layer in the active image and pastes the clipboard contents at exact coordinates the contents was originally copied from.
This feature is available for both the regular clipboard and named buffers.
O comando cria uma nova imagem e cola o conteúdo da área de transferência na mesma. Se o conteúdo não tiver forma retangular ou quadrada, as áreas faltantes são deixadas como transparentes (o canal alfa é criado automaticamente). A nova imagem tem o mesmo tamanho que a seleção.
Este comando tem exatamente a mesma ação que o comando → → .
The command creates a floating selection in the active image and pastes the clipboard contents into it.
If the data are not rectangular or square in shape, any regions that do not extend to the edge of the canvas are left transparent (an Alpha channel is automatically created). Of course, you have to copy your selection before you use this command.
![[Nota]](images/note.png)
|
Nota |
|---|---|
|
Você só pode ter uma seleção flutuante ativa de cada vez. Você não pode realizar alterações em outras camadas se houver uma seleção flutuante; você precisa ancorar, descartar ou transformar a seleção flutuante em uma nova camada antes de continuar trabalhando no restante da imagem. |
The command creates a floating selection in the active image and pastes the clipboard contents into it at the exact location the contents was originally copied from.
If the data are not rectangular or square in shape, any regions that do not extend to the edge of the canvas are left transparent (an Alpha channel is automatically created). Of course, you have to copy your selection before you use this command.
![[Nota]](images/note.png)
|
Nota |
|---|---|
|
Você só pode ter uma seleção flutuante ativa de cada vez. Você não pode realizar alterações em outras camadas se houver uma seleção flutuante; você precisa ancorar, descartar ou transformar a seleção flutuante em uma nova camada antes de continuar trabalhando no restante da imagem. |
The command replaces the contents of the current selection with the contents of the clipboard and turns it into a floating selection.
The clipboard data is clipped by the selection, but the image data in it can still be moved if it extends outside the selection.
If no selection exists, the “Paste as Floating Data Into Selection” command places the data from the clipboard into the center of the canvas, as the “Paste” command does.
![[Nota]](images/note.png)
|
Nota |
|---|---|
|
Você só pode ter uma seleção flutuante ativa de cada vez. Você não pode realizar alterações em outras camadas se houver uma seleção flutuante; você precisa ancorar, descartar ou transformar a seleção flutuante em uma nova camada antes de continuar trabalhando no restante da imagem. |
The command replaces the contents of the current selection with the contents of the clipboard, at the exact coordinates the contents was originally copied from, and turns it into a floating selection.
The clipboard data is clipped by the selection, but the image data in it can still be moved if it extends outside the selection.
If no selection exists, the “Paste as Floating Data Into Selection In Place” command places the data from the clipboard into the center of the canvas, as the “Paste” command does.
![[Nota]](images/note.png)
|
Nota |
|---|---|
|
Você só pode ter uma seleção flutuante ativa de cada vez. Você não pode realizar alterações em outras camadas se houver uma seleção flutuante; você precisa ancorar, descartar ou transformar a seleção flutuante em uma nova camada antes de continuar trabalhando no restante da imagem. |
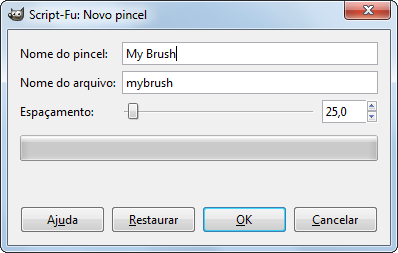
Este comando abre uma janela de diálogo que permite que você dê um nome ao seu novo pincel. O pincel aparece no Diálogo de pincéis. Se a imagem de onde você copiou o conteúdo for em Tons de cinza, o novo pincel usará a cor ativa na Caixa de ferramentas quando você o usar.
- Nome do pincel
-
Nome do pincel é o nome que ele terá no diálogo de “Pincéis”.
- Nome do arquivo
-
O novo pincel é salvo com o nome digitado em Nome do arquivo (com a extensão
.gbr) na sua pasta pessoal de pincéis do GIMP (brushes) - Espaçamento
-
Espaçamento: Quando o pincel desenha uma linha, na verdade ele é “carimbado” repetidas vezes na imagem. Se as imagens do pincel carimbadas dessa forma estiverem muito próximas uma das outras, você terá a impressão de uma linha contínua.
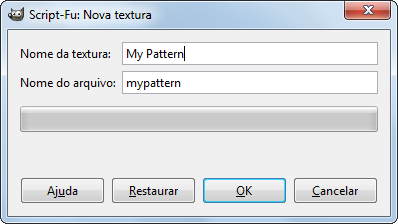
Este comando abre uma janela de diálogo que permite que você de um nome para a sua nova textura. A textura aparece no Diálogo de texturas.
- Nome da textura
-
Pattern name is the name as it will be in the Patterns Dialog.
- Nome do arquivo
-
A nova textura é salva como Nome do arquivo (com a extensão
.pat) na sua pasta pessoal de texturas do GIMP (patterns)


