The “Brushes” dialog is used to select and manage brushes. These brushes are used by the Paintbrush, Pencil and Airbrush tools. The MyPaint Brush uses its own kind of brushes. GIMP comes with a wide selection of brushes and more can be added easily. You can also create custom brushes using the Brush Editor, or by exporting an image as a brush.
See the Brushes section for basic information on brushes and how they are used in GIMP.
There can be only one brush active at any time. To make a brush active, select it in the list or grid. The name of the currently active brush is shown directly above the list of brushes. The active brush can also be recognized by a selection rectangle around the preview (which can sometimes be difficult to see, depending on your theme). The size, angle, spacing and several other characteristics of a brush can be set in the Tool Options Dialog when one of the relevant paint tools is active.
O diálogo de “Buffers” é um diálogo de encaixe;veja a seção Seção 2.3, “Caixas de diálogo e de encaixe” para mais informações sobre como gerenciá-lo.
-
From the main menu select → → .
-
From the Tab menu in any dockable dialog click the tab menu button
 and select
→ .
and select
→ .
-
If you enabled the “Show active brush, pattern & gradient” option in the Toolbox Preferences, you can click on the active brush icon in the Brush, Pattern, Gradient area.
-
From the Tool Options dialog for the Paintbrush, Pencil and Airbrush tools, by clicking on the Brush icon button. This opens a popup with similar functionality that allows you to quickly choose a brush from the list. To open the actual brush dialog click on the button at the bottom right corner of the popup.
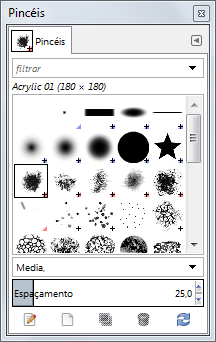
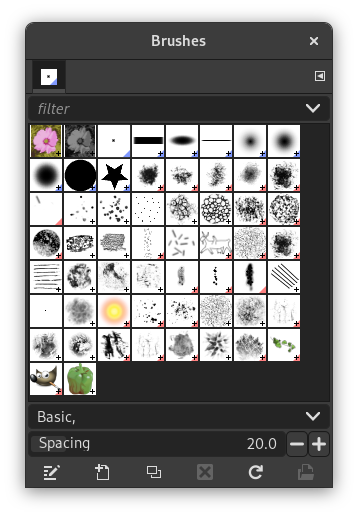
O diálogo de “Pincéis” simplificado
The button bar at the bottom offers the following functionality:
-
 Smaller previews
-
 Larger previews
-
 View as list
-
 View as grid
-
 Open the brush selection dialog
Note that, depending on your Preferences, a brush selected with the popup may only apply to the currently active tool, not to other paint tools. See the Paint Options Shared Between Tools section in the Tool Options Preferences for more information.
-
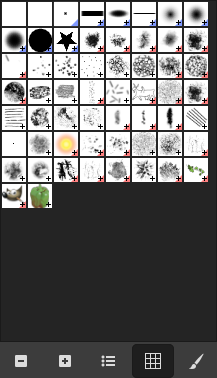
In the Tab menu, you can choose between and . In Grid mode, the brush shapes are laid out in a rectangular array, making it easy to see many at once and find the one you are looking for. In List mode, the shapes are lined up in a list, with the names beside them.
In the Tab menu, the option Preview Size allows you to adjust the size of brush previews to your liking.
- Modo de grade
-
Na parte de cima do diálogo aparece o nome do pincel atualmente selecionado e o tamanho em pincéis.
No centro, aparece a visão em grade com todos os pincéis disponíveis, com o pincel atualmente selecionado em destaque.
- Modo de lista
-
Em quase todos os aspectos, o diálogo se comporta da mesma forma no modo de Grade ou modo de Lista, com uma exceção:
Se você der um clique-duplo no nome de um pincel, você poderá editá-lo. Entretanto, em geral, você só pode alterar o nome dos pincéis que você mesmo tenha criado, não os que vêm pré-instalados com o GIMP. Se você tentar mudar o nome de um pincel pré-instalado, você não verá um erro, mas assim que apertar Enter, o nome anterior será restaurado. É uma regra geral que você não pode alterar o nome ou outras propriedades de recursos pré-instalados com o GIMP: Pincéis, texturas, degradês, etc... apenas os que você cria. Isso no entanto não é mágica: se você alterar as permissões do seu sistema operacional onde os recursos são guardados, e alterar as permissões de cada pasta nas Preferências do GIMP, você poderá alterá-los.
When you click on a brush preview, it becomes the active brush that will be used when using one of the relevant painting tools. Double-clicking a brush preview, activates the Brush Editor.
Brushes can be managed in several ways using the buttons at the bottom of the dialog or the right-click context menu.
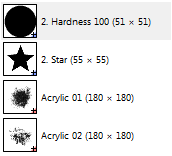
Meaning of the symbols at the bottom right corner of a brush preview
-
A plus sign indicates that the brush preview is shown at a reduced size. To preview the normal size, left click and hold the preview.
-
A blue corner indicates the brush is a parametric brush, created with the Brush Editor.
-
A red corner indicates this is an animated brush. To preview the animation, left click and hold the preview.
On the right side, next to the filter selection, there is a
![]() Use theme colors for preview button.
Use theme colors for preview button.
By default, brushes and fonts show a white background for each preview. If you prefer the background to be more in line with your theme, you can toggle that by clicking this button. GIMP will then use the background color as set by your theme.
The “filter” drop-down allows you to select one or more tags to filter and reduce the number of brushes shown. The “tags” can be managed below the preview area. For more information on tagging see Seção 3.7, “Rotulando”.
Esse controle faz com que você possa configurar a distância entre marcas consecutivas do pincel quando você traça uma pincelada com o ponteiro do mouse (ou com uma das opções de editar->contornar). O espaçamento é uma percentagem da largura do pincel.
The button bar at the bottom offers the following functionality:
-
 Editar pincel
-
This activates the Brush Editor. Pressing the button will open the Editor for any brush. It only works, however, for parametric brushes, which can be recognized by the blue bottom right corner in the preview. For other types of brushes the Editor will show you a preview, but not allow you to make any changes.
-
 Novo pincel
-
This creates a new parametric brush, initializes it with a small fuzzy round shape, and opens the Brush Editor so that you can modify it. The new brush is automatically saved in your personal Brushes Folder.
-
 Duplicar pincel
-
This button is only enabled if the currently selected brush is a parametric brush. If so, the brush is duplicated, and the Brush Editor is opened so that you can modify the copy. The result is automatically saved in your personal Brushes Folder.
-
 Remover pincel
-
This option is active for parametric brushes only. This removes all traces of the brush, both from the dialog and the folder where its file is stored, if you have permission to do so. It asks for confirmation before doing anything. The brushes that come with GIMP can not be removed.
-
 Atualizar pincéis
-
If you add brushes to your personal Brushes Folder or any other folder in your brush search path, by some means other than the Brush Editor, this button causes the list to be reloaded, so that the new entries will be available in the dialog.
-
 Open brush as image
-
Clicking this, opens the selected brush as a regular image that you can edit. It can be turned back into a brush by copying it and selecting → → , or by exporting it as a brush. This is different from Seção 3.2.3, “Editor de pincéis” that allows you to modify an existing parametric brush.
The functions performed by these buttons can also be accessed from the dialog pop-up menu, activated by right-clicking anywhere in the brush grid/list, or by choosing the top item, , from the tab menu.
Right clicking on a brush preview opens a context menu. Most of the commands of this submenu are described with the Buttons, except for the following.
- Copy Brush Location
-
Copy Brush Location allows you to copy the brush path to the clipboard. After that you can use the → , command, to open the brush as a new image.
- Show in File Manager
-
Show in File Manager opens the location of the brush in the default File Manager on your system.
- Elliptical, Feathered…, Elliptical…, Rectangular, Feathered…, Rectangular…
-
Options to create elliptical and rectangular brushes. These brushes can be feathered, but they are not parametric brushes.
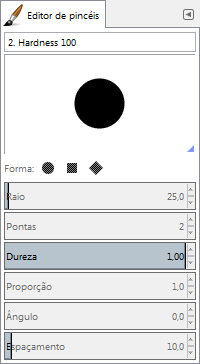
O Editor de pincéis permite que você veja os parâmetros de um pincel suprido pelo GIMP, e você pode alterá-los. Você também pode criar um pincel personalizado: clique no botão Novo pincel para ativar as funções do editor de pincéis; Você pode escolher uma forma geométrica, um círculo, um quadrado ou um diamante. Esse editor tem vários elementos:
The dialog bar:
As with all dialog windows, the
tab menu button
![]() opens a menu allowing you to access and set further related options.
opens a menu allowing you to access and set further related options.
A barra de título: para dar um nome ao seu pincel.
A área de pré-visualização: alterações no pincel aparecem em tempo real na pré-visualização.
Configurações
- Forma
-
Um círculo, um quadrado ou um losango são as formas básicas disponíveis. Você poderá modificá-las usando as opções seguintes:
- Raio
-
A distância entre o centro do pincel e a borda, na direção da largura. Um quadrado com raio de 10 pixels terá um lado de 20 pixels. Um losango com raio de 5 pixels, terá uma largura de 10 pixels. A partir do GIMP 2.8 esse tamanho não é mais tão importante, já que é sobrepujado pela opção de “Tamanho” das opções de ferramenta para as ferramentas de pintura. Ao contrário de pincéis baseados em pixel, que são lidos de arquivos de imagem, os pincéis paramétricos não perdem qualidade se forem usados com um tamanho maior do que o tamanho em que estão salvos.
- Pontas
-
Ao aumentar o número de pontas para um pincel quadrado, você obtém um polígono com mais lados. Com o pincel em forma de losango, você obtém pincéis em formato de estrela. Para pincéis redondos, com proporção diferente de “1,0”, você obtém formas que lembram flores estilizadas.
- Dureza
-
Esse parâmetro controla o quando a borda do pincel é enevoada. O valor = 1,00 gera um pincel com uma borda nítida (0,00 - 1,00)
- Proporção
-
Esse parâmetro controla a proporção entre a largura e a altura do pincel. Um losango com raio de 5 pixels e proporção = 2 aparecerá achatado, com uma largura de 10 pixels e altura de 5 pixels.
- Ângulo
-
This angle is the angle between the brush width direction, which is normally horizontal, and the horizontal direction, clock-wise. When this value increases, the brush width turns clock-wise (0° to 180°).
- Espaçamento
-
Quando o pincel desenha uma linha, o GIMP na verdade carimba a figura do pincel repetidamente na imagem. Quando as marcas estão próximas o suficiente, você tem a impressão de uma linha sólida. Em geral, você tem algo parecendo com uma linha sólida se usar pincéis redondos, um pouco enevoados,e valores pequenos, mas que não precisam ser igual a “1” - esse número é uma porcentagem da largura do pincel: então o espaçamento máximo, de 200, equivale a duas vezes a largura do pincel (1,00 - 200,00).
The Brush Editor has a context menu that can be opened with the
tab menu button
![]() and then choosing
. It only has one option.
and then choosing
. It only has one option.
Quando você usa o comando Copiar ou Cortar em uma imagem, ou uma seleção, uma cópia do conteúdo copiado aparece no canto superior esquerdo do diálogo de “Pincéis”. Esse pincel vai persistir até que você use o comando de Cópiar novamente. Ele desaparece ao fechar o GIMP.
![[Nota]](images/note.png)
|
Nota |
|---|---|
|
You can save this clipboard brush with → → as soon as it appears in the “Brushes” dialog. See Seção 3.10.8, “Colar como Novo pincel”. |


