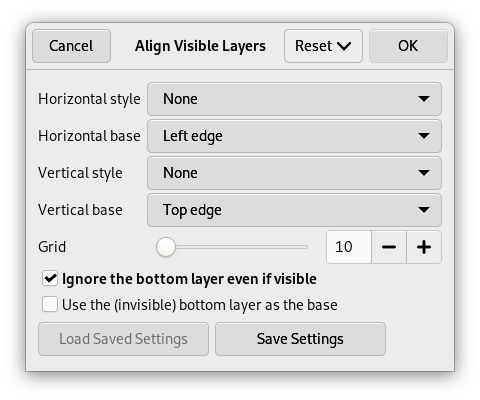
Met de opdracht kunt u de zichtbare lagen (die gemarkeerd met het pictogram “oog”) zeer nauwkeurig positioneren. Deze mate van precisie is vooral handig wanneer u aan animaties werkt, die doorgaans veel kleine lagen hebben. Als u op klikt, wordt een dialoogvenster weergegeven waarin u kunt kiezen hoe de lagen moeten worden uitgelijnd.
-
U kunt deze opdracht uitvoeren vanuit het hoofdmenu met → , Er is geen standaard sneltoets. Als de laag slechts een laag bevat, krijgt u een bericht van GIMP dat u zegt dat er meer dan een laag in de afbeelding moet zijn om de opdracht uit te kunnen voeren.
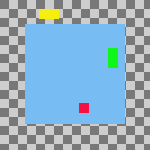
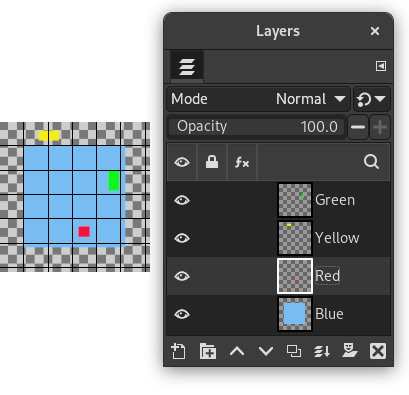
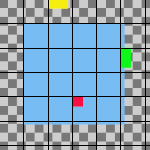
The examples in the Description of the “Align Visible Layers” dialog section all use the same starting image. The image contains four layers. The order of those layers from top to bottom is as follows:
-
Green, vertical rectangle (top layer)
-
Yellow, horizontal rectangle
-
Red, small square
-
Blue, larger square (bottom layer)

The command aligns layers based on their boundaries. In the example image, each layer's boundary is adjusted to match the perimeter of the shape in that layer. For information about how to adjust a layer's boundary, see Layer Boundary Size. You can also use a command such as Crop Layers to Content to automatically adjust a layer's boundary.
![[Opmerking]](images/note.png)
|
Opmerking |
|---|---|
|
In the examples, the Ignore the bottom layer even if visible checkbox is left checked. The bottom layer, which is the larger blue square, is then not affected by any of the alignment operations. |
- Horizontale stijl, Verticale stijl
-
Deze opties bepalen hoe de lagen ten opzichte van elkaar verplaatst moeten worden. U kunt kiezen tussen:
-
Geen: Er zal geen verandering zijn in respectievelijk de horizontale of verticale positie.
-
Verzamelen: de zichtbare lagen worden uitgelijnd op het canvas, op de manier die wordt bepaald door de opties Horizontale basis en Verticale basis. Als u een Horizontale basis van Rechterrand selecteert, kunnen lagen van het canvas verdwijnen. U kunt ze herstellen door het canvas te vergroten. Als u de optie Gebruik de (onzichtbare) onderste laag als basis aanvinkt, worden de lagen uitgelijnd in de linkerbovenhoek van de onderste laag.
Afbeelding 16.73. Example Use of Collect: Layers Aligned to Left Edge of the Canvas
Originele afbeelding
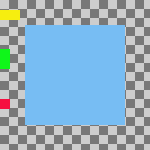
Horizontal style: Collect , Horizontal base: Left edge.
De lagen zijn horizontaal verplaatst, zodat hun linker randen zijn uitgelijnd met de linker rand van het canvas.
Afbeelding 16.74. Example Use of Collect: Layers Aligned to Left Edge of the Bottom Layer
Originele afbeelding
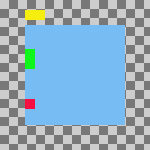
Same parameters as the previous example, but with the Use the (invisible) bottom layer as the base checkbox checked.
De lagen zijn horizontaal verplaatst zodat hun linker randen uitgelijnd zijn met de linker rand van de onderste laag.
-
Fill (left to right); Fill (top to bottom): The visible layers will be arranged left to right (or top to bottom) on the canvas according to their order in the layer stack.
The top layer in the stack will be aligned with the layer that currently has the leftmost (or uppermost) position on the canvas. The bottom layer in the stack will be aligned with the layer that currently has the rightmost (or bottommost) position on the canvas. All other visible layers will be evenly distributed between those two positions according to their order in the layer stack.
Your choice of Horizontal base (or Vertical base) determines how the top and bottom layers are aligned with their respective target layers. For example, if you choose Right edge as the Horizontal base, the right edge of the top and bottom layers will be aligned with the right edge of their target layers.
Opmerking If the Use the (invisible) bottom layer as the base checkbox is checked, the top layer in the stack will be aligned with the current position of the bottom layer in the stack, instead of the leftmost (or uppermost) layer on the canvas.
Afbeelding 16.75. Example Use of Fill: Layers Filled Left to Right
Originele afbeelding
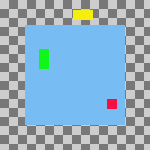
Horizontal style: Fill (left to right), Horizontal base : Left edge.
The top layer in the stack, the green one, was aligned with the layer that had the leftmost position on the canvas. The bottom layer in the stack, the red one, was aligned with the layer that had the rightmost position on the canvas. The yellow layer is placed between the other two.
Afbeelding 16.76. Example Use of Fill: Layers Filled Left to Right With the Bottom Layer as the Base
Originele afbeelding
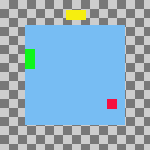
Same parameters as the previous example, but with the Use the (invisible) bottom layer as the base checkbox checked.
The top layer in the stack, the green one, is aligned with the left edge of the base layer. The bottom layer in the stack, the red one, was aligned with the layer that had the rightmost position on the canvas. The yellow layer is placed between the other two.
-
Vullen (rechts naar links); Vullen (onder naar boven): deze instellingen werken op dezelfde manier als hierboven beschreven, maar het vullen gebeurt in de tegenovergestelde richting.
Afbeelding 16.77. Example Use of Fill: Layers Filled Bottom to Top With the Bottom Layer as the Base
Originele afbeelding
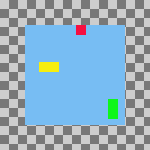
Vertical style: Fill (bottom to top), Vertical base : Top edge, Use the (invisible) bottom layer as the base: checked.
The bottom layer in the stack, the red one, is aligned with the top edge of the base layer. The top layer in the stack, the green one, was aligned with the top edge of the of the layer that had the lowest position on the canvas. The yellow layer is placed between the other two.
Er moeten ten minste drie zichtbare lagen in de afbeelding zijn om de opties voor “Vullen” te kunnen gebruiken.
-
Magnetisch raster: De zichtbare lagen zullen worden uitgelijnd op een raster. Gebruik de instelling Raster om de afstand van het raster te definiëren. De basis die u selecteert zal worden uitgelijnd met de dichtstbijzijnde rasterlijn. Als u bijvoorbeeld selecteert Linker rand uit de lijst Horizontale basis, zal de linker rand van elke laag worden uitgelijnd met de rasterlijn die het dichtst bij de linker rand van de laag ligt.
In het volgende voorbeeld is het raster voor de afbeelding ingeschakeld en is de afstand ingesteld op dezelfde afstand als de instelling Raster. Dat is alleen om te helpen om het effect te demonstreren van de optie Magnetisch raster. U hoeft het raster voor de afbeelding niet in te schakelen en geen van de instellingen ervan wordt gebruikt bij het uitlijnen van lagen.
Afbeelding 16.78. Example Use of Snap to Grid: Layers Aligned to Top Left Corner of Grid Squares
Original image with an added 30 pixel image grid
Horizontal style: Snap to grid, Horizontal base: Left edge, Vertical style : Snap to grid, Vertical base: Top edge , Grid: 30
Each layer other than the base is aligned with the top left corner of a 30 by 30 pixel grid square.
-
- Raster
-
Als u de optie Magnetisch raster kiest uit ofwel de lijst Horizontale stijl of de lijst Verticale stijl, definieert de instelling Raster de tussenruimte voor het raster waarmee de lagen worden uitgelijnd.


