Het gereedschap Uitlijnen en verdelen is nuttig om de afbeeldingslagen uit te lijnen met verschillende afbeeldingsobjecten. Wanneer dit gereedschap is geselecteerd, wordt de muisaanwijzer een kleine hand. Door te klikken op een element van een laag in de afbeelding, kiest u de laag die zal worden verplaatst (met Shift +klik, kunt u meerdere lagen kiezen om te worden uitgelijnd); deze laag met de focus heeft kleine vierkanten in de hoeken en wordt de bron genoemd. Dan worden knoppen in het dialoogvenster actief (ze blijven actief gedurende de gehele sessie van GIMP): ze stellen u in staat het doel te selecteren, d.i. de andere laag, selectie, pad, waarmee de bron zal worden uitgelijnd.
U kunt het gereedschap op verschillende manieren activeren:
-
Vanuit het hoofdmenu: → → .
-
Door te klikken op het pictogram van het gereedschap
 in de Gereedschapskist.
 -
Door te drukken op de sneltoets Q.
- Shift
-
U kunt verschillende lagen selecteren door Shift ingedrukt te houden terwijl u op de lagen klikt.
![[Tip]](images/tip.png)
Tip Soms is het gemakkelijker om meerdere lagen te kiezen door een gebied aan te wijzen: klik op een hoek van een denkbeeldig rechthoekig gebied waar alle te selecteren lagen in passen. Sleep de muisaanwijzer naar de hoek ertegenover. Nu wordt elke laag, die zich volledig binnen de gesleepte rechthoek bevindt, geselecteerd.
Merk op dat er nu geen doel “eerste item” is waarop de geselecteerde lagen kunnen worden uitgelijnd.
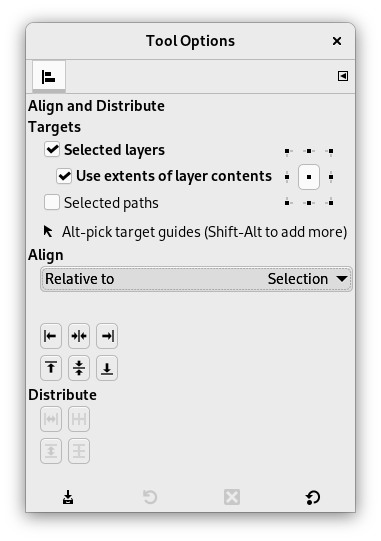
Normaal gesproken worden gereedschapsopties weergegeven in een venster dat is gekoppeld onder de Gereedschapskist, zodra u een gereedschap activeert. Als dat niet zo is, kunt u er toegang toe krijgen vanuit het hoofdmenu met → → , dat het venster met de gereedschapsopties voor het geselecteerde gereedschap opent. De beschikbare gereedschapsopties kunnen ook worden bereikt door te dubbelklikken op het corresponderende pictogram van het gereedschap in de Gereedschapskist.
- Uitlijnen
-
- Ten opzichte van:
-
In deze keuzelijst selecteert u het doel, het soort afbeeldingsobject waarmee de laag zal worden uitgelijnd.
-
Afbeelding: het doel is de hele afbeelding.
-
Selectie: de selectie is het doel.
-
Gekozen vergelijkingsobject: Het geselecteerde object (laag, pad, hulplijn) op het canvas.
-
- Knoppen Uitlijnen
-
Deze knoppen worden actief wanneer een doel is geselecteerd.
-
 : om de linker rand van de bron uit te lijnen met de linker rand van het doel.
 -
 : om het midden van de bron uit te lijnen op de verticale middellijn van het doel.
 -
 : om de rechter rand van de bron uit te lijnen met de rechter rand van het doel.
 -
 : om de bovenste rand van de bron uit te lijnen met de bovenste rand van het doel.
 -
 : om het midden van de bron uit te lijnen op de horizontale middellijn van het doel.
 -
 : om de onderste rand van de bron uit te lijnen met de onderste rand van het doel.
-
- Voorbeeld
-
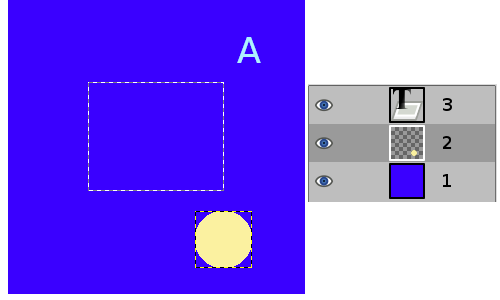
Een afbeelding met een selectie, laag #1 (achtergrond) is actief, laag #2 is bijgesneden tot inhoud, laag #3 is een tekstlaag.
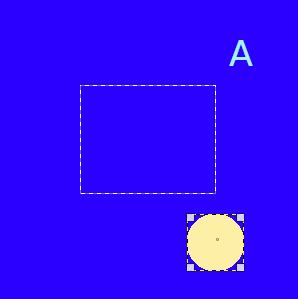
We klikken op de gele cirkel: laag #2 wordt de bron. We willen deze bron in het midden van de selectie hebben: de optie Ten opzichte van is ingesteld op “Selectie”.

Knop ingedrukt
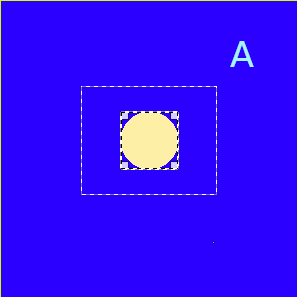
Knop ingedrukt
- Verdelen
-
- Verdelen knoppen
-
Deze opties worden gebruikt als u verschillende doelen hebt en ze wilt schikken. Hier worden de lagen, die zijn geselecteerd met Shift+klik, “doelen” genoemd. Maar in feite zijn zij bronnen. De opties “Ten opzichte van” zijn actief om het doel in te stellen. Deze transformaties zijn gewoonlijk relatief ten opzichte van “Afbeelding”.
Deze opties werken zoals de opties Uitlijnen, maar u kunt bronnen gelijkmatig verdelen.
-
 : om bronnen gelijkmatig horizontaal te verdelen.
 -
: om het midden van bronnen horizontaal te verdelen ten opzichte van het midden van het doel.
-
 : om bronnen gelijkmatig verticaal te verdelen.
 -
: om het midden van bronnen verticaal te verdelen ten opzichte van het midden van het doel.
-
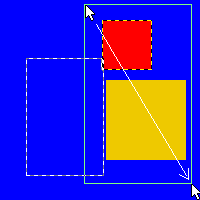
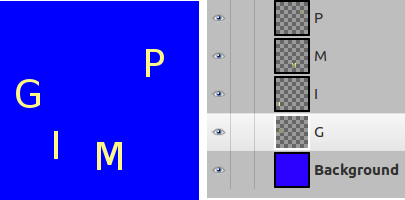
Afbeelding 14.93. Voorbeeld voor de opdrachten “Verdelen”
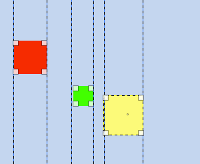
Basisafbeelding: drie lagen.
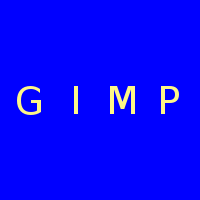
(Verdelen op rechter rand van doel) zal worden gebruikt.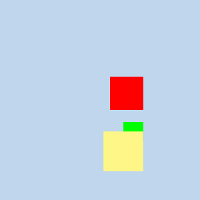 Actieve laag is geel (doel). Alle lagen worden uitgelijnd op de rechter rand van de gele laag.
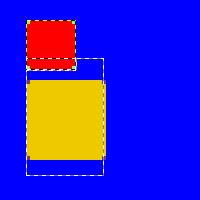
Afbeelding 14.94. Voorbeeld
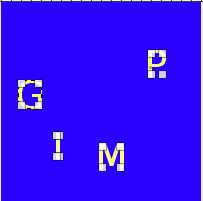
We selecteren ze als bronnen met Shift + Click.
Het standaard doel (Ten opzichte van) is “Afbeelding”. We gebruiken de opdracht
![]() (Doelen gelijkmatig verticaal verdelen).
(Doelen gelijkmatig verticaal verdelen).
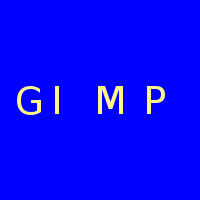
Daarna gebruiken
![]() (Doelen gelijkmatig horizontaal verdelen).
(Doelen gelijkmatig horizontaal verdelen).