I buffer, una sorta di memoria temporanea per i dati immagine, vengono creati quando si taglia o copia parte di un disegno (un livello, una maschera di livello, ecc.). I seguenti comandi sono disponibili dal menu per salvare un'immagine in un buffer:
- Taglia con nome...
-
→ → . Questo comando taglia la parte selezionata dalla zona di disegno corrente (di solito un livello) e la mette in un buffer. Se non c'è selezione verrà utilizzata l'intera area disegnabile. Verrà richiesto di dare un nome al buffer. L'immagine verrà rimossa dalla selezione al termine del comando.
- Copia con nome...
-
→ → Questo comando copia la parte selezionata dal disegno corrente (di solito un livello) e lo mette in un buffer. Se non c'è selezione verrà utilizzata l'intera area disegnabile. Verrà chiesto di dare un nome al buffer.
- Copia visibile con nome...
-
→ → Questo comando copia la parte selezionata di tutta la parte disegnabile visibile e la posiziona in un buffer. Se non c'è alcuna selezione verrà utilizzata l'intera immagine. Verrà chiesto di dare un nome al buffer.
- Incolla con nome...
-
→ → Questo comando di menu apre il Pannello dei buffer. Per incollare effettivamente un buffer, scegliere uno dei pulsanti di questa finestra di dialogo o usare il menu contestuale. Entrambe le scelte possibili verranno spiegate di seguito.
La finestra di dialogo «Buffer» mostra il contenuto di tutti i buffer con nome esistenti e consente di operare su di essi in diversi modi. Mostra anche, in alto, il contenuto del buffer globale (il contenuto degli appunti). Questo buffer globale è solo un display: non si può farci niente. Non esiste un limite assoluto al numero di buffer con nome che si può creare, tranne per il fatto che consumerà una parte della memoria disponibile del computer.
![[Attenzione]](images/caution.png)
|
Attenzione |
|---|---|
|
I buffer con nome non vengono salvati tra le sessioni: spariranno quando si chiuderà GIMP. L'unico modo per salvare i loro contenuti è di incollarli dentro delle immagini. |
Questa finestra di dialogo è di tipo agganciabile; vedere la sezione sulle Finestre agganciabili per le istruzioni su come gestire questo tipo di finestre.
È accessibile:
-
dal menu principale: → → ;
-
dal un menu principale: → → ;
-
da un menu scheda di un qualsiasi pannello agganciabile facendo clic sul pulsante menu scheda
 e selezionando → .
Nel menu , c'è un elenco di pannelli staccati che esiste fintantoché esiste un pannello aperto. In questo caso, è possibile portare in primo piano il pannello «Buffer» dal menu principale agendo su: → .
Facendo clic su di un buffer presente nell'area di visualizzazione, lo rende il buffer attivo, cioè quello che verrà usato per i comandi di incollamento eseguiti dal menu contestuale dei buffer o tramite i pulsanti presenti sul fondo della finestra di dialogo. Facendo doppio clic su di un buffer, lo si incolla sull'immagine attiva come selezione fluttuante; questo è un metodo molto veloce per eseguire il comando «Incolla buffer».
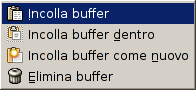
In fondo alla finestra di dialogo ci sono cinque pulsanti. Le operazioni che essi eseguono sono accessibili anche dal menu buffer che si ottiene facendo clic con il tasto destro del mouse sul buffer attivo.

Nel menu scheda della finestra «buffer», è possibile scegliere tra e . In modalità griglia, i buffer sono disposti come un insieme regolare rettangolare mentre in modalità elenco, essi sono allineati verticalmente in una colonna: ogni riga mostra una miniatura dei contenuti del buffer, il suo nome e le sue dimensioni in pixel.
![[Suggerimento]](images/tip.png)
|
Suggerimento |
|---|---|
|
Ctrl+F apre una casella di ricerca. Vedere Mostra come elenco |
È possibile cambiare la dimensione delle miniature dei buffer nella finestra a questi dedicata, agendo sul sottomenu «Dimensione anteprima» del menu scheda associato alla finestra dei buffer.
La barra dei pulsanti in basso offre le seguenti funzionalità:
-
 Incolla buffer
,
Incolla buffer sul posto
Incolla buffer
,
Incolla buffer sul posto
-
Questo comando incolla il contenuto del buffer selezionato nell'immagine attiva, come selezione fluttuante. L'unica differenza tra questo e l'ordinario comando Incolla è che il primo usa il buffer selezionato invece che il buffer globale degli appunti.
Con il tasto Maiusc premuto, incollare il buffer nella sua posizione originale.
-
 Incolla buffer dentro la selezione
,
Incolla buffer selezionato sul posto
Incolla buffer dentro la selezione
,
Incolla buffer selezionato sul posto
-
Questo comando incolla i contenuti del buffer selezionato nella selezione dell'immagine attiva, come selezione fluttuante. L'unica differenza tra questo e l'ordinario comando Incolla dentro è che usa il buffer selezionato invece che il buffer globale degli appunti.
Con il tasto Maiusc premuto, incollare il buffer nella selezione attiva, nella sua posizione originale.
-
 Incolla buffer come nuovo livello
,
Incolla buffer come nuovo livello sul posto
Incolla buffer come nuovo livello
,
Incolla buffer come nuovo livello sul posto
-
Questo comando crea un nuovo livello nell'immagine attiva dal contenuto del buffer selezionato. L'unica differenza tra questo e il comando ordinario Incolla come nuova immagine è che utilizza il buffer selezionato anziché il contenuto del buffer degli appunti globali.
Con il tasto Maiusc premuto, crea il livello nella posizione originale del buffer.
-
Incolla buffer come nuova immagine
-
Questo comando crea una nuova immagine a singolo livello dai contenuti del buffer selezionato. L'unica differenza tra questo e l'ordinario comando Incolla come nuova immagine è che usa il buffer selezionato invece che il contenuto del buffer globale degli appunti.
-
 Elimina buffer
-
Questo comando elimina il buffer selezionato, senza chiedere nulla. È comunque impossibile cancellare il buffer globale.


