Lo strumento Soglia trasforma il livello corrente o la selezione in un'immagine in bianco e nero, in cui i pixel bianchi rappresentano i pixel dell'immagine il cui valore per il Canale scelto si trova nell'intervallo di soglia, mentre i pixel neri rappresentano i pixel con valore al di fuori dell'intervallo di soglia.
È possibile usarlo per migliorare un'immagine in bianco e nero (ad esempio un testo scansionato) o per creare maschere di selezione.
![[Nota]](images/note.png)
|
Nota |
|---|---|
|
Dato che questo strumento crea un'immagine in bianco e nero, l'anti-aliasing dell'immagine originale scompare. Se ciò può costituire un problema, usare invece lo strumento Livelli. |
-
È possibile accedere a questo comando dal menu principale tramite → .
-
È possibile accedervi anche facendo clic sull'icona
 nel pannello strumenti se questo strumento vi è stato abilitato (come preimpostazione è disabilitato). Per fare ciò, fare riferimento a Sezione 6.13, «Strumenti».
- Preimpostazioni, Opzioni di fusione, Anteprima, Fondi filtro, Dividi vista
-
Nota Queste opzioni sono descritte in Sezione 8.1.2, «Caratteristiche comuni dei colori».
- Canale
-
Consente di selezionare i canali da utilizzare per applicare la soglia. L'impostazione predefinita è Valore, che utilizzerà tutti i canali colore, ma è anche possibile scegliere di utilizzare un singolo canale: Rosso, Verde, Blu e Alfa (disponibile solo quando il livello ha un canale alfa), Luminanza o RGB.
-
 Istogramma lineare,
 Istogramma logaritmico
-
Questi due pulsanti a destra della selezione Canale consentono di scegliere il tipo di istogramma da mostrare.
- Campo della soglia
-
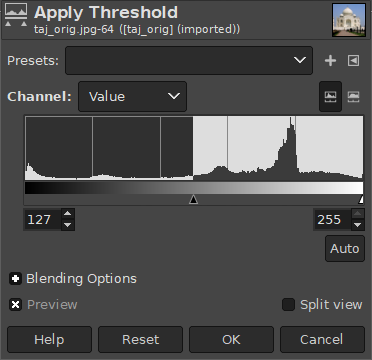
Lo strumento Soglia fornisce un grafico, un istogramma, del valore di intensità del livello o della selezione attivi. È possibile impostare l'intervallo di soglia usando le caselle di ingresso di minimo o massimo o facendo clic e trascinandolo sul grafico. Permette di selezionare una parte dell'immagine con una intensità da uno sfondo con un'altra intensità. I pixel all'interno dell'intervallo saranno bianchi e gli altri saranno neri. Regolare l'intervallo per ottenere la selezione desiderata in bianco su sfondo nero. Si può usare il pulsante per regolare automaticamente la soglia.
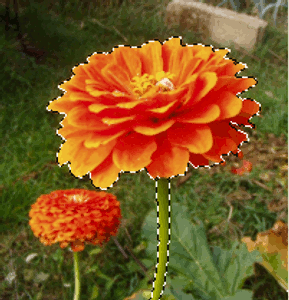
A volte un elemento che si vuole estrarre da un'immagine può risaltare bene sullo sfondo. In questo caso, si può usare lo strumento Soglia per estrarre quest'elemento dallo sfondo e poi usare la Maschera veloce.
-
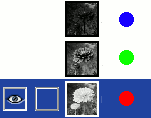
Innanzitutto, iniziare a scomporre l'immagine nei suoi componenti RGB e HSV usando il filtro Scomponi. Viene creata una nuova immagine in scala di grigi e i componenti vengono visualizzati come livelli nella finestra di dialogo dei livelli. Questi livelli sono dotati di una miniatura, ma è troppo piccola anche per un'analisi superficiale. Ovviamente si può aumentare le dimensioni di questa anteprima con il menu del pannello (il piccolo pulsante triangolare), ma giocare con gli «occhi» è più semplice per visualizzare il livello desiderato nell'immagine scomposta. Selezionare il livello che isola meglio l'elemento.
-
Chiama lo strumento Soglia dall'immagine scomposta. Spostando il cursore nero, adatta la soglia per isolare al meglio l'elemento che si desidera estrarre. Quest'ultimo probabilmente non sarà perfetto: si migliorerà il risultato con la maschera di selezione che andremo a creare.
![[Avvertimento]](images/warning.png)
Avvertimento Assicurarsi di aver selezionato il livello giusto quando si richiama lo strumento Soglia: quando è aperto, non è possibile passare ad un altro livello.
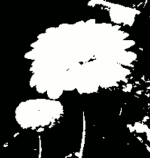
Figura 16.220. Il livello selezionato dopo la regolazione della soglia
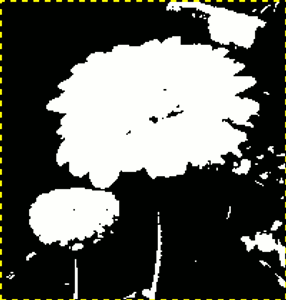
Ecco il miglior contorno per il nostro fiore. Ci sono diversi oggetti rossi che sono da rimuovere.
-
Assicurarsi che l'immagine che mostra il livello selezionato sia attiva e copiarla negli appunti con Ctrl+C.
-
Ora, attivare l'immagine originale. Fare clic sul pulsante nell'angolo in basso a sinistra della finestra immagine: l'immagine viene coperta con una maschera traslucida rossa (il colore predefinito). Questo colore rosso non si adatta bene alla nostra immagine con molto rosso: andare alla finestra di dialogo Canali, attivare il canale «Maschera veloce» e cambiare colore con . Ritornare all'immagine originale. Premere Ctrl+V per incollare il livello precedentemente copiato.
-
Voilà. La maschera di selezione è pronta: è possibile migliorare la selezione come al solito. Quando la selezione è pronta, disabilitare la maschera veloce facendo nuovamente clic sul relativo pulsante: si osserverà la selezione lampeggiante attorno alla selezione.
Si è usato lo Zoom per lavorare a livello di pixel, la selezione a mano libera per rimuovere aree indesiderate di grandi dimensioni, la matita (per ottenere limiti precisi), il disegno in nero per rimuovere le aree selezionate, il disegno in bianco per aggiungere le aree selezionate, in particolare per lo stelo.