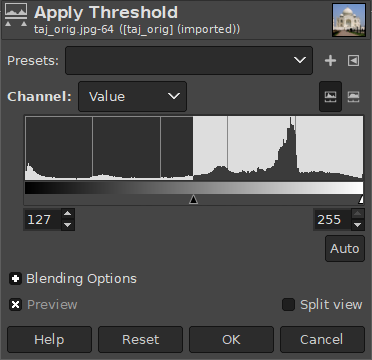
Инструмент «Порог» преобразовывает текущий слой или выделение в чёрно-белое изображение, где белые пиксели представляют пиксели изображения, значение которых находится в пределах порогового диапазона, а чёрные — пиксели со значением, находящимся вне его.
Этот инструмент можно использовать для улучшения чёрно-белых изображений (например, отсканированный текст) или для создания маски выделения.
![[Примечание]](images/note.png)
|
Примечание |
|---|---|
|
Поскольку этот инструмент создаёт чёрно-белое изображение, то сглаживание исходного изображения исчезает. Если это представляется проблемой, лучше использовать инструмент Уровни. |
-
You can access this command from the main menu through → .
-
You can also access it by clicking the tool icon
 in the Toolbox if Threshold has been enabled as a tool (which is
disabled by default). For this,
please refer to Раздел 6.13, «Панель инструментов».
in the Toolbox if Threshold has been enabled as a tool (which is
disabled by default). For this,
please refer to Раздел 6.13, «Панель инструментов».
- Профили, Параметры смешения, Предварительный просмотр, Объединить фильтр, Сравнение до/после
-
Примечание These options are described in Раздел 8.1.2, «Часто встречающиеся возможности команд «Цвет»».
- Канал
-
Позволяет выбрать, какие каналы будут использоваться для применения «Порога». По умолчанию используется Значение, которое будет использовать все цветовые каналы, но вы также можете выбрать один канал: Красный, Зелёный, Синий и Альфа (доступно только в том случае, если слой имеет альфа-канал), Светимость или RGB.
-
 Линейная гистограмма,
 Логарифмическая гистограмма
-
Эти две кнопки справа от выбора канала позволяют выбрать тип гистограммы.
- Пороговый диапазон
-
Инструмент «Порог» предоставляет наглядный график, гистограмму значений интенсивности активного слоя или выделения. Настроить пороговый диапазон можно либо с помощью полей ввода, либо щелчком и перетаскиванием непосредственно в графике. Здесь можно выбрать часть изображения с определённой яркостью на фоне с другой яркостью. Пиксели внутри диапазона будут белыми, снаружи — чёрными. Настройте диапазон для получения желаемого выделения в белом цвете на чёрном фоне. Кнопка может использоваться для автоматический настройки порога.
Часто бывает, что элемент, который нужно извлечь из изображения, хорошо выделяется на фоне. В этом случае для выделения элемента целиком можно использовать инструмент «Порог», а затем Быструю маску.
-
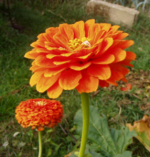
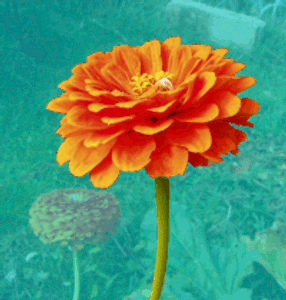
Для начала разберём изображение на составляющие RGB и HSV, использовав фильтр Разобрать. Будет создано новое изображение в оттенках серого, с составляющими, показанными в виде слоёв в диалоге слоёв. Для каждого из этих слоёв есть миниатюра просмотра, но она слишком маленькая, что препятствует лёгкому просмотру. Конечно, можно увеличить размер этой миниатюры в меню диалога (маленькая треугольная кнопка), но будет проще настроить видимость нужного слоя в разложенном изображении с помощью «глаза». Выберите слой, который лучше всего изолирует этот элемент.
-
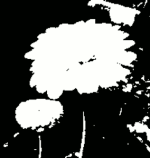
Запустите инструмент «Порог» для разложенного изображения. Перемещая чёрный курсор, настройте порог, чтобы лучше всего изолировать элемент, который нужно извлечь. Скорее всего, результат будет не идеальным: улучшим его с помощью маски выделения, которую мы собираемся создать.
![[Предупреждение]](images/warning.png)
Предупреждение Убедитесь в том, что выбрали именно нужный слой перед вызовом «Порога»: после открытия этого инструмента изменить слой уже невозможно.
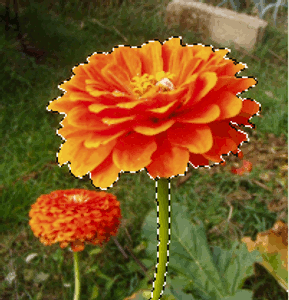
Рисунок 16.220. Выбранный слой после подгонки порога
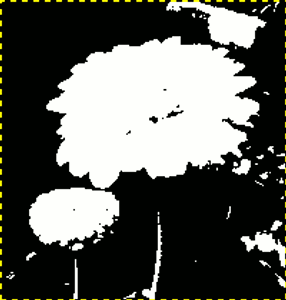
Мы получили лучший возможный контур для нашего цветка. Осталось несколько красных объектов, которые нужно убрать.
-
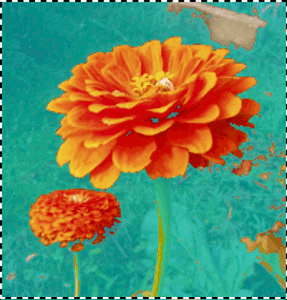
Убедитесь, что изображение с выбранным слоем активно, и скопируйте его в буфер обмена с помощью Ctrl+C.
-
Теперь сделаем активным исходное изображение. Нажмите кнопку в нижнем левом углу окна изображения: на изображение будет наложена красная (по умолчанию) прозрачная маска. Этот красный цвет не очень подходит для нашего изображения, где и так много красного: перейдите в диалог каналов, активируйте канал «Быстрая маска» и измените её цвет с помощью пункта . Вернитесь к исходному изображению. Нажмите Ctrl+V, чтобы вставить ранее скопированный слой.
-
Итак, наша маска выделения готова: как и всегда, выделение можно подкорректировать. Имея готовое выделение, отключите быструю маску, снова нажав на её кнопку, после чего можно будет увидеть выделение с границей в виде муравьиной дорожки.
Мы использовали «Масштаб» для работы на пиксельном уровне, «Лассо» для удаления больших нежелательных областей, карандаш (для получения жёстких границ), чёрную краску для удаления выделенных областей, белую краску для добавления выделенных областей, особенно для стебля.