El filtre Llindar transforma la capa actual o la selecció en una imatge en blanc i negre, on els píxels blancs representen els píxels de la imatge on el valor del canal escollit està dins l'interval del llindar, i els píxels negres representen píxels amb un valor fora de l'interval del llindar.
Podeu utilitzar-la per a millorar una imatge en blanc i negre (per exemple, text escanejat) o per a crear màscares de selecció.
![[Nota]](images/note.png)
|
Nota |
|---|---|
|
A mesura que aquesta eina crea una imatge en blanc i negre, l'antialiàsing de la imatge original desapareix. Si això planteja un problema, utilitzeu l'eina Nivells. |
-
You can access this command from the main menu through → .
-
You can also access it by clicking the tool icon
 in the Toolbox if Threshold has been enabled as a tool (which is
disabled by default). For this,
please refer to Secció 6.13, «Caixa d'eines».
in the Toolbox if Threshold has been enabled as a tool (which is
disabled by default). For this,
please refer to Secció 6.13, «Caixa d'eines».
- Predefinits, Opcions de barreja, Previsualitza, Combina el filtre, Vista dividida
-
Nota These options are described in Secció 8.1.2, «Característiques comunes dels colors».
- Canal
-
Permet seleccionar quins canals s'utilitzaran per a aplicar el llindar. El valor per defecte és Valor, el qual utilitzarà tots els canals de color, però també podeu triar utilitzar un sol canal: Vermell, Verd, Blau i Alfa (només disponible quan la capa té un canal alfa), Luminància, o RGB).
-
 Histograma lineal,
 Histograma logarítmic
-
Aquests dos botons a la dreta de la selecció del canal permeten escollir el tipus d'histograma mostrat.
- Interval del llindar
-
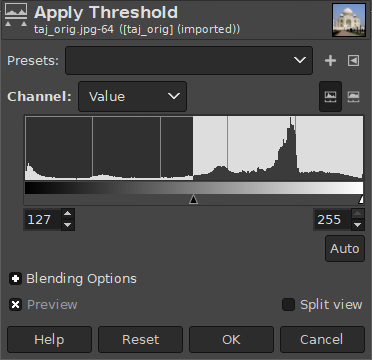
L'eina Llindar proporciona un gràfic visual, un histograma, del valor d'intensitat de la capa o selecció activa. Podeu establir el rang del llindar utilitzant els quadres d'entrada mínim i màxim, o fent clic i arrossegant sobre el gràfic. Permet seleccionar una part de la imatge amb alguna intensitat des d'un fons amb una altra intensitat. Els píxels dins de la gamma són blancs, i els altres són negres. Ajusteu el rang per a obtenir la selecció que voleu en blanc sobre fons negre. El botó es pot utilitzar per ajustar automàticament el llindar.
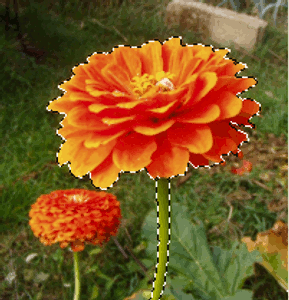
De vegades un element que vulgueu extreure d'una imatge pot destacar bé sobre el fons. En aquest cas, podeu utilitzar l'eina Llindar per seleccionar aquest element com un tot, i després fer servir una la Màscara ràpida.
-
Comença la descomposició de la imatge en els seus components RGB i HSV utilitzant el filtre Descompondre. Es crea una nova imatge en escala de grisos i els components es mostren com a capes en el diàleg de capes. Aquestes capes venen amb una miniatura, però és massa petita per a un estudi fàcil. Per descomptat, podeu augmentar la mida d'aquesta previsualització amb el menú de diàleg (el petit botó triangular), però jugar amb els «ulls» és més senzill per a mostrar la capa desitjada a la imatge descomposta. Seleccioneu la capa que aïlla millor l'element.
-
Crideu l'eina llindar des de la imatge descomposta. Si moveu el cursor negre, ajusteu el llindar per a aïllar el millor element que vulgueu extreure. Probablement això no serà perfecte: millorarem el resultat amb la màscara de selecció que crearem.
![[Avís]](images/warning.png)
Avís Assegureu-vos que heu seleccionat la capa adequada quan agafeu l'eina Llindar: quan s'ha obert, no podeu canviar a una altra capa.
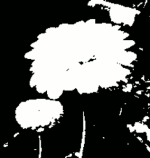
Figura 16.220. La capa seleccionada després d'ajustar el llindar
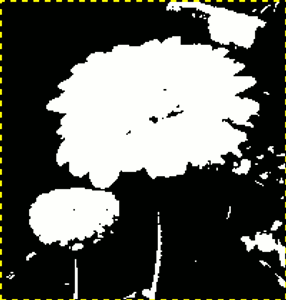
Tenim el millor contorn per a la nostra flor. Hi ha diversos objectes vermells que hem de treure.
-
Assegureu-vos que la imatge que mostra la capa seleccionada estigui activa i copieu-la al porta-retalls amb Ctrl+C.
-
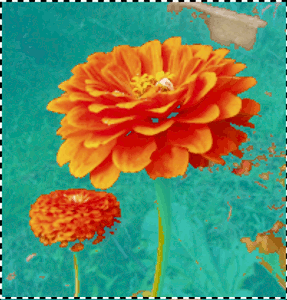
Ara, feu que la imatge original sigui activa. Feu clic al botó de l'extrem inferior esquerre de la finestra de la imatge: la imatge es cobreix amb una màscara translúcida vermella (per defecte). Aquest color roig no s'adapta bé a la nostra imatge amb molt vermell: aneu al diàleg del canal, activeu el canal «màscara ràpida» i canvieu aquest color amb els . Tornem a la imatge original. Premeu Ctrl+V per a enganxar la capa copiada anteriorment.
-
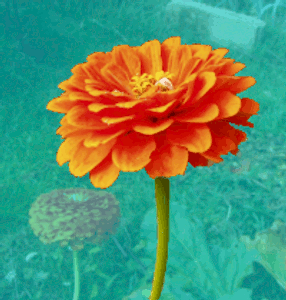
Heus ací! La màscara de selecció està preparada: podreu millorar la selecció com sempre. Quan la selecció estigui preparada, desactiveu la màscara ràpida fent clic de nou al botó: veureu el caminet de formiguetes al voltant de la selecció.
Vam utilitzar la Lupa per a treballar a nivell de píxel, la Selecció Lliure per a eliminar grans àrees no desitjades, el llapis (per a aconseguir límits durs), pintura negra per a eliminar zones seleccionades, pintura blanca per a afegir zones seleccionades, especialment per a la tija.