Indice
- 1. Comando Esposizione ad alta profondità di colore in virgola mobile: molto meglio di Curve per rendere più chiare le ombre ed i mezzi toni di un'immagine, senza distruggere le alteluci
- 2. Un esempio passo-passo che mostra come recuperare le informazioni delle ombre usando l'alta profondità di colore del comando di GIMP →
- 3. Note d'uso
- 4. Conclusione
Questo tutorial proviene da www.gimp.org/tutorials ed è stato scritto da Elle Stone. È stato riprodotto qui per essere tradotto.
Un problema di modifica molto comune è come alleggerire le ombre e i mezzitoni di un'immagine mantenendo i dettagli delle alteluci, un'attività chiamata a volte anche “recupero dell'ombra” e più in generale “mappatura tonale”. Questa guida passo-passo mostra come usare il comando di GIMP in virgola mobile ad alta profondità di bit di colore Esposizione, per aggiungere uno o più stop di compensazione dell'esposizione positiva alle ombre e ai mezzitoni di un'immagine, mantenendo i dettagli delle alteluci.
Un problema molto comune nella elaborazione grafica è come illuminare le ombre e i mezzi toni di una immagine senza distruggere le alteluci; un problema spesso riscontrabile quando si ha a che fare con foto di scene illuminate da luce solare diretta. Algoritmi preconfezionati per ottenere ciò vengono spesso definiti come algoritmi di “recupero ombre”. In realtà questi algoritmi sono algoritmi specializzati di mappatura tonale, che alle volte funzionano bene, altre meno bene, a seconda dell'algoritmo , dell'immagine, e delle particolari intenzioni artistiche dell'autore per l'immagine.
Questa guida passo-passo mostra come usare l'illimitato comando di GIMP in virgola mobile Esposizione per recuperare informazioni dalle ombre, che significa in parole povere, aggiungere uno o più stop positivi di compensazione dell'esposizione alle ombre e ai mezzi-toni di un'immagine, senza rovinarne o comprimerne troppo le alteluci. La procedura è completamente “regolabile a mano” usando maschere e livelli, ed è ciò che si avvicina di più alla modifica non distruttiva usando l'alta profondità di colore di GIMP.
Figura 1: linee elettriche a mezzogiorno
Prima e dopo la mappatura tonale (conosciuta anche con il termine di “recupero ombre”) usando l'alta profondità di colore del comando in virgola mobile di GIMP, Esposizione.
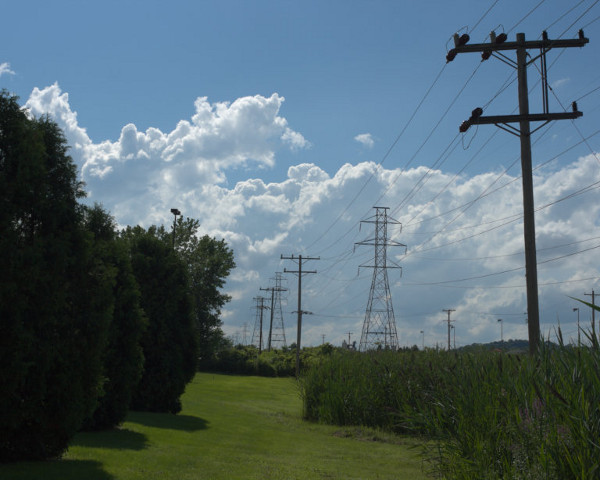
File raw interpolato riferito alla scena.
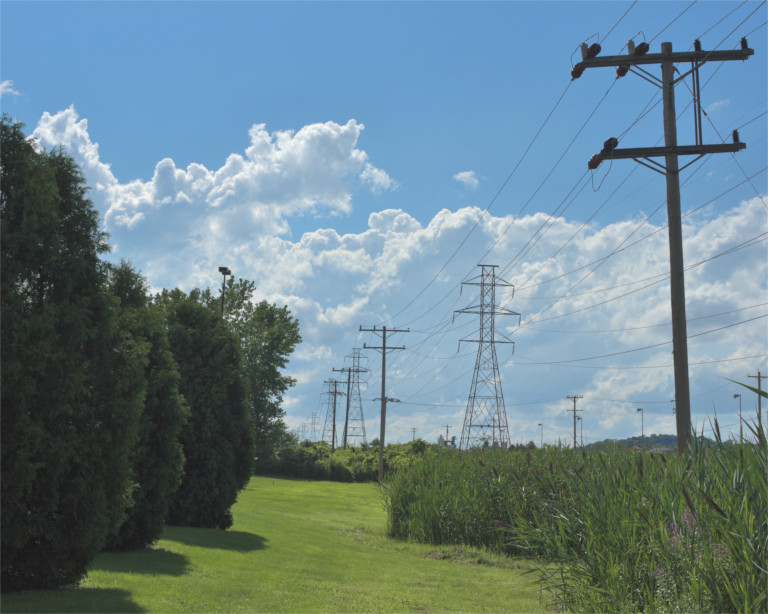
Dopo il recupero ombre/mappatura tonale usando gli illimitati livelli di GIMP.
GIMP ad alta profondità di colore è il mio strumento di elaborazione immagini principale, ed ho usato la procedura descritta sotto, negli ultimi due anni, come “il modo” per modificare la tonalità di un'immagine. La stessa procedura generale può essere usata sia per scurire che per schiarire porzioni di una immagine, controllando l'effetto tramite una maschera di livello. Non è esattamente una modifica non distruttiva dato che ad un certo punto è necessario creare un livello “Nuovo dal visibile”. Ma diversamente dall'usare le Curve, usando il comando “Colori/Esposizione” ad alta profondità di colore in virgola mobile di GIMP, non taglia i valori dei canali RGB e permette di regolare finemente il risultato modificando più volte la maschera di livello fino a che non si è completamente soddisfatti con la tonalità risultante.


