Sumari
- 1. Operació Exposició en punt flotant del GIMP amb gran profunditat de bits: molt millor que l'eina Corbes per a il·luminar les ombres i els tons mitjans d'una imatge sense fer desaparèixer les zones clares
- 2. Un exemple pas a pas que mostra com recuperar la informació de l'ombra utilitzant el punt flotant del GIMP de gran profunditat de bits → operació
- 3. Notes d'ús
- 4. Conclusió
Aquest tutorial prové del www.gimp.org/tutorials i ha estat creat per Elle Stone. Es presenta per a traduccions.
Un problema d'edició molt comú és com aclarir les ombres i els mitjos tons d'una imatge conservant detalls destacats, una tasca a vegades denominada «recuperació d'ombres» i més generalment com a «mapa-tonal». Aquest tutorial pas a pas us mostra com utilitzar l'operació Exposició del punt flotant del GIMP de gran profunditat de bits per a afegir un o més diafragmes de compensació de l'exposició positiva als tons foscos i mitjos d'una imatge mantenint detalls destacats.
Un problema d'edició és com aclarir les ombres i els tons mitjans d'una imatge sense destrossar-ne les zones clares, sol passar amb fotografies d'escenes il·luminades directament per la llum del sol. Els algorismes que s'utilitzen sovint es coneixen com a algorismes de «recuperació d'ombres». Però en realitat són algorismes de mapa-tonal que de vegades funcionen bastant bé i altres vegades no tan bé, depenent de l'algorisme, de la imatge i de les vostres intencions artístiques respecte a la imatge.
Aquest tutorial us mostra pas a pas com fer servir l'operació Exposició per a recuperar la informació de les ombres, és a dir, afegir un o més diafragmes de compensació d'exposició a les ombres i tons mitjos d'una imatge sense fer desaparèixer ni comprimir els tons clars de la imatge. El procediment és completament manual fent ús de màscares i capes, i el més proper possible a l'edició d'imatges no destructives mitjançant la gran profunditat de bits del GIMP.
Figura 1: línies elèctriques al migdia
Abans i després del mapa-tonal (recuperació d'ombres) utilitzant l'operació Exposició en punt flotant amb gran profunditat de bits.
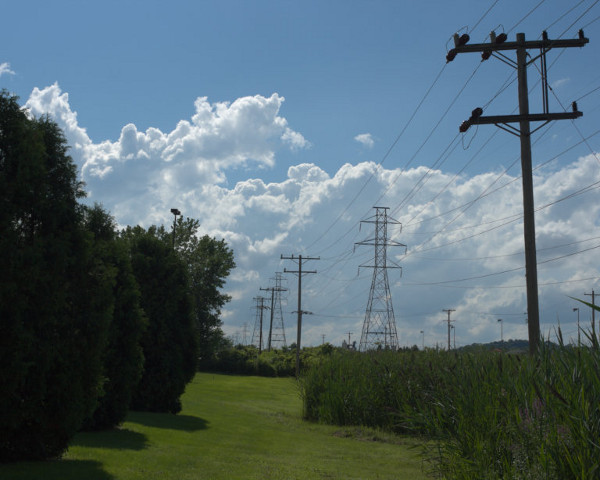
Fitxer RAW interpolat referit a l'escena.
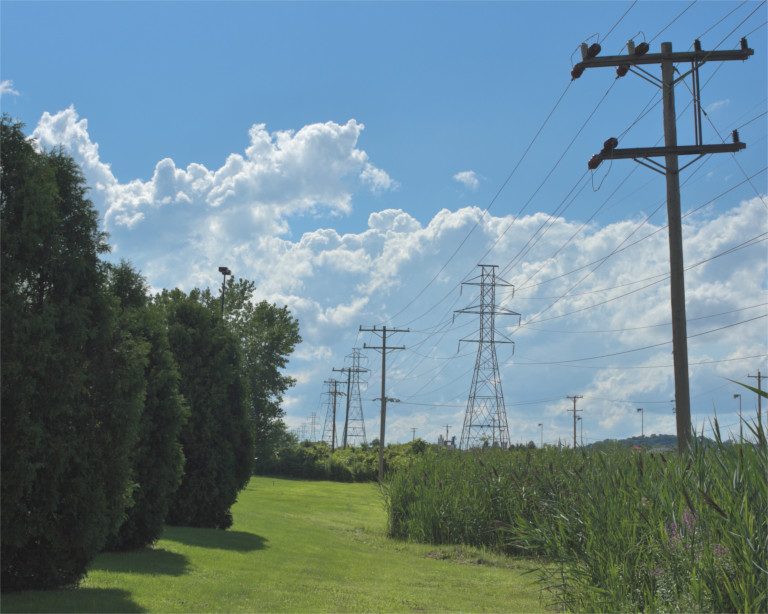
Després del mapa-tonal/recuperació d'ombres utilitzant els nivells il·limitats del GIMP.
El GIMP de gran profunditat de bits és el meu principal editor d'imatges, i he utilitzat el procediment descrit a sota durant els darrers dos anys per a canviar la tonalitat de les imatges. El mateix procediment general es pot utilitzar per a enfosquir i aclarir parts d'una imatge, controlant l'efecte amb una màscara de capa. No és exactament una edició no destructiva perquè en algun moment cal que realitzeu una capa «Nova des de visible». Però, a diferència d'utilitzar Corbes, l'ús de l'operació Exposició en punt flotant del Gimp amb gran profunditat de bits no retalla els valors del canal RGB i permet ajustar els resultats modificant i remodificant la màscara de capa fins que estigueu completament satisfets amb la tonalitat desitjada.


