矩形選択ツールは活性レイヤーから矩形領域を選択するためにあります。 選択ツールとしては最も基本的なものですが、 非常によく使われています。 GIMP における選択についての情報や使い方は 選択 を、 選択ツール全種類に共通する機能についての情報は 選択ツール をご覧ください。
このツールは画像上に矩形を描くためにも用いられます。 色が一様な矩形を描くには、 矩形選択をとり、 その内側を 塗りつぶし ます。 矩形の輪郭を描く最も簡単で柔軟性のある方法は、 矩形選択をとってその 境界線を描画 します。
There are different possibilities to activate the tool:
-
From the main menu: → → .
-
By clicking the tool icon
 in the Toolbox.
-
By pressing the R keyboard shortcut.
![[注記]](images/note.png)
|
注記 |
|---|---|
|
選択ツールに共通して使える修飾キーについては 選択ツール をお読みください。 ここではこのツールに特有のオプションに効果のあるものについてのみ取り上げます。 |
- Ctrl
-
Pressing the Ctrl key after starting your selection, and holding it down until you are finished, causes your starting point to be used as the center of the selected rectangle, instead of a corner. Note that if you press the Ctrl key before starting to make the selection, the resulting selection will be subtracted from the existing selection. The cursor becomes

- Shift
-
If you press the Shift key before starting the selection, the resulting selection will be added to the existing one. The cursor becomes

選択範囲をとり始めた 後に Shift キーを押すと、 値を固定 オプションが有効になり、 範囲をとり終えるまでキーを押し続けたならば、 初回の選択に限り出来あがる矩形が正方形になります。 固定される条件は初期設定では 縦横比 なので、 このあと同様の方法で選択範囲を作るときは直前の縦横比が踏襲されます。
- Ctrl+Shift
-
Pressing both keys after starting your selection combines the two effects, giving you a square selection centered on your starting point. Note that pressing these keys before starting your selection intersects the resulting selection with the existing one and the pointer change shape accordingly:

When this tool is selected the mouse pointer is displayed like this:
 as soon as it is over the image. A drag and drop allows to get a
rectangular (or square) shape. When the mouse button is relaxed, a
dotted line
(「marching ants」)
outlines the selection. It's not necessary to adjust the selection with
care; you can resize it easily later.
as soon as it is over the image. A drag and drop allows to get a
rectangular (or square) shape. When the mouse button is relaxed, a
dotted line
(「marching ants」)
outlines the selection. It's not necessary to adjust the selection with
care; you can resize it easily later.
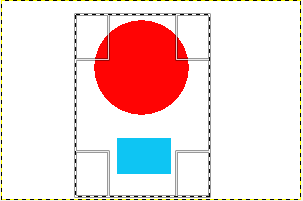
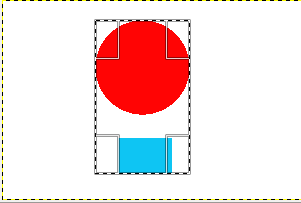
マウスポインターを画面上で移動させると場所によりその姿が変化し、 選択の矩形の形状を変える方法が示されます。
- イ. 選択範囲の領域外ではマウスポインターは選択を作る以前の形をしています。 そこから選択をとったときは、 前段で紹介した他の選択範囲との和や差や積をとるキー修飾を使わなければ、 現在の選択範囲は破棄され新たな選択範囲がつくられます。
- within selection peripheral parts, the mouse pointer changes into
various shapes when overflying rectangular sensitive and clearly marked
areas. These handles allow you to resize the
selection. In selection corners the pointer changes into a shape
according to the context; for instance in the low right corner it
becomes:
 .
So, by click-and-dragging these areas, you can magnify or shrink the
selection size. Over median selection parts, lateral, low or up,
pointer is changed into appropriate shapes according to the context.
For instance, when the mouse pointer is over the median right side, the
pointer looks like:
.
So, by click-and-dragging these areas, you can magnify or shrink the
selection size. Over median selection parts, lateral, low or up,
pointer is changed into appropriate shapes according to the context.
For instance, when the mouse pointer is over the median right side, the
pointer looks like:
 .
So you can click-and-drag to magnify or to shrink the selection size by
moving the chosen boundary.
.
So you can click-and-drag to magnify or to shrink the selection size by
moving the chosen boundary.
- inside selection central area the mouse pointer looks like usual for
object manipulation, i.e.:
 .
So you can move the whole selection by a click-and-drag.
.
So you can move the whole selection by a click-and-drag.
なお、 ハイライト表示 オプションのチェックを外していなければ、 選択されていないところが選択範囲よりも暗くされ、 選択範囲が浮かびあがりますから作業がしやすくなるでしょう。
![[ヒント]](images/tip.png)
|
ヒント |
|---|---|
|
上 下 左 右 矢印キーを用いた選択範囲の移動もしくは変形は 1 ピクセルずつ変化します。 このキーと Shift キーとの組み合わせでは 25 ピクセルずつの変化です。 |
選択範囲を作成し加工したあとは、 編集モードから抜け出ることが (そして何らかの変化を起こすことが) 必要になるはずです。 これは選択範囲の内側でクリックするか Enter キーを押せばできます。 でもそのあとに選択しないツールを使うならば、 たとえば塗りつぶしたり選択範囲を描画したりは直後にできます。
Normally, tool options are displayed in a window attached under the Toolbox as soon as you activate a tool. If they are not, you can access them from the main menu through → → which opens the option window of the selected tool. The available tool options can also be accessed by double clicking the corresponding tool icon in the Toolbox.
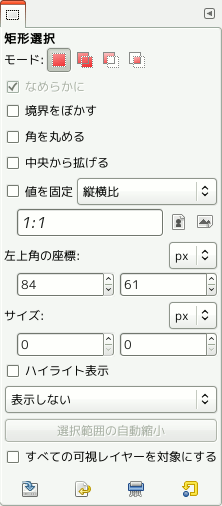
- モード, なめらかに, Feather edges
-
注記 See Selection Tools Options for help with options that are common to all these tools. Only options that are specific to this tool are explained here.
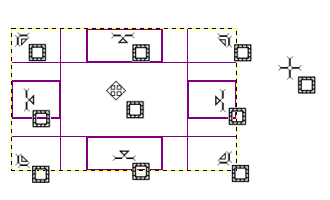
- 角を丸める
-
このオプションを有効にするとスライダーが現れます。 選択の矩形の角を丸める円の半径を定めるのに使えます。
- 中央から拡げる
-
このオプションが有効なときはマウスでドラッグし始めた選択の始点が選択範囲の中心とされます。
- 値を固定
-
このメニューにはいろいろな条件で矩形の形状を制限するためのオプションがあります。
- 縦横比
-
このオプションで選択の矩形の高さと幅の比を一定に保ちつつ変形でき、 付属の記入欄に比を記入すれば形状があらかじめ想定できます。 既定の比は 1:1、 すなわち正方形ですが変更できます。 縦長と横長を選ぶ小さなアイコンを押せば比を逆転できます。
- 幅
-
これを選ぶと選択の矩形の幅が固定されます。
- 高さ
-
これを選ぶと選択の矩形の高さが固定されます。
- サイズ
-
これを選ぶと選択の矩形の幅と高さが固定されます。
- 左上角の座標
-
これら 2 つの記入欄の数値は現在の選択範囲の左上角の座標の水平方向および垂直方向の各成分に基づいています。 ここに数値を記入することにより選択範囲の位置を精密に指定できます。
- サイズ
-
These two text fields contain the current width and height of the selection. You can use these fields to adjust the selection size precisely.
- ハイライト表示
-
このオプションを有効にすると、 選択範囲の周囲にマスクを掛けて選択範囲を際立たせることで、 視覚的に選択しやすくなります。
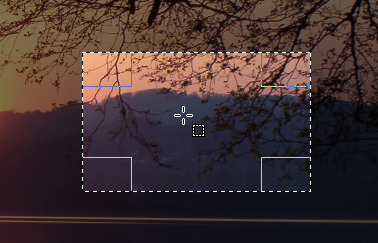
- ガイド (見当線)
-
このコンボメニューから分割の種類を選ぶと、 選択範囲内を分割するガイドが現れますので、 選択範囲の 写真の構図法 に凖じた構図が作りやすくなります。
6 種類のオプションがあります。
-
表示しない
-
センターライン
-
三分割法
-
五分割法
-
黄金分割
-
対角線構図
-
- Auto Shrink
-
This option is active when a rectangle selection is drawn. Clicking on the button will make the selection automatically shrink to the nearest rectangular shape including elements in the selection. The algorithm for finding the best rectangle to shrink to is 「intelligent」, which in this case means that it sometimes does surprisingly sophisticated things, and sometimes does surprisingly strange things. In any case, if the region that you want to select has a solid-colored surround, auto-shrinking will always pick it out correctly. Note that the resulting selection does not need to have the same shape as the one you sweep out.
- すべての可視レイヤーを対象にする
-
If Sample Merged is also enabled, then Auto Shrink will use the pixel information from the visible display of the image, rather than just from the active layer.
For more information, see the Glossary entry.