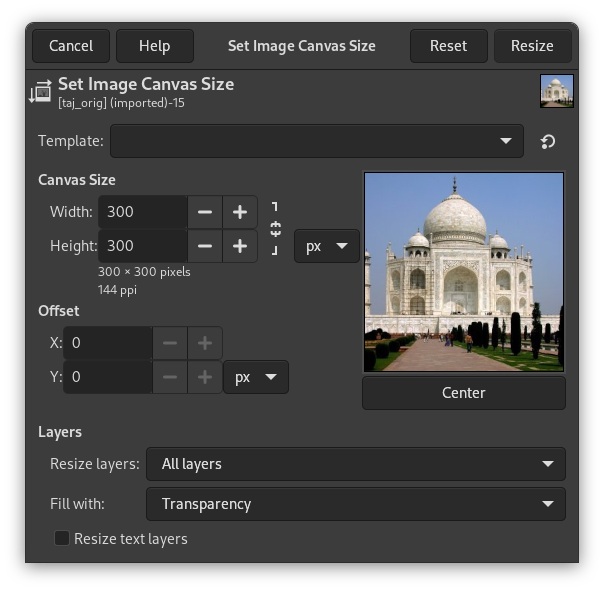
The 「canvas」 is the visible area of the image. By default the size of the canvas coincides with the size of the layers. The command opens the 「Set Image Canvas Size」 dialog that lets you enlarge or reduce the canvas size. You can, if you want, modify the size of the layers. When you enlarge the canvas, you create free space around the contents of the image. When you reduce it, the visible area is cropped, however the layers still extend beyond the canvas border.
キャンバスの幅や高さを小さくしたときはダイアログ中央の見本画像内に新たなキャンバスの枠が反転色で表示されます。 この画像上にマウスポインターをかざすと移動を示す四方矢印の姿になります。 これをクリックしてドラッグするとキャンバスの枠はそのままに見本画像が移動できます。
キャンバスサイズの変更...
- Width, Height
-
You can set the Width and the Height of the canvas. The default units are pixels but you can choose different units, e.g. percent, if you want to set the new dimensions relative to the current dimensions. If the
 Chain to the right of the Width and
Height is not broken, both Width and Height keep the same
relative size to each other. That is, if you change one of the
values, the other one also changes a corresponding amount.
If you break the Chain by clicking on it, you can set
Width and Height separately.
Chain to the right of the Width and
Height is not broken, both Width and Height keep the same
relative size to each other. That is, if you change one of the
values, the other one also changes a corresponding amount.
If you break the Chain by clicking on it, you can set
Width and Height separately.
どのような単位で大きさを指定しても、 ピクセル単位の大きさと解像度が常に「幅」と「高さ」の欄より下に表示されます。 「キャンバスサイズの変更」ダイアログでは解像度が変更できません。 変更するときは 画像印刷解像度の設定 ダイアログをご利用ください。
オフセット
オフセット 値はキャンバスに対する画像の (活性レイヤーではありません。 画像の) 相対位置を示します。 ダイアログ中央の見本画像を見ればキャンバスの内容や大きさがわかります。 キャンバスが元画像よりも小さければ、 見本画像内にその大きさを表す枠が反転色で表示されます。
- X, Y
-
X と Y でキャンバスの左上隅に対する画像の左上隅の相対位置を指定します。 画像よりもキャンバスが小さいときには負の値になります。 画像の位置はつぎのいずれかの方法で指定できます。 (言わずもがなのことながら、 キャンバスの枠外には座標が動かせません。)
-
画像をクリックしてドラッグする方法
-
数値記入欄 X と Y に値を記入する方法
-
数値の欄に付属する矢印をクリックする方法 (1 単位ずつ増減します)
-
数値記入欄内にタブ操作やクリックなどでフォーカスしてから、 1 単位ごとなら 上 下 キーを、 10 単位ごとなら PageUp キーか PageDown キーを押して値を増減する方法
-
- レイヤー
-
-
Resize layers: this drop-down list offers you several possibilities:
-
なし: 初期設定で選ばれるオプションです。 キャンバスだけが大きさを変更され、 レイヤーの大きさは変化しません。
-
すべてのレイヤー: すべてのレイヤーがキャンバスと同じ大きさに変わります。
-
キャンバスサイズのレイヤー: 画像と同じ大きさのレイヤーだけはキャンバスと同じ大きさの変更をうけます。
-
All visible layers: only visible layers, marked with a
 icon, in the Layers dialog, are sized to canvas size.
-
-
Fill with: you can fill resized layers with Foreground color, Background color, Middle Gray (CIELAB), White, Transparency (default), Pattern.
-
Resize text layers: Resizing text layers will make them uneditable.
-
- 中央
-
ボタンはキャンバスの中心に画像の中心を合わせるはたらきがあります。 このボタンをクリックするとオフセット値が自動的に算出され、 X と Y の数値記入欄にその値が表示されます。
![[注記]](images/note.png)
|
注記 |
|---|---|
|
ボタンをクリックするとキャンバスの大きさは変更されますが、 画素情報や画像の描画縮尺は変わりません。 If the layers of the image did not extend beyond the borders of the canvas before you changed its size, there are no layers on the part of the canvas that was added by resizing it. Therefore, this part of the canvas is transparent and displayed with a checkered pattern, and it is not immediately available for painting. You can either flatten the image, in which case you will get an image with a single layer that fits the canvas exactly, or you can use the Layers to Image Size command to resize only the active layer, without changing any other layers. You can also create a new layer and fill it with the background you want. By doing this, you create a digital 「passe-partout」 (a kind of glass mount with a removable back for slipping in a photograph). |
図16.60 元画像

The background color in the Foreground/Background Colors area of the Toolbox is set to yellow; Original image with 100×100 pixels size.

We started with a green background layer 100×100 pixels. Then we added a new red layer 80×80 pixels. The active layer limits are marked with a black and yellow dotted line. The red layer does not fill the canvas completely: the unoccupied part is transparent.
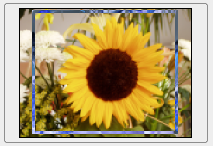
図16.61 キャンバスの拡張 (レイヤーは変化なし)

The canvas has been enlarged to 120×120 pixels. The unoccupied part of the canvas is transparent.

The layers size remained unchanged.
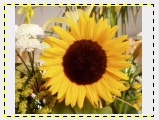
図16.62 キャンバスの拡張 (すべてのレイヤーも変更)

The canvas has been enlarged to 120×120 pixels. The undrawn part is transparent in the red layer and yellow (background color in Toolbox) in the green background layer.

All layers have been enlarged to the canvas size.
画像の領域をもっと大きくとり、 その大きさいっぱいのレイヤーを新たに追加して新しいレイヤーに描画するという場合にいかがでしょう。 切り抜き操作の逆です。
画像の切り抜きにも使えます。
Click on the
![]() chain next to Width and Height entries to unlink
dimensions. By modifying these dimensions and moving image against
canvas, by trial and error, you can crop the part of the image you
want. Click on the Center button and then on the Resize button.
chain next to Width and Height entries to unlink
dimensions. By modifying these dimensions and moving image against
canvas, by trial and error, you can crop the part of the image you
want. Click on the Center button and then on the Resize button.
|
|
注記 |
|---|---|
|
切り抜きツール のほうが使い易いと思います。 |


