El “lienzo” es el área visible de la imagen. De manera predeterminada, el tamaño del lienzo coincide con el tamaño de las capas. El comando le permite agrandar o reducir el tamaño del lienzo. Si quiere, puede modificar el tamaño de las capas. Cuando agranda el lienzo, crea un espacio libre alrededor del contenido de la imagen. Cuando lo reduce, el área visible se recorta, aunque las capas todavía se extienden más allá de los bordes del lienzo.
Cuando se reduce el tamaño del lienzo, el lienzo nuevo aparece rodeado con un borde fino negativo en la vista previa. El puntero del ratón es una cruz móvil: pulse y arrastre para mover la imagen en este marco.
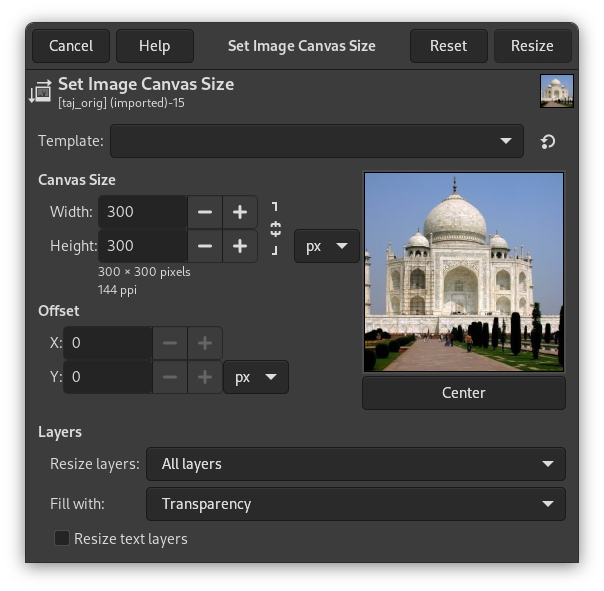
Tamaño del lienzo
- Width, Height
-
You can set the Width and the Height of the canvas. The default units are pixels but you can choose different units, e.g. percent, if you want to set the new dimensions relative to the current dimensions. If the
 Chain to the right of the Width and
Height is not broken, both Width and Height keep the same
relative size to each other. That is, if you change one of the
values, the other one also changes a corresponding amount.
If you break the Chain by clicking on it, you can set
Width and Height separately.
Chain to the right of the Width and
Height is not broken, both Width and Height keep the same
relative size to each other. That is, if you change one of the
values, the other one also changes a corresponding amount.
If you break the Chain by clicking on it, you can set
Width and Height separately.
Independientemente de la unidad utilizada, la información sobre el tamaño en píxeles y la resolución actual siempre se muestran bajo los campos Anchura y Altura. No se puede cambiar la resolución en el diálogo ; si quiere hacerlo, use el Diálogo tamaño de la impresión .
Desplazamiento
Los valores de Desplazamiento se usan para situar la imagen en el lienzo (la imagen, no la capa activa). Puede ver el tamaño y el contenido del lienzo en la vista previa de la ventana del diálogo. Cuando el lienzo es más pequeño que la imagen, la vista previa muestra la imagen en un marco con un borde fino negativo.
- X, Y
-
Los parámetros X e Y especifican las coordenadas de la esquina superior izquierda de la imagen relativas a la esquina superior izquierda del lienzo. Los valores X e Y son negativos cuando el lienzo es más pequeño que la imagen. Puede situar la imagen de diferentes maneras (por supuesto, las coordenadas no pueden exceder los bordes del lienzo):
-
pulsando y arrastrando la imagen,
-
al introducir los valores en las cajas de texto X e Y,
-
al pulsar sobre las flechas de cabeza pequeña. Esto incrementa el valor en un píxel (unidad).
-
Y cuando el foco está sobre una caja de texto, puede usar las teclas de dirección del teclado, Arriba y Abajo para cambiar en un píxel (unidad) o AvPág y RePág para cambiar el valor en 10 píxeles (unidades).
-
- Capas
-
-
Resize layers: this drop-down list offers you several possibilities:
-
Ninguno: es la opción predefinida. No se redimensiona ninguna capa, sólo el lienzo.
-
Todas las capas: Se redimensionan todas las capas al tamaño del lienzo.
-
Capas al tamaño de la imagen: solo las capas con el mismo tamaño que la imagen se redimensionan al tamaño del lienzo.
-
All visible layers: only visible layers, marked with a
 icon, in the Layers dialog, are sized to canvas size.
-
-
Fill with: you can fill resized layers with Foreground color, Background color, Middle Gray (CIELAB), White, Transparency (default), Pattern.
-
Cambiar el tamaño de las capas de texto: cambiar el tamaño del tamaño de las capas de texto hará que no se pueda editar.
-
- Centrar
-
El botón Centrar le permite centrar la imagen en el lienzo. Cuando se pulsa sobre el botón centrar, los valores de desplazamiento se calculan y se muestran, automaticamente, en la caja de texto.
![[Nota]](images/note.png)
|
Nota |
|---|---|
|
Cuando se pulsa sobre el botón Redimensionar, el lienzo se redimensiona, pero la información del píxel y la escala del trazado de la imagen no cambian. If the layers of the image did not extend beyond the borders of the canvas before you changed its size, there are no layers on the part of the canvas that was added by resizing it. Therefore, this part of the canvas is transparent and displayed with a checkered pattern, and it is not immediately available for painting. You can either flatten the image, in which case you will get an image with a single layer that fits the canvas exactly, or you can use the Layers to Image Size command to resize only the active layer, without changing any other layers. You can also create a new layer and fill it with the background you want. By doing this, you create a digital “passe-partout” (a kind of glass mount with a removable back for slipping in a photograph). |
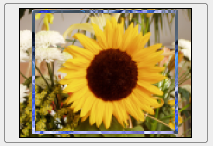
Figura 16.60. Imagen original

The background color in the Foreground/Background Colors area of the Toolbox is set to yellow; Original image with 100×100 pixels size.

We started with a green background layer 100×100 pixels. Then we added a new red layer 80×80 pixels. The active layer limits are marked with a black and yellow dotted line. The red layer does not fill the canvas completely: the unoccupied part is transparent.
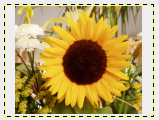
Figura 16.61. Lienzo agrandado (las capas no cambian)

The canvas has been enlarged to 120×120 pixels. The unoccupied part of the canvas is transparent.

The layers size remained unchanged.
Figura 16.62. Lienzo agrandado (todas las capas cambiadas)

The canvas has been enlarged to 120×120 pixels. The undrawn part is transparent in the red layer and yellow (background color in Toolbox) in the green background layer.

All layers have been enlarged to the canvas size.
Puede querer añadir algo alrededor de su imagen: agrandar el tamaño del lienzo, añadir una capa nueva que tendrá el mismo tamaño del lienzo nuevo y pintar en esta capa. Esto es lo contrario de recortar.
También puede usar este comando para recortar una imagen:
Click on the
![]() chain next to Width and Height entries to unlink
dimensions. By modifying these dimensions and moving image against
canvas, by trial and error, you can crop the part of the image you
want. Click on the Center button and then on the Resize button.
chain next to Width and Height entries to unlink
dimensions. By modifying these dimensions and moving image against
canvas, by trial and error, you can crop the part of the image you
want. Click on the Center button and then on the Resize button.
|
|
Nota |
|---|---|
|
La Herramienta de recorte es más fácil de usar. |


