The „canvas“ is the visible area of the image. By default the size of the canvas coincides with the size of the layers. The command opens the „Set Image Canvas Size“ dialog that lets you enlarge or reduce the canvas size. You can, if you want, modify the size of the layers. When you enlarge the canvas, you create free space around the contents of the image. When you reduce it, the visible area is cropped, however the layers still extend beyond the canvas border.
Wenn Sie die Leinwand mit dem Befehl „Leinwandgröße“ verkleinern, wird die neue Leinwand im Vorschaubild durch einen dünnen Rahmen dargestellt. Der Mauszeiger nimmt innerhalb der Vorschau die Form eines Kreuzes an, das übliche Aussehen beim Verschieben. Sie können jetzt das Bild durch Anklicken und Ziehen gegen den Rahmen verschieben.

Leinwandgröße
- Breite, Höhe
-
You can set the Width and the Height of the canvas. The default units are pixels but you can choose different units, e.g. percent, if you want to set the new dimensions relative to the current dimensions. If the
 Chain to the right of the Width and
Height is not broken, both Width and Height keep the same
relative size to each other. That is, if you change one of the
values, the other one also changes a corresponding amount.
If you break the Chain by clicking on it, you can set
Width and Height separately.
Chain to the right of the Width and
Height is not broken, both Width and Height keep the same
relative size to each other. That is, if you change one of the
values, the other one also changes a corresponding amount.
If you break the Chain by clicking on it, you can set
Width and Height separately.
Unabhängig davon, welche Maßeinheit Sie zur Einstellung verwenden, werden Ihnen unterhalb der Eingabefelder immer die eingestellte Größe in Pixel und die logische Auflösung in dpi zur Kontrolle angezeigt.
Versatz
Der Versatz wird benutzt, um das Bild (nicht nur die aktive Ebene!) auf der Leinwand auszurichten. Sie sehen die Größe und den Inhalt der Leinwand mit den aktuellen Einstellungen im Vorschaubereich des Dialogfensters. Dort können Sie gut erkennen, wie die Bildinhalte auf der Leinwand angeordnet sind. Wenn die Leinwand kleiner als das Bild ist, wird sie im Vorschaubereich durch einen negativen Rahmen dargestellt.
- X, Y
-
Mit diesen Eigenschaften legen Sie die Anordnung der vorhandenen Bildinhalte auf der neuen Leinwand fest, d.h. den Abstand des Bildes zur Leinwand. X und Y geben den horizontalen bzw. vertikalen Abstand der linken oberen Ecke des Bildes relativ zur linken oberen Ecke der Leinwand an. Wenn die Leinwand kleiner als das Bild ist, sind die Werte negativ. Sie können den Versatz auf verschiedene Weisen einstellen:
-
durch Anklicken des Bildes und Ziehen mit der Maus,
-
durch EIngabe der horizontalen (X) und vertikalen (Y) Werte im entsprechenden Eingabefeld
-
oder durch Anklicken der Pfeilsymbole neben dem Eingabefeld, was eine Erhöhung bzw. Verminderung um eine Einheit bewirkt.
-
Wenn Sie das entsprechende Eingabefeld angeklickt haben (wenn dieses Element also den Fokus hat), können Sie auch die Pfeiltasten Auf und Ab verwenden, um den Wert um einen Pixel (Einheit) zu ändern, und die Tasten Bild auf und Bild ab, um den Wert um 10 Einheiten zu ändern.
-
- Ebenen
-
-
Resize layers: this drop-down list offers you several possibilities:
-
Keine: die Voreinstellung. Keine Ebene wird verändert, sondern nur die Leinwand.
-
Alle Ebenen: alle Ebenen werden auf die Leinwandgröße vergrößert oder verkleinert.
-
Ebenen in Bildgröße: nur die Ebenen, die dieselbe Größe wie das Bild haben, werden an die Leinwandgröße angepasst.
-
All visible layers: only visible layers, marked with a
 icon, in the Layers dialog, are sized to canvas size.
-
-
Fill with: you can fill resized layers with Foreground color, Background color, Middle Gray (CIELAB), White, Transparency (default), Pattern.
-
Resize text layers: Resizing text layers will make them uneditable.
-
- Zentrieren
-
Mit Hilfe dieser Schaltfläche können Sie die Bildinhalte sehr einfach auf der neuen Leinwand zentrieren. Die Werte für den Versatz werden beim Klicken auf die Schaltfläche berechnet und automatisch eingefügt.
![[Anmerkung]](images/note.png)
|
Anmerkung |
|---|---|
|
Wenn Sie auf die Schaltfläche Größe ändern klicken, ändert sich die Leinwandgröße, aber die Pixel und der Maßstab des Bildes nicht. If the layers of the image did not extend beyond the borders of the canvas before you changed its size, there are no layers on the part of the canvas that was added by resizing it. Therefore, this part of the canvas is transparent and displayed with a checkered pattern, and it is not immediately available for painting. You can either flatten the image, in which case you will get an image with a single layer that fits the canvas exactly, or you can use the Layers to Image Size command to resize only the active layer, without changing any other layers. You can also create a new layer and fill it with the background you want. By doing this, you create a digital „passe-partout“ (a kind of glass mount with a removable back for slipping in a photograph). |
Abbildung 16.60. Originalbild

The background color in the Foreground/Background Colors area of the Toolbox is set to yellow; Original image with 100×100 pixels size.

We started with a green background layer 100×100 pixels. Then we added a new red layer 80×80 pixels. The active layer limits are marked with a black and yellow dotted line. The red layer does not fill the canvas completely: the unoccupied part is transparent.
Abbildung 16.61. Leinwand vergrößert (Ebenen unverändert)

The canvas has been enlarged to 120×120 pixels. The unoccupied part of the canvas is transparent.

The layers size remained unchanged.
Abbildung 16.62. Leinwand vergrößert (alle Ebenengrößen verändert)

The canvas has been enlarged to 120×120 pixels. The undrawn part is transparent in the red layer and yellow (background color in Toolbox) in the green background layer.

All layers have been enlarged to the canvas size.
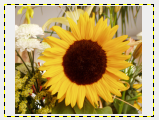
You may want to add some stuff around your image: enlarge canvas size, add a new layer that will have the same size as the new canvas and then paint this new layer. That's the converse of cropping.
Sie können diesen Befehl verwenden, um ein Bild zuzuschneiden:
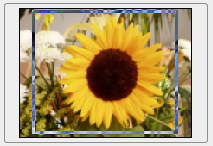
Click on the
![]() chain next to Width and Height entries to unlink
dimensions. By modifying these dimensions and moving image against
canvas, by trial and error, you can crop the part of the image you
want. Click on the Center button and then on the Resize button.
chain next to Width and Height entries to unlink
dimensions. By modifying these dimensions and moving image against
canvas, by trial and error, you can crop the part of the image you
want. Click on the Center button and then on the Resize button.
|
|
Anmerkung |
|---|---|
|
Das Werkzeug Zuschneiden ist einfacher zu benutzen. |


