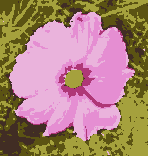
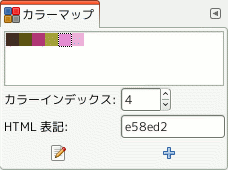
The Colormap (Indexed Palette is a better name) dialog allows you to edit the colormap of an indexed image. (If the mode of the active image is RGB or Grayscale instead of Indexed, the dialog is empty and unusable.)
「バッファー」ダイアログはドッキング可能です。 その扱い方については 「ダイアログとその合体」 の節をご覧ください。
呼び出し方はつぎのとおりです。
-
from the main menu: → → ;
-
from the Tab menu in any dockable dialog by clicking the tab menu button
and selecting → .
In the menu, there is a list of detached windows which exists only if at least one dialog remains open. In this case, you can raise the 「Colormap」 dialog from the main menu: → .
インデックス化された画像では、 各画素に直接色を与える方法 (つまり RGB 画像やグレースケール画像での方式) をとらず、 色は カラーマップ と呼ばれる対照表を通す遠回りな方法で画素に与えられます。 [各画素には対照表への参照番号が記録されます。]
GIMP は画素に表示する色を判定するときに画像のカラーマップを見て、 参照番号に割り当てられた色を出します。 インデックス化画像はそれぞれ固有のカラーマップを持っています。 GIMP ではカラーマップに並べられる色数は最大で 256 色の制限があります。 カラーマップは最大色数ならば 0 から 255 までの、 索引番号のひとつひとつに任意の RGB 色が割り振られます。 対照表に登録できる色には何ら制限はなく、 その順序も問いません。 どの索引番号にどの色を結び付けても構わないのです。
インデックス化カラー画像で 使える 色はカラーマップに 登録されている色に限られる ことは重要ですのでしっかり理解してください。 つまり使いたい色が他にあれば最大色数が許す範囲で再登録すればよいとも言えます。 この制約は GIMP での大多数の操作に大きな影響を及ぼします。 たとえば、 パターンで埋め尽くそうとするとほとんどの場合カラーマップには同等な色が見付からないので、 GIMP は一番近そうな色で近似を行ないます。 この処理に 量子化 を援用することもよくあります。 カラーマップの制約が大きかったり色数が乏しいと仕上がりはほぼ確実に非常に貧弱な画質になります。
カラーマップダイアログで画像のカラーマップを変更できます。 新たに登録項目を作成したり既存の項目の色を別の色に変えたりします。 既に使用されている参照番号に対する色を変更すると画像上にもその変更が反映され、 その色を参照しているすべての画素の色が一斉に入れ替わります。 ダイアログの色表では 0 番の色が左上隅に、 1 番の色がその右隣に …のように並んでいます。
このダイアログを使うとできることはつぎのとおりです。
- 色見出しをクリック
-
するとクリックした色が (ツールボックスの色標識で表示されている) GIMP 描画色になります。 そのあとは塗色操作にこの色が使えるようになります。
- Ctrl キーを押しながら色見出しをクリック
-
するとクリックした色が (ツールボックスの色標識で表示されている) GIMP 背景色になります。
- 色見出しをダブルクリック
-
するとクリックした色が GIMP 描画色になり、 さらに「インデックスカラーの変更」ダイアログが開かれてカラーマップ上のその項目の色を別の色に変更できるようになります。
- カラーインデックス
-
カラーインデックス の数値欄に索引番号を記入したりスピンボタンを操作して色見出しが指定できます。 そのほかクリックで選択した色見出しの色の索引番号がこの数値欄に表示されます。
- HTML notation
-
HTML 表記 の数値欄は現在選択されている検索番号に登録されている色を、 16進表記 (HTML で使われているものと同じ) で表示します。 お望みならば色編集ダイアログを呼び出さなくても直接 RGB 値をここに記入して色を指定する方法がとれます。 用語集の HTML 表記法 をご覧ください。
- アイコンボタン
-
The button bar at the bottom offers the following functionality:
-
色の変更...
-
 このボタン (ダイアログの左下にある) をクリックすると「インデックスカラーの変更」ダイアログが開かれ、 現在選択しているカラーマップの索引項目の色がそこで変更できます。 色見出しをダブルクリックしたときと似ていますが、 このボタンを使った場合は GIMP 描画色の変更はありません。
 -
Delete color
-
This button (in the lower left corner of the dialog) allows you to delete a color which is not used in the image from the colormap.
-
色を追加
-
This button (at the bottom of the dialog) allows you to add new colors to the colormap. If you click on the button, the current foreground color, as shown in the Toolbox, will be added to the end of the colormap. If instead you hold down Ctrl and click, the background color from the Toolbox will be added.
![[注記]](images/note.png)
注記 The colormap can not contain more than 256 entries. If it already has 256 entries, trying to add a color will have no effect.
-
Select all pixels with this color
-
This button allows you to select all pixels with this color. To add to the selection, use Shift buttonclick, to subtract use Ctrl buttonclick, and to intersect with the current selection use Shift+Ctrl buttonclick.
-
![[ヒント]](images/tip.png)
|
ヒント |
|---|---|
|
If you make a mistake, you can undo it by focusing the pointer in the image whose colormap you have changed, and then pressing Ctrl+Z or choosing → in the main menu. |
![[注記]](images/note.png)
|
注記 |
|---|---|
|
インデックス化カラー画像に塗った色がカラーマップになかった場合は、 GIMP はカラーマップにあるよく似た色を代わりに使って発色させます。 |
Right-clicking on a color in the Colormap selects this color and opens a context menu with the following options:
- 色の変更...
-
は色を探るダイアログを開きますから、 そこで現在選択している索引番号に対する色を変更できます。
- 描画色をマップに追加
-
このコマンドはインデックス化パレットの色数が 256 色に満たない場合にのみ現れます。 ツールボックスでも表示されている背景色がカラーマップに付け加えられます。
- 背景色をマップに追加
-
このコマンドはインデックス化パレットの色数が 256 色に満たない場合にのみ現れます。 ツールボックスでも表示されている描画色がカラーマップに付け加えられます。
- Select this Color
-
This selects all pixels in the image which have the chosen palette index.
- 選択範囲に加える
-
Adds all pixels in the image which have the chosen palette index to the selection.
- 選択範囲から引く
-
Subtracts all pixels in the image which have the chosen palette index from the selection.
- 選択範囲との交わり
-
Intersect all pixels in the image with the chosen palette index with the current selection.
- インデックスカラーの並べ替え...
-
「インデックスカラーの並べ替え...」 に説明があります。


 色の変更...


