Le pagine seguenti documentano le finestre di dialogo per aprire, salvare ed esportare le immagini.
La finestra di dialogo consente di selezionare un'immagine da caricare dal disco o da un dispositivo esterno.
-
È possibile accedere alla finestra di dialogo dal menu tramite: → .
-
È possibile aprire questa finestra anche usando la scorciatoia da tastiera Ctrl+O.
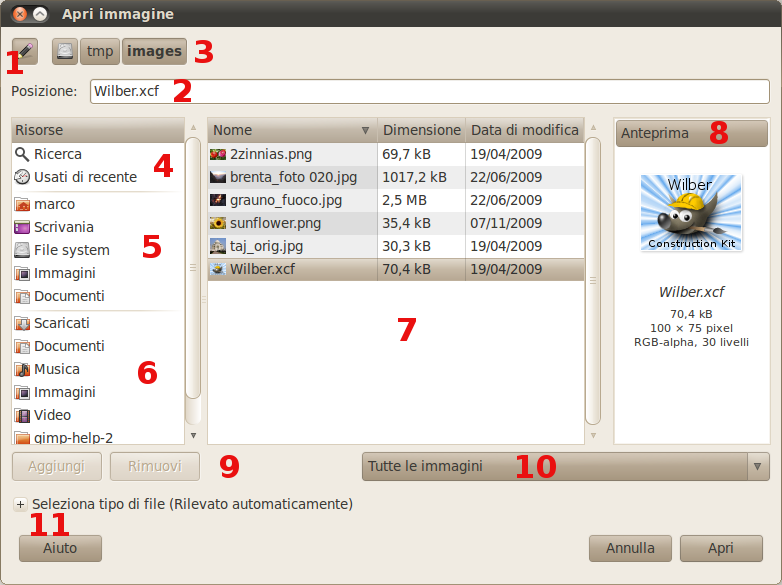
Questa finestra di dialogo per la selezione dei file dovrebbe risultare familiare se si ha già lavorato con i file in precedenza. Si noti che a seconda del sistema operativo in uso, l'aspetto di questa finestra di dialogo potrebbe variare. Spiegheremo i dettagli di questa finestra di dialogo usando i numeri nei cerchi rossi.
-
Quest'area dà accesso alle cartelle principali e ai dispositivi di archiviazione. La prima volta che si apre questa finestra dopo aver avviato GIMP, viene qui selezionata l'opzione Recenti. Questa è una cartella speciale che mostra le immagini (vedere punto 3) che si ha aperto di recente in GIMP.
Oltre alla cartella Recenti, qui si può trovare la propria cartella Home, cartelle contenenti documenti, immagini e altre posizioni speciali, nonché dischi, unità esterne e condivisioni di rete. Facendo clic con il pulsante sinistro del mouse su una di queste cartelle, la seleziona come cartella corrente e il contenuto dell'area dell'elenco immagini verrà aggiornato (3).
Facendo clic con il pulsante destro del mouse su una cartella in questo elenco, si aprirà un menu contestuale. Non tutti i comandi saranno sempre disponibili o abilitati. Lo stesso menu contestuale è presente anche nell'elenco delle cartelle dei segnalibri, vedere (5).
 Il menu contestuale cartella e segnalibri
- Apri
-
Questo apre il contenuto della cartella selezionata nella finestra dell'elenco delle immagini (3).
- Aggiungi segnalibro
-
Questo consente di aggiungere la cartella selezionata come segnalibro. I segnalibri vengono visualizzati nell'area contrassegnata con (5).
- Rimuovi
-
Consente di rimuovere un segnalibro. È disabilitato per altre cartelle e dispositivi.
- Rinomina...
-
Questo permette di rinominare un segnalibro o determinate cartelle speciali. Nota: rinomina solo il segnalibro o la cartella speciale come mostrato nella finestra di dialogo del file, non la cartella a cui punta.
-
Per impostazione predefinita, questo mostra il percorso della cartella corrente. È possibile accedere a una delle cartelle principali facendo clic sulla parte desiderata.
In alternativa, si può inserire il nome di un'immagine. Non appena si inizia a digitare, l'elenco dei file (3) cambia e mostra solo l'elenco contenente la combinazione di lettere inserita.
Se si ha bisogno di navigare verso un'altra posizione non disponibile facendo clic, si può aprire un campo di testo in cui digitare o incollare la posizione desiderata. Per accedervi, usare Ctrl+L, quindi, dopo aver inserito la posizione, premere Invio.
![[Nota]](images/note.png)
Nota È possibile utilizzare questo campo di immissione della posizione per visualizzare il contenuto di una cartella diversa, immettendo il percorso di una cartella, oppure aprire un'immagine specifica immettendo il percorso completo dell'immagine.
-
Qui viene mostrato il contenuto della cartella selezionata. Per cambiare la cartella corrente basta fare doppio clic su una cartella presente nel pannello. Per selezionare un file invece si usa il clic singolo. Si può poi aprire il file selezionato facendo clic sul pulsante . Il doppio clic sul file lo apre direttamente. Si possono aprire solo file immagine.
Per impostazione predefinita, l'elenco dei file immagine è ordinato alfabeticamente in base al nome del file. I nomi delle colonne sopra l'elenco delle immagini possono essere utilizzati per selezionare la modalità di ordinamento desiderata. Facendo clic su una colonna, l'elenco verrà ordinato in base a quella colonna. Un piccolo triangolo nel nome della colonna indica che la colonna è attualmente in uso per ordinare l'elenco. Se il triangolo è rivolto verso l'alto, l'ordinamento è crescente. Facendo nuovamente clic sulla stessa colonna, l'ordinamento passerà a decrescente e il triangolo sarà rivolto verso il basso.
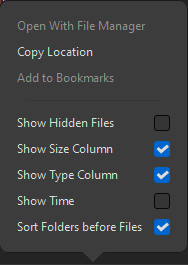
Facendo clic con il pulsante destro del mouse su un'immagine o una cartella in questo elenco si apre un menu contestuale:
 Il menu contestuale elenco immagini
- Apri con il file manager
-
Questa opzione è abilitata solo per le cartelle. Se abilitata, è possibile aprire la cartella selezionata nel file browser predefinito del computer. Nota: questo comando al momento non funziona su Windows.
- Copia posizione
-
Questo copia la posizione del file selezionato negli appunti.
- Aggiungi ai segnalibri
-
Questo comando consente di aggiungere la cartella selezionata come segnalibro. I segnalibri vengono visualizzati nell'area contrassegnata con (5). Questa opzione è disabilitata se è stato selezionato un file anziché un'immagine.
- Mostra file nascosti
-
Se abilitata, i file nascosti verranno mostrati nell'elenco dei file immagine (3).
- Mostra colonna dimensione
-
Se abilitata, la dimensione di ciascuna immagine verrà mostrata nell'elenco dei file immagine (3).
- Mostra colonna tipo
-
Se abilitata, il tipo di file di ciascuna immagine verrà visualizzato nell'elenco dei file immagine (3).
- Mostra tempo
-
Se abilitata, per ogni immagine nell'elenco dei file immagine (3) verrà visualizzata l'ora di modifica oltre alla data di modifica.
- Ordina cartelle prima dei file
-
Se abilitata, tutte le cartelle presenti nella cartella attualmente selezionata verranno visualizzate in cima all'elenco dei file immagine (3). Se disabilitata, le cartelle verranno mescolate con i file immagine in base alla colonna di ordinamento selezionata.
-
Una versione miniatura dell'immagine selezionata nell'elenco immagini (3) viene visualizzata nella finestra Anteprima a destra. Se si tratta di un formato immagine riconosciuto da GIMP, le dimensioni del file, le dimensioni e la composizione dell'immagine vengono visualizzate sotto la finestra di anteprima.
![[Suggerimento]](images/tip.png)
Suggerimento Se l'immagine è stata modificata, ma la miniatura non si è aggiornata, si può fare clic sull'anteprima per aggiornare la miniatura. Per forzare l'aggiornamento della miniatura anche se non è stata modificata, usare Ctrl + clic.
-
Questa parte dell'elenco mostra le cartelle che si ha aggiunto ai preferiti. Si può aggiungere segnalibri utilizzando l'opzione Aggiungi ai segnalibri, visualizzata facendo clic con il pulsante destro del mouse su una cartella nel pannello dell'elenco immagini (3).
È possibile rimuovere un segnalibro utilizzando il comando Rimuovi, visualizzato facendo clic con il pulsante destro del mouse su un segnalibro. Questo menu contestuale può essere utilizzato anche per Rinominare il segnalibro. Rinominare il segnalibro non comporta la modifica del nome della cartella a cui punta.
-
Facendo clic sull'etichetta Altre posizioni, nel riquadro dell'elenco delle immagini si aprirà un elenco di altre posizioni e dispositivi noti sul computer. È possibile utilizzare questa opzione per accedere più facilmente a determinate posizioni sul computer che potrebbero non essere direttamente disponibili nell'elenco delle cartelle a sinistra.
-
L'opzione Mostra tutti i file è solitamente deselezionata. Se si seleziona questa opzione, verranno mostrati tutti i file nella cartella selezionata, anziché solo i file immagine riconosciuti da GIMP.
-
Seleziona tipo di file può essere utilizzato per impostare esplicitamente il formato del file immagine. Si tratta di un elenco a discesa che mostra tutti i formati di file immagine riconosciuti da GIMP. In generale, non è necessario preoccuparsene, perché nella maggior parte dei casi GIMP è in grado di determinare automaticamente il tipo di file.
Il valore predefinito Rilevato automaticamente, fa in modo che GIMP provi automaticamente a scoprire il formato corretto.
Nelle rare occasioni dove né l'estensione del file né il contenuto interno del file è sufficiente per permettere a GIMP di rilevare correttamente il tipo di file, si può selezionare manualmente il tipo giusto da questo elenco.
![[Suggerimento]](images/tip.png)
Suggerimento Selezionare esplicitamente il tipo di file può essere utile in alcuni casi. Ad esempio, si potrebbe volerlo fare per caricare un'immagine Photoshop fusa, come questa è stata salvata in un'immagine PSD (se presente). Poiché le immagini Photoshop non possono sempre essere caricate correttamente in GIMP, questo consente di visualizzare l'immagine così come è stata concepita da Photoshop.
Quando la finestra di dialogo Apri immagine è attiva, è possibile digitare il nome di un file o di una sottocartella per effettuare una ricerca. Viene visualizzato un campo di ricerca e il contenuto della posizione viene filtrato durante la digitazione. Verranno visualizzati tutti i file o le sottocartelle che corrispondono completamente o parzialmente al testo della ricerca.
Si può cercare nei Recenti o in qualsiasi cartella a cui si può accedere. La ricerca include solo il contenuto della posizione selezionata. La ricerca non verrà eseguita nelle sottocartelle della posizione selezionata.
Se la finestra di dialogo Apri immagine include un pulsante di ricerca (icona a forma di lente di ingrandimento), è possibile fare clic sopra di essa per attivare o disattivare la ricerca. Il pulsante di ricerca appare solo quando le decorazioni lato client (CSD) sono attivate, come in alcune versioni dell'ambiente desktop Xfce.
Quando si apre un'immagine non XCF a cui è associato un profilo colore, GIMP aprirà una finestra di dialogo che chiederà se si desidera mantenere il profilo originale o convertirlo nel profilo colore sRGB integrato in GIMP.
Sebbene in genere si consiglia di mantenere il profilo colore, entrambe le opzioni vanno bene, poiché GIMP eseguirà la conversione del profilo in background quando necessario.
![[Suggerimento]](images/tip.png)
|
Suggerimento |
|---|---|
|
Se si vuole che GIMP non ponga più questa domanda, selezionare l'opzione Non chiedermelo ancora. Se si cambia idea, si può sempre ripristinare la domanda nelle Preferenze, Gestione colore, Criteri, Comportamento apertura file. |


