I «gruppi di livelli» permettono di tenere assieme gruppi di livelli strutture gerarchiche. Ciò facilita la gestione del progetto se questo possiede molti livelli.
- Creazione di un gruppo di livelli
-
Si può creare un gruppo di livelli tramite il pulsante in fondo alla finestra dei livelli, o usando il comando da menu → , oppure per mezzo del menu contestuale della finestra dei livelli.
Questo gruppo di livelli vuoto appare appena sopra il livello corrente. È importante dargli subito un nome che sia significativo. Per cambiare il nome del gruppo, fare doppio clic sul nome, premere F2, o fare clic destro sul gruppo e selezionare Modifica attributi di livello dal menu contestuale. Se non si cambia il nome del gruppo di livelli sarà facile fare confusione quando ne verranno creati altri con nomi come Gruppo livelli #1, Gruppo livelli #2, ecc.
Si possono creare più gruppi di livelli ed inoltre questi possono anche essere incorporati, cioè racchiusi in altri gruppi di livelli.
- Aggiungere un livello ad un gruppo di livelli
-
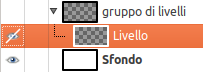
Si possono aggiungere livelli preesistenti ad un gruppo di livelli facendo clic e trascinandoli con il mouse.
![[Nota]](images/note.png)
Nota La mano che rappresenta il puntatore del mouse deve diventare più piccola prima di rilasciare il pulsante del mouse.
Una sottile linea orizzontale indica dove il livello verrà inserito.
Per aggiungere un nuovo livello al gruppo di livelli corrente, fare clic sul pulsante presente in fondo alla finestra di dialogo dei livelli, o usare il comando dal menu principale, o premere Maiusc+Ctrl+N.
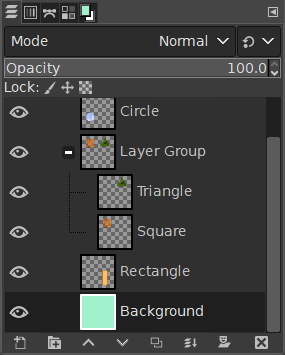
Quando un gruppo di livelli non è vuoto, appare una piccola icona
 . Facendo clic su di essa, si può aprire o nascondere l'elenco dei livelli.
I livelli che appartengono ad un gruppo livelli vengono leggermente indentati a destra, in modo tale da agevolare la distinzione dell'appartenenza ai gruppi.
- Visibilità
-
Se un gruppo di livelli viene reso invisibile usando l'icona occhio ma ancora aperto (in modo che il livelli dentro il gruppo siano mostrati nell'elenco), c'è un occhio barrato mostrato accanto ai livelli che stanno dentro al gruppo per indicare che questi livelli non vengono mostrati nella proiezione finale dell'immagine, ma sono in teoria visibili nel gruppo di livelli.
- Alzare e abbassare i gruppi di livelli
-
Si possono alzare e abbassare i gruppi di livelli, nella finestra di dialogo dei livelli, allo stesso modo dei livelli normali: facendo clic e trascinando o usando i tasti freccia su e freccia giù presenti in fondo alla finestra di dialogo dei livelli.
- Duplica un gruppo di livelli
-
Per duplicare un gruppo di livelli, fare clic sul pulsante o fare clic destro e selezionare il comando Duplica livello presente nel menu contestuale.
- Sposta gruppi di livelli
-
Si può spostare un gruppo di livelli in un'altra immagine facendo clic e trascinando. Si può anche copiarlo e incollarlo usando le combinazioni di tasti Ctrl+C e Ctrl+V: in questo modo si ottiene una selezione fluttuante che bisogna ancorare (
 pulsante àncora in fondo alla finestra di dialogo dei livelli).
Si può anche spostare un gruppo di livelli sul piano del disegno: ciò ha l'effetto di duplicare il gruppo nel gruppo. Selezionare il gruppo di livelli, selezionare lo strumento sposta e poi, nell'immagine, spostare il livello. Ecco un modo per moltiplicare gli oggetti multilivello presenti in un'immagine.
- Elimina gruppi di livelli
-
Per eliminare uno o più gruppi di livelli, fare clic sul pulsante icona
 nella parte inferiore della finestra di dialogo Livelli, oppure trascinare e rilasciare i gruppi di livelli selezionati in cima a tale pulsante, oppure utilizzare il comando Elimina livelli dal menu principale o dal menu contestuale della finestra di dialogo Livelli.
 - Gruppi di livelli annidati
-
Quando un gruppo di livelli viene attivato, si può aggiungere un altro gruppo dentro di esso con il comando «Nuovo gruppo di livelli». Non sembra ci siano dei limiti, ad eccezione della memoria, al numero di nidificazione dei gruppi di livelli.
- Modalità e gruppi di livelli
-
Una modalità di livello applicata ad un gruppo di livelli agisce solo sui livelli presenti in questo gruppo. Una modalità di livello presente sopra un gruppo di livelli agisce su tutti i livelli sottostanti, fuori e dentro i gruppi di livelli.
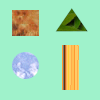
Immagine originale
Figura 8.71. Modalità di livello in un gruppo di livelli

Abbiamo aggiunto un livello bianco dentro il gruppo di livelli in modalità Colore HSL.

Solo il quadrato e il triangolo sono diventati grigi.
Figura 8.72. Modalità di livello fuori al gruppo livelli

Abbiamo aggiunto un livello bianco all'esterno e sopra il gruppo di livelli con la modalità colore HSL.

Tutti i livelli sottostanti sono diventati grigi, compreso il livello di sfondo.
I gruppi di livelli hanno una speciale modalità di livello: la modalità Passante. Questa modalità esiste solo se un gruppo di livelli è attivo.
La modalità Passante è meno una modalità di fusione in sé e per sé che un'istruzione per il gruppo nel suo complesso: indica che i livelli all'interno del gruppo devono essere renderizzati in combinazione con altri livelli sottostanti il gruppo, invece di essere renderizzati separatamente da essi.
Mentre con la modalità Normale, i livelli dentro un gruppo vengono trattati come se fossero un livello unico, il quale poi viene fuso con gli altri sotto nella pila; un modificatore su un livello dentro il gruppo fonde i livelli sottostanti solo nel gruppo.
Per ulteriori dettagli su Passante vedere Passante nel Glossario.
- Opacità
-
Quando un gruppo di livelli viene attivato, i cambiamenti di opacità vengono applicati a tutti i livelli del gruppo.
- Maschera di livello
-
Sono possibili anche le maschere sui gruppi di livelli. Esse lavorano in maniera simile alle ordinarie maschere di livello, con le seguenti considerazioni.
La dimensione della maschera del gruppo è sempre la dimensione combinata di tutte le dimensioni dei suoi figli. Quando la dimensione del gruppo cambia, la maschera viene ritagliata alla nuova dimensione — le aree della maschera che cadono fuori dai nuovi confini vengono eliminate, e le nuove aree aggiunte vengono riempite di nero (e per questo rese automaticamente trasparenti).

Abbiamo aggiunto una maschera di livello nera (trasparente) al gruppo di livelli.

I livelli all'interno del gruppo sono diventati trasparenti (invisibili).
Naturalmente, si può ancora aggiungere una maschera di livello ad un livello nel gruppo per mascherare parte del livello.
- Trovare un livello
-
Quando si lavora con molti livelli, trovare un livello particolare nell'elenco può essere difficile. Per trovare il livello al quale un elemento immagine appartiene usare la selezione livelli dalla superficie di disegno tramite Alt+Clic centrale sull'elemento immagine. I livelli disponibili mostreranno in ciclo il nuovo livello attivo il cui nome verrà temporaneamente mostrato sulla barra di stato.
- Anteprima livello
-
Ci sono stati problemi di rendering lento dell'anteprima dell'area disegnabile nel caso di molti livelli di una immagine estesa. Se questo problema vi affligge, si può disabilitare il rendering delle anteprime dei gruppi di livelli in → → .


