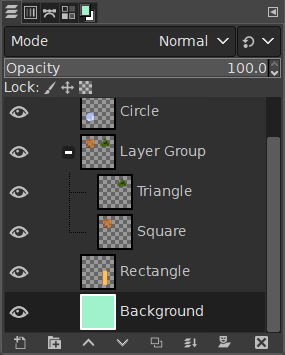
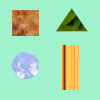
«Группы слоёв» позволяют объединять слои в иерархической структуре. Это облегчает управление проектом, если у вас много слоёв.

- Создание группы слоёв
-
Вы можете создать группу слоёв, нажав кнопку внизу диалогового окна слоёв, с помощью команды меню → или через контекстное меню диалогового окна слоёв.
Пустая группа слоёв появится прямо над текущим слоем. Рекомендуется дать ей описательное имя. Чтобы изменить имя группы слоёв, дважды щёлкните по имени, нажмите F2 или щёлкните правой кнопкой мыши по слою и выберите в контекстном меню команду Изменить атрибуты слоя. Если не переименовывать группы слоёв, можно запутаться, если создано несколько групп с такими именами, как Группа слоёв #1, Группа слоёв #2 и так далее.
Можно создать несколько групп слоёв, а также встраивать одну группу в другую, то есть включать одну группу слоёв в другую.
- Добавление слоёв в группу слоёв
-
Уже существующие слои можно добавить в группу, нажав и перетащив их.
![[Примечание]](images/note.png)
Примечание При перетаскивании дождитесь, пока значок руки, представляющий курсор, не уменьшится, после чего кнопку мыши можно отпустить.
Место, где появится перетаскиваемый слой, отмечается тонкой горизонтальной линией.
Чтобы добавить новый слой в текущую группу слоёв, нажмите кнопку в нижней части диалогового окна слоёв, используйте команду в главном меню или нажмите Shift+Ctrl+N.
Если группа слоёв не является пустой, рядом с ней показывается маленький значок
. Нажав на него, можно свернуть/развернуть список слоёв.

Слои в группе слегка сдвинуты вправо, что помогает легко понять, какие слои являются частью этой группы.
- Видимость
-
Если группа слоёв была сделана невидимой с помощью значка глаза, но по-прежнему является развёрнутой (то есть слои внутри группы показываются в списке), то рядом со слоями в группе будет присутствовать значок перечёркнутого глаза, указывающий на то, что эти слои не показываются в окончательной проекции изображения, но являются условно видимыми в группе слоёв.

- Поднять и опустить группу слоёв
-
Можно поднимать и опускать группы слоёв в диалоговом окне слоёв так же, как и при работе с обычными слоями: щелчком и перетаскиванием, а также с помощью клавиш стрелка вверх и стрелка вниз в нижней части диалогового окна слоёв.
- Создание копии группы слоёв
-
Можно создавать копии группы слоёв: нажмите кнопку или же сделайте щелчок ПКМ и в появившемся контекстном меню выберите пункт Создать копии слоёв.
- Перемещение группы слоёв
-
Можно нажать и перетащить группу слоёв в другое изображение. Также можно выполнить копирование-вставку с помощью Ctrl+C и Ctrl+V: в этом случае получится плавающее выделение, которое будет необходимо прикрепить (
значок якоря в нижней части диалогового окна слоёв).
Также группу слоёв можно перемещать на холст: это действие создаёт копию группы в группе. Выберите группу слоёв, выберите инструмент Перемещение, затем в окне изображения переместите слой. Таким способом можно копировать многослойные объекты изображения.
- Удаление группы слоёв
-
Чтобы удалить одну или несколько групп слоёв, нажмите кнопку со значком
в нижней части диалогового окна «Слои», или перетащите выбранные группы слоёв на эту кнопку, или воспользуйтесь командой Удалить слои из главного меню или из контекстного меню диалогового окна «Слои».
- Встраивание группы слоёв
-
С помощью команды «Создать новую группу слоёв» в активную группу можно добавить другую группу слоёв. Число добавляемых групп ограничивается только доступным объёмом оперативной памяти.
- Режимы слоёв и группы
-
Режим слоя, активируемый для группы слоёв, действует только для слоёв данной группы. Режим, применяемый для слоёв, находящихся над группой, действует для всех нижележащих слоёв, как находящихся в группе, так и для отдельных.

Исходное изображение
Рисунок 8.71. Layer Mode in Layer Group

We added a white layer in the layer group with HSL Color mode.

Only the square and triangle turned gray.
Рисунок 8.72. Layer Mode outside Layer Group

We added a white layer outside and above the layer group with HSL Color mode.

All layers underneath changed to gray, including the background layer.
Layer groups have a special layer mode: the Pass through mode. This mode exists only if a layer group is active.
Pass through mode, is less a blending mode in and of itself than an instruction for the group as a whole: it indicates that layers inside the group are to be rendered in combination with other layers below the group, instead of being rendered separately from them.
While with Normal mode, layers within a group are treated as if they were a single layer, which is then blended with other layers below in the stack; a modifier on a layer inside the group blends layers below in the group only.
For more details about Pass through, see Pass through in the Glossary.
- Непрозрачность
-
Для активной группы изменения непрозрачности применяются ко всем слоям группы.
- Маска слоя
-
Также для групп слоёв доступны маски. Они действуют так же, как и обычные маски слоёв, но следует учитывать нижеследующие аспекты.
Размер маски группы слоёв никогда не отличается от размера группы (т.е. размера ограничивающего блока дочерних элементов группы). При изменении размера группы маска обрезается до этого нового размера — области маски, заходящие за новые границы, отбрасываются, а новые добавленные области заполняются чёрным (и, соответственно, являются по умолчанию прозрачными).

We added a black (transparent) layer mask to the layer group.

The layers inside the group became transparent (invisible).
И конечно, для добавления маски к части слоя по-прежнему можно добавить маску для слоя в составе группы.
- Поиск слоя
-
При работе с большим количеством слоёв поиск определённого слоя в списке может быть затруднён. Чтобы найти слой, к которому относится элемент изображения, используйте функцию выбора слоя на холсте, нажав Alt+средняя кнопка мыши на элементе изображения. Доступные слои будут просмотрены, чтобы показать новый активный слой, а название слоя будет временно отображаться в строке состояния.
- Предварительный просмотр слоёв
-
Возникли проблемы с медленным отображением групп слоёв в превью в случае большого количества слоёв на большом изображении. Если вы столкнулись с этой проблемой, вы можете отключить визуализацию предварительного просмотра групп слоёв с помощью → → .


