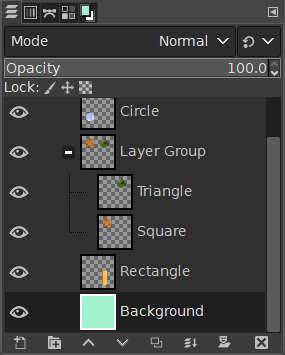
“Layer Groups” enable you to group layers together in a hierarchical structure. This will make it easier to manage your project if you have many layers.
- Crear un grupo de capas
-
You can create a layer group by clicking the button at the bottom of the Layers Dialog, by using the menu command → , or through the Layers dialog context menu.
This new empty layer group appears just above the current layer. It is recommended to give it a descriptive name. To change the layer group name, double-click the name, press F2, or right-click the layer and select Edit Layer Attributes from the context menu. If you don't rename your layer groups, you can get confused when several groups have been created with names such as Layer Group #1, Layer Group #2, etc.
You can create multiple layer groups and you can embed them, that is include a layer group in another one.
- Añadir capas a un grupo de capas
-
Puede añadir capas existentes a un grupo de capas pulsando y arrastrando.
![[Nota]](images/note.png)
Nota La mano que representa el puntero del ratón debería volverse más pequeña antes de soltar el botón del ratón.
A thin horizontal line marks where the layer will be inserted.
To add a new layer to the current layer group, click the button at the bottom of the Layers dialog, use the command in the main menu, or press Shift+Ctrl+N.
When a layer group is not empty, a small icon
 appears. By clicking it, you can fold or unfold the group.

Layers that belong to a layer group are slightly indented to the right, allowing you to easily see which layers are part of the group.
- Visibilidad
-
Si un grupo de capas se vuelve invisible usando el icono del ojo pero aún está abierto (de modo que las capas dentro del grupo se muestran en la lista), se muestra un ojo tachado además de las capas que están dentro del grupo para indicar que estas capas no se muestran en la proyección final de la imagen, pero son teóricamente visibles en el grupo de capas.
- Subir o bajar grupos de capas
-
You can raise and lower layer groups in the Layers dialog as you do with normal layers: click-and-dragging, and by using up arrow and down arrow keys at the bottom of the Layers dialog.
- Duplicar un grupo de capas
-
To duplicate a layer group, click the button or right-click and select the Duplicate Layers command in the pop up context menu.
- Mover grupos de capas
-
You can move a layer group to another image by click-and-dragging. You can also copy-paste it using Ctrl+C and Ctrl+V: then, you get a floating selection that you must anchor (
 anchor button
at the
bottom of the Layers Dialog).
anchor button
at the
bottom of the Layers Dialog).
You can also move a layer group to the canvas: this duplicates the group in the group. Select the layer group, select the Move tool, then, in the image, move the layer. That's one way to multiply multi-layer objects in an image.
- Delete Layer Groups
-
To delete one or more layer groups, click the
 icon button on the bottom of the Layers dialog, or drag and drop the
selected layer groups on top of that button,
or use the Delete Layers
command from the main menu or from the Layers dialog context menu.
icon button on the bottom of the Layers dialog, or drag and drop the
selected layer groups on top of that button,
or use the Delete Layers
command from the main menu or from the Layers dialog context menu.
- Acoplar grupos de capas
-
When a layer group is activated, you can add another group inside it with the “Add New Layer Group” command. There seems to be no limit, except memory, to the number of embedded layer groups.
- Modos de capa y grupos
-
Un modo de capa aplicado a un grupo de capas actúa sólo en las capas de ese grupo. Un modo de capa por encima de un grupo de capas actúa sobre todas las capas inferiores, dentro y fuera de los grupos de capas.
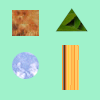
Imagen original
Figura 8.71. Layer Mode in Layer Group

We added a white layer in the layer group with HSL Color mode.

Only the square and triangle turned gray.
Figura 8.72. Layer Mode outside Layer Group

We added a white layer outside and above the layer group with HSL Color mode.

All layers underneath changed to gray, including the background layer.
Layer groups have a special layer mode: the Pass through mode. This mode exists only if a layer group is active.
Pass through mode, is less a blending mode in and of itself than an instruction for the group as a whole: it indicates that layers inside the group are to be rendered in combination with other layers below the group, instead of being rendered separately from them.
While with Normal mode, layers within a group are treated as if they were a single layer, which is then blended with other layers below in the stack; a modifier on a layer inside the group blends layers below in the group only.
For more details about Pass through, see Pass through in the Glossary.
- Opacidad
-
Cuando un grupo de capas está activado, los cambios en la opacidad se aplican a todas las capas del grupo.
- Máscara de capa
-
Masks are also available on layer groups. They work similarly to ordinary layer masks, with the following considerations.
The layer group’s mask size is the same as the combined size of all its children at all times. When the group’s size changes, the mask is cropped to the new size — areas of the mask that fall outside of the new bounds are discarded, and newly added areas are filled with black (and hence are transparent by default).

We added a black (transparent) layer mask to the layer group.

The layers inside the group became transparent (invisible).
Of course, you still can add a layer mask to a layer in the group to mask a part of the layer.
- Encontrar una capa
-
When working with a lot of layers, finding a particular layer in the list can be difficult. To find the layer to which an image element belongs, use the on-canvas layer selection function via Alt+Middle click on the image element. The available layers will be looped through to show the new active layer and the layer name will be temporarily displayed in the status bar.
- Vista previa de capa
-
There have been problems with slow preview rendering of layer groups in case of many layers in a large image. If you are experiencing this, you can disable rendering layer group previews in → → .


