The Fuzzy Select tool is designed to select areas of the current layer or image based on color similarity.
이 도구를 사용할 때 가장 중요한 것은 정확한 기준점을 찾는 것입니다. 만약 엉뚱한 지점을 기준으로 잡으면, 원하는대로 선택을 하지 못할 수도 있습니다.
Fuzzy Select is a good tool for selecting objects with sharp edges. It is fun to use, so beginners often start out using it a lot. You will probably find, however, that the more you use it, the more frustrated you become with the difficulty of selecting exactly what you want, no more, no less. More experienced users find that the Path and Color Select tools are often more efficient, and use the Fuzzy Select tool less. Still, it is useful for selecting an area within a contour, or touching up imperfect selections. It often works very well for selecting a solid-colored (or nearly solid-colored) background area.
선택되는 영역은 연속된 픽셀뿐만 아니라 약간 떨어진 곳도 포함됩니다. 이렇게 선택가능한 거리는 기본 설정 대화 상자의 도구 선택사항 페이지에 있는 "기본 임계값" 에서 설정할 수 있습니다. 이 값을 조절함으로써 마법 지팡이 도구의 영향 범위를 바꿀 수 있습니다.
There are different possibilities to activate the tool:
-
From the main menu: → → .
-
By clicking the tool icon
 in the Toolbox.
-
By pressing the U keyboard shortcut.
연속적인 선택 도구에는 특별한 동작 변경 키가 없습니다. 다만 모든 도구에 영향을 주는 동작 변경 키만 사용할 수 있습니다. 이에 대한 자세한 내용은 선택 도구 섹션에 있습니다.

It starts selecting when you click at a spot in the image, and expands outwards like water flooding low-lying areas, selecting contiguous pixels whose colors are similar to the starting pixel. You can control the threshold of similarity by dragging the mouse downward or to the right: the farther you drag it, the larger you get the selected region. And you can reduce the selection by dragging upwards or to the left.
You can move the selection outline using Alt + arrow keys.
Normally, tool options are displayed in a window attached under the Toolbox as soon as you activate a tool. If they are not, you can access them from the main menu through → → which opens the option window of the selected tool. The available tool options can also be accessed by double clicking the corresponding tool icon in the Toolbox.
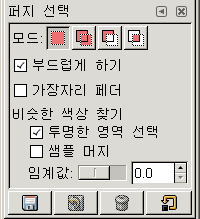
- 모드, 안티앨리어싱(Antialiasing), Feather edges
-
![[참고]](images/note.png)
참고 See Selection Tools Options for help with options that are common to all these tools. Only options that are specific to this tool are explained here.
- Finding Similar Colors
-
These options affect the way Fuzzy Select expands the selection out from the initial point.
- 투명한 영역 선택
-
This option gives Fuzzy Select the ability to select areas that are completely transparent. If this option is not checked, transparent areas will never be included in the selection.
- 표본 합치기
-
If you enable this option, sampling is not calculated only from the values of the active layer, but from all visible layers.
For more information, see the Glossary entry.
- Diagonal Neighbors
-
When activated, the tool considers diagonally neighboring pixels as connected when calculating the affected area. In other words, instead of looking at the four orthogonal neighbors of each pixel, it looks at all eight pixels
그림 14.20. Example for Diagonal Neighbors
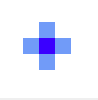
A pixel with 4 orthogonal neighbors
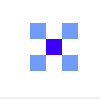
A pixel with 4 diagonal neighbors

A pixel with 8 neighbors
그림 14.21. Example for Diagonal Neighbors option applied
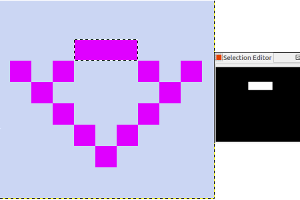
Diagonal Neighbors option unchecked
Diagonal Neighbors option checked
- 임계값
-
이 조절바는 처음 지점을 기준으로 선택할 색상의 범위를 결정하는 바입니다. 높은 값일수록 넓은 범위를 선택하게 되며, 마우스를 클릭한 뒤 드래그를 통해 값을 변경할 수 있습니다. 아래쪽이나 오른쪽으로 드래그하면 값이 증가하고 위쪽이나 왼쪽으로 드래그하면 값이 감소합니다. 따라서 원래의 임계값에 관계없이 드래그로 그때그때 원하는 만큼의 값을 설정해 사용할 수 있습니다.
- Select by
-
This option determines which component of the image GIMP uses to calculate the similarity in color.
You can choose from , , , , , , . , , , and .
- Draw Mask
-
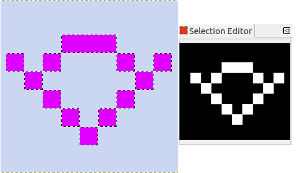
This option can help to visualize the selection. Selected areas marked with marching ants may not be evident when selecting with Fuzzy Select. If this option is checked, selected areas will be filled with a magenta color as long as you keep pressing on the left mouse button, and this mask will disappear as soon as you release this button.
그림 14.22. Example for Draw mask option applied

Fuzzy Select used with Draw Mask option unchecked
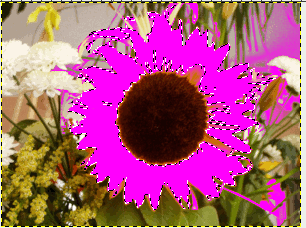
Fuzzy Select used with Draw Mask option checked, left mouse button not released yet.


