Tryllestaven vert brukt for å velja ut samanhengande område i det gjeldande laget eller biletet med meir eller mindre same farge.
Når du nyttar dette verktøyet, er det svært viktig å velja det rette startpunktet. Vel du feil, kan resultatet verta nokså langt frå det du hadde venta deg.
Tryllestaven er eit godt verktøy for å velja ut område med skarpe, markerte kantar. I tillegg er det morosamt å bruka, så nybyrjarane likar ofte dette verktøyet svært godt. Etter kvart vert kanskje gleda bytt ut med frustrasjon over at du ikkje greier å gjera nøyaktig det utvalet du ønskjer. Meir frustrerande er det kanskje likevel at etter at du har sleppt museknappen, kan du ikkje gjera endringar i utvalet. Er du misnøgd, må du gjera alt om igjen. Etter kvart vil du kanskje finna ut at verktøya for bane og vel etter farge er vel så nyttige. Du bør likevel ikkje avskriva tryllestaven. Han er fin til å velja ut eit område innføre eit omriss, og for å retta opp unøyaktige markeringar. Vidare er han ofte svært nyttig for å velja einsfarga eller nær einsfarga bakgrunnar eller større fargeflater.
Legg merke til at det valde området forplantar seg utover frå sentrum. Det spreier seg ikkje berre til nærliggande fargepunkt, men kan også gjera små hopp. Kor lange desse hoppa kan vera, bestemmer du i verktøyinnstillingane under i brukarinnstillingane. Ved å auka eller minska «terskelverdien» i avsnittet «vel samanhengande område» kan du gjera tryllestaven meir eller mindre aggressiv. Ver berre klar over at dette også påverkar fylle- og blande-verktøya.
Du kan slå på verktøyet på mange måtar:
-
Frå hovudmenyen via → → .
-
Ved å klikka på verktøysymbolet
 i verktøykassen.
 -
Ved å bruka snarvegen U.
Dette verktøyet har ingen spesielle innstillingar for valtastane utover dei som er omtalte under felles valtaster.
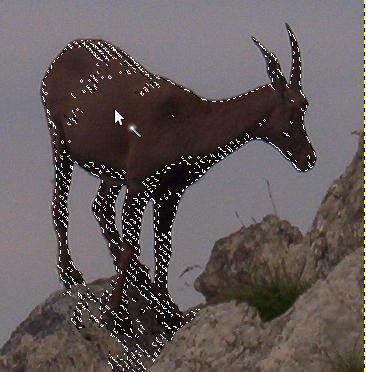
Tryllestaven byrjar å velja ved at du klikkar på eit fargepunkt i biletet. Du vil då sjå korleis markeringa flyt utover som vatn over eit flatt lende etter kvart som punkta med liknande farge som startpunktet vert markerte. Du kan kontrollera kor like fargane må vera for å verta tekne med i utvalet ved å flytta musepeikaren nedover eller mot høgre. Dess lenger du flyttar peikaren, dess større område. Flytter du peikaren oppover eller mot venstre, vert området redusert.
Du kan flytta omrisset av utvalet med tastekombinasjonen Alt + piltast.
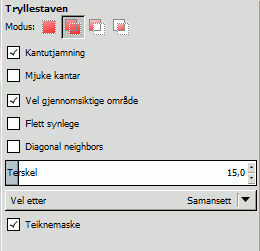
Normalt vert innstillingane for det valde verktøyet vist under verktøykassa så snart som du slår på verktøyet. Dersom dette ikkje er tilfelle, kan du få tilgang til dei frå biletmenyen via → → som vil opna verktøyinnstillingane for det valde verktøyet. Du kan også opna verktøyinnstillingane ved å dobbeltklikka på det tilsvarande verktøyikonet i verktøykassen.
- Modus, Kantutjamning, Mjuke kantar
-
![[Notat]](images/note.png)
Notat Mange av innstillingane er felles for alle utvalsverktøya og er nærare omtalte i Innstillingar for utvalsverktøy. Berre innstillingar som er spesifikke for dette verktøyet er omtalte her.
- Finn liknande fargar
-
Dette er innstillingar som påverkar måten tryllestaven utvidar seg på ut frå det valde startpunktet.
- Vel gjennomsiktige område
-
Dersom denne er avmerkt, kan tryllestaven markera også fullstendig gjennomsiktige område. Elles vert ikkje gjennomsiktige område tekne med i utvalet.
- Flett synlege
-
Viss du slår på dette valet, vert prøvene ikkje berre rekna ut på grunnlag av verdiane i det gjeldande laget, men frå alle synlege laga.
Du kan finna meir om dette i ordforklaringar.
- Diagonale naboar
-
Når dette valet er slått på vil verktøyet bruka også diagonale nabopikslar ved utrekninga av effekten. Altså at i staden for å bruka dei fire ortogonale (rettvinkla) pikslane vert alle åtte pikslane rundt kvar piksel brukt
Figur 14.20. Eksempel på diagonale naboar
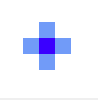
Ein piksel med fire ortogonale naboar
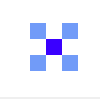
Ein piksel med fire diagonale naboar

Ein piksel med åtte naboar
Figur 14.21. Eksempel der diagonale naboar er brukt
Diagonale naboar ikkje brukt
Diagonale naboar brukt
- Terskel
-
Denne glidebrytaren bestemmer kor like fargane må vera fargen i du byrja med. Dess høgare verdi, dess større område vert markert. Dersom du etter det første knappetrykket drar peikaren nedover eller til høgre, vert området større. Drar du peikaren oppover eller til venstre, vert området mindre. Du har såleis eigentleg ikkje bruk for denne brytaren til anna enn eventuelt å minska avstanden du må flytta peikaren.
- Vel etter
-
Dette valet bestemma kva biletkomponentar GIMP skal bruka for å rekna ut fargelikskapen.
Du kan velja mellom , , , , , , . , , og .
- Teikna maske
-
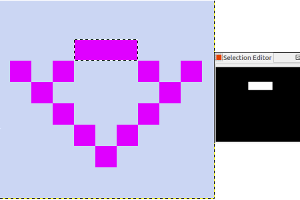
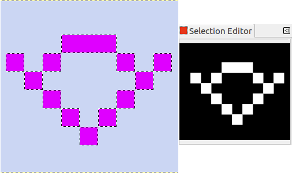
Du kan bruka dette alternativet for å visualisera utvalet. Utvalde område merkt med marsjerande maur er kanskje ikkje tydelege når du vel med tryllestaven. Viss dette alternativet er merkt av, vert dei valde områda fylte med ein magentafarge så lenge du held nede den venstre museknappen. Denne maska vil forsvinna når du slepp denne knappen.
Figur 14.22. Eksempel der teiknemaske er brukt
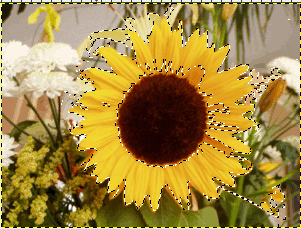
Tryllestaven brukt utan teiknemaska
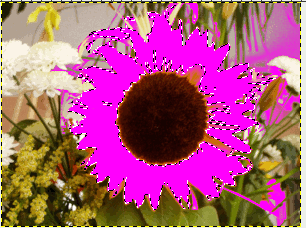
Tryllestaven brukt med teiknemaska og museknappen nede.


