Следующий диалог позволяет управлять и манипулировать такими структурами изображения, как слои, каналы и контуры.
Диалог «Слои» является главным интерфейсом для редактирования, изменения и управлениями слоями.
Этот диалог можно прикрепить на панель. Более подробно об этом написано в разделе Раздел 2.3, «Диалоговые окна и стыкуемые панели».
Его можно открыть следующими способами:
-
через главное меню: → → ;
-
через меню вкладок любого стыкуемого диалога, нажав кнопку меню вкладок
 и выбрав → ;
 -
при помощи клавиши быстрого доступа (по умолчанию): Ctrl+L.
В меню есть список откреплённых окон, который существует только пока открыт хотя бы один диалог. В этом случае диалог «Слои» можно вызвать из главного меню: → .
- Общая информация
-
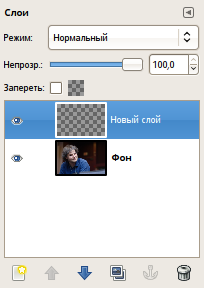
Каждый слой появляется в диалоге в виде миниатюрного изображения. Когда изображение содержит несколько слоёв, они появляются в виде списка. Верхний слой в списке является первым видимым, а самый нижний — последним видимым, то есть фоновым. Над списком можно увидеть характеристики каждого слоя. Под списком находятся кнопки управления списком слоёв. При нажатии правой кнопкой мыши на миниатюре слоя вызывается контекстное меню слоя.
- Выбор нескольких слоёв
-
GIMP позволяет выбирать несколько слоёв и выполнять с ними действия. Например, можно переместить их в другое место в стопке слоёв, изменить масштаб и т. д. Выбор нескольких слоёв осуществляется с помощью мыши и клавиши Shift, чтобы добавить диапазон слоёв, или Ctrl, чтобы добавить или удалить выбранный слой.
Помните, что некоторые действия можно выполнять только с одним слоем. Если вы попытаетесь использовать такое действие, например, кисть, появится предупреждение о том, что этого делать нельзя и что необходимо выбрать отдельный слой.
- Заголовок списка слоёв
-
Непосредственно над списком слоёв находится строка заголовка. Слева расположены три значка которые показывают, какой столбец используется для видимости, блокировки и эффектов слоя. Посередине находится текстовая надпись, указывающая, сколько слоёв выбрано в данный момент, если их больше одного. Справа находится значок поиска. Щелчок по этой части откроет диалог поиска, в котором можно искать слои.
-
 Искомые слои и сохранённые поиски
-
Поиск слоёв может быть полезен, если в вашем проекте много слоёв. Как только вы начнёте вводить текст в строке поиска, начнётся поиск слоёв, которые соответствуют вашему запросу, и они будут выбраны. Будет выбрано несколько слоёв, если они все подходят.
Под строкой поиска вы увидите значок плюса. Нажав на него, вы можете добавить текущий поиск в качестве нового именованного набора. Этот поиск, а также ранее заданные, будут отображаться под строкой поиска. Щелчок по одному из этих сохранённых поисков выделит все слои, соответствующие запросу.Каждый сохранённый поиск имеет значок закрытия в правом углу, который можно использовать для удаления сохранённого поиска.
-
- Атрибуты слоя
-
Каждый слой отображается в списке вместе с его атрибутами:
-
 Видимость слоя
-
Щелчок на этом значке переключает видимость слоя. (Щелчок на значке при нажатой Shift показывает или скрывает все остальные слои того же уровня. Щелчок на значке при нажатой Alt показывает или скрывает все остальные выбранные слои на том же уровне.)
-
 Сохранять прозрачность
-
При нажатии на пустой флажок в столбце запрета изменений слоя открывается меню со следующими опциями. (Shift + щелчок на значке приводит к запрету или разрешению изменений других слоёв того же уровня. Alt + щелчок на значке приводит к запрету или разрешению изменений других выбранных слоёв на том же уровне).
-
 Запретить изменения пикселей
-
Если эта кнопка-переключатель включена, вы не можете использовать ни один инструмент на основе кисти (Кисть, Карандаш, Ластик и т. д.), Аэрограф или Перо на текущем выбранном слое. Это позволяет защитить их от нежелательных изменений.
-
 Запретить изменение положения и размера
-
Эта кнопка-переключатель включает или отключает защиту слоёв от их перемещения или трансформации. Если включено, то вы не сможете использовать инструмент трансформации (Вращение, Наклон, Перспектива и другие) или перемещать слои.
-
 Запретить изменение видимости
-
Эта кнопка-переключатель управляет параметром «Запретить изменения» для видимости слоя. Если включено, видимость слоя не может быть изменена, пока вы не отключите запрет на изменения.
-
 Запретить изменения альфа-канала
-
Эта кнопка-переключатель управляет параметром «Сохранять прозрачность» для прозрачности слоя. Если включено, альфа-канал для слоя блокируется, и никакие манипуляции не влияют на него. В частности, никакие действия с прозрачной частью слоя не будут иметь эффекта.
Рисунок 15.2. Пример запрета изменений альфа-канала

В активном слое находятся три горизонтальные непрозрачные полосы на прозрачном фоне. Рисуем красную вертикальную полосу. Параметр «Сохранять прозрачность» не выбран: непрозрачные и прозрачные области активного слоя закрашены красным.

Параметр «Сохранять прозрачность» выбран: только непрозрачные области закрашены красным. Прозрачные области сохранены.
![[Подсказка]](images/tip.png)
Подсказка Если название слоя выделено жирным шрифтом, у этого слоя нет альфа-канала.
-
-
 Эффекты слоя
-
Если этот значок виден, значит, для этого слоя доступны эффекты. Если щёлкнуть по нему, откроется диалоговое окно, содержащее список всех эффектов, добавленных к этому слою. Для каждого эффекта можно изменить видимость, порядок эффектов, объединить все эффекты со слоем или удалить их.
Эффекты слоя — это фильтры, которые изменяют слой недеструктивно, то есть их можно добавлять, удалять и изменять, не изменяя сам слой. Вместо этого они добавляют эффекты поверх слоя.
See Using Layer Effects for more details.
Многие фильтры GEGL в меню «Цвета» и «Фильтры» могут быть использованы таким образом. Диалоговое окно эффектов слоя состоит из следующих частей:
- Список эффектов слоя
-
В верхней части находится список всех эффектов, которые были добавлены к этому слою. Обратите внимание, что эффекты применяются поверх слоя, начиная с эффекта в нижней части списка.
Слева от каждого эффекта находится значок глаза; его можно нажать, чтобы скрыть или показать конкретный эффект. Рядом с ним находится значок эффекта «Фильтр».
- Кнопки
-
Панель кнопок внизу предлагает следующие функции:
-
Видимость эффектов слоя
-
Эта кнопка-переключатель управляет настройками «видимости» для всех эффектов слоя. По умолчанию все эффекты видны. Нажатие этой кнопки скрывает эффекты, позволяя увидеть реальное пиксельное содержимое слоя.
-
 Изменить выбранный фильтр
-
Эта кнопка позволяет открыть диалог выбранного эффекта слоя, чтобы внести изменения в его настройки. Также можно дважды щёлкнуть на эффекте слоя в списке, чтобы открыть диалог.
-
 Переместить эффект слоя вверх
-
Здесь вы можете переместить эффект слоя вверх по списку.
-
 Переместить эффект слоя вниз
-
Здесь вы можете переместить эффект слоя вниз по списку.
-
 Объединить все активные фильтры
-
Эта кнопка позволяет объединить все активные (видимые) эффекты слоя с содержимым слоя. При этом эффекты удаляются из слоя после того как они были применены к слою.
-
 Удалить выбранный фильтр
-
Эта кнопка удаляет выбранный эффект слоя.
-
- Миниатюра слоя
-
Содержимое слоя представлено миниатюрой. Удерживая ЛКМ в течение одной секунды на этой миниатюре увеличивает миниатюру в размерах. Цвет границы слоя зависит от того, является он активным или неактивным.
- Имя слоя
-
Вы можете изменить имя слоя, дважды щёлкнув по нему. Также можно использовать диалог Изменить атрибуты слоя в контекстном меню, которое появляется при щелчке правой кнопкой мыши по слою.
![[Примечание]](images/note.png)
Примечание При работе над анимацией имя слоя можно использовать для указания определённых параметров. Подробнее см. в разделе экспорт анимации.
-
- Характеристики слоёв
-
Над списком слоёв можно задать некоторые свойства для выбранных слоёв. Выбранные слои подсвечиваются. Свойства:
- Режим
-
Режим слоя определяет способ взаимодействия активного слоя с другими слоями. Через ниспадающий список можно выбрать любой из доступных в GIMP режимов. Подробнее о каждом из режимов можно прочитать в Раздел 2, «Режимы слоёв».
- Непрозрачность
-
Перемещая ползунок, вы увеличиваете или уменьшаете непрозрачность слоя. Когда значение непрозрачности равно 0, слой является прозрачным и абсолютно невидимым. Не путайте это с маской слоя, которая устанавливает прозрачность поточечно.
- Управление слоями
-
Под списком слоёв находятся несколько кнопок, при помощи которых осуществляются основные операции со списком слоёв.
-
 Создать новый слой
-
Здесь можно создать новый слой. Будет открыт диалог, описываемый в разделе Создать слой.
Нажмите Shift для создания нового слоя с последними использованными ранее параметрами.
-
 Создать новую группу слоёв
-
Здесь можно создать новую группу слоёв. Будет создан новый слой, в котором можно разместить другие слои.
Группы слоёв описываются в разделе Группы слоёв.
-
Поднять слой
-
С помощью этой функции можно поднять активный слой на один уровень выше в списке. Если при этом удерживать нажатой клавишу Shift, слой станет самым верхним.
-
Опустить слой
-
С помощью этой функции можно опустить активный слой на один уровень ниже в списке. Если при этом удерживать нажатой клавишу Shift, слой окажется в самом низу.
Подсказка Для того, чтобы переместить самый нижний слой, к фоновому слою сначала может понадобиться добавить прозрачный слой (также называемый альфа-каналом). Чтобы сделать это, щёлкните правой кнопкой мыши по фоновому слою и выберите в появившемся меню Добавить альфа-канал.
-
 Создать копии слоёв
-
Здесь можно создать копию выбранных слоёв. К имени нового слоя добавляется «копия».
-
Объединить слои
 Прикрепить плавающее выделение
-
Кнопка видна только в том случае, если присутствует плавающее выделение. Она прикрепляет плавающее выделение к предыдущему активному слою.
При отсутствии плавающего выделения отображается значок
с несколькими возможностями: -
Объединить эти слои с первым видимым слоем ниже.
-
Нажатие клавиши Shift объединяет слои группы слоёв в один обычный слой.
-
Нажатие Ctrl объединяет все видимые слои в один слой.
-
Нажатие Shift+Ctrl: объединяет все видимые слои с последними использованными значениями.
-
-
 Добавить маски к слоям
-
Добавить маски к выбранным слоям.
-
Удалить слои
-
С помощью этой функции вы можете удалить выделенные слои.
-
- Дополнительные функции
-
Другие функции, касающиеся размера слоя, доступны в контекстном меню слоя, которое вызывается щелчком правой кнопкой мыши по диалогу слоёв. Также их можно найти в подменю главного меню.
Вы найдёте функции объединения слоёв в меню «Изображение».
- Перемещение слоёв
-
Нажмите и потяните миниатюрное изображение слоя: оно увеличится и его можно будет перемещать с помощью мыши. Также возможны выбор и перемещение нескольких слоёв.
-
Таким образом слои можно менять местами в списке.
-
Кроме того, если переместить слой на панель инструментов, то будет создано новое изображение, состоящее только из этого слоя. Это не работает с несколькими выбранными слоями.
-
Наконец, вы можете переместить слой в другое изображение: он будет добавлен и станет самым верхним в стопке.
-
Если щёлкнуть правой кнопкой мыши в диалоговом окне «Слои» или открыть меню из меню вкладок, откроется контекстное меню для диалога «Слои».
Большинство команд этого меню уже описано выше или в других местах:
- Изменить атрибуты слоя…
-
За исключением параметров Ширина, Высота и Заливка, этот диалог такой же, как и диалог Создать слой. Для получения информации об атрибутах слоя мы обращаемся к документации по этому диалогу.
- Подменю «Пространство смешивания»
-
См. Пространство смешивания в диалоге создания слоя.
- Подменю «Пространство совмещения»
-
См. Пространство совмещения в диалоге создания слоя.
- Подменю «Режим совмещения»
-
См. Режим совмещения в диалоге создания слоя.
- Подменю «Цветовые метки»
-
См. документацию Цветовая метка в диалоге создания слоя.
- Создать слой…, Создать группу слоёв, Создать копии слоёв, Объединить с предыдущим, Прикрепить слой, Удалить слои
-
Эти команды рассмотрены выше, см. характеристики слоя.
- Создать из видимого
-
См. документацию по команде меню Создать из видимого.
- Размер границы слоя…
-
См. документацию по команде меню Размер границы слоя….
- Слои к размеру изображения
-
См. документацию по команде меню Слои к размеру изображения.
- Масштаб слоя…
-
См. документацию по команде меню Масштаб слоя….
- Добавить маски слоя…, Применить маски слоя…, Удалить маски слоя, Показать маски слоя, Изменить маску слоя, Отключить маски слоя, Маски в выделение
-
Для дополнительной информации об этих командах см. документацию по подменю «Маска слоя».
- Добавить альфа-канал, Удалить альфа-канал
-
Только один из них будет включён. Если у текущего слоя нет альфа-канала, вы сможете его добавить. Если есть, можно его удалить.
- Альфа в выделение
-
См. документацию по команде меню Альфа в выделение.
- Объединить видимые слои
-
Эта команда объединяет все видимые слои в один слой.
- Свести изображение
-
Эта команда объединяет все слои в один и удаляет прозрачность.
- Общая информация
-
К любому слою может быть добавлена маска прозрачности, которая определяет, какие части слоя будут прозрачными или непрозрачными. Такая маска называется маской слоя. У маски слоя тот же размер и то же число пикселей, что и у слоя, к которому она добавляется. Каждый пиксель маски становится парой для пикселя слоя, имеющего те же координаты. Маской является набор пикселей в оттенках серого. Пиксели со значением 0 являются чёрными и обеспечивают парному пикселю слоя полную прозрачность. Пиксели с максимальным значением (1,0 или 255) являются белыми и обеспечивают парному пикселю слоя полную непрозрачность.
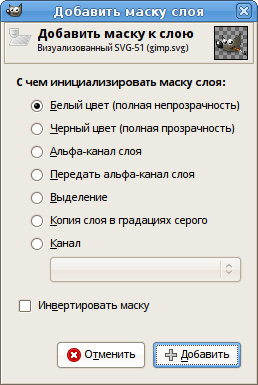
Чтобы создать маску слоя, щёлкните правой кнопкой мыши по слою, чтобы вызвать контекстное меню и выберите в нём пункт . Появится диалоговое окно, в котором можно задать содержимое маски:
-
Белый цвет (полная непрозрачность): в диалоге слоёв маска — белая. Все пиксели слоя видимы в изображении, поскольку рисование белым на маске делает точки пиксели видимыми. При рисовании чёрным пиксели слоя становятся прозрачными.
-
Чёрный цвет (полная прозрачность): в диалоге слоёв маска — чёрная. Весь слой полностью прозрачен, поскольку рисование чёрным по маске делает пиксели слоя невидимыми. Рисование белым удалит маску и сделает пиксели слоя видимыми.
-
Альфа-канал слоя: маска создаётся согласно содержимому альфа-канала.
-
Передать альфа-канал слоя: действует аналогично предыдущему параметру, за исключением того, что этот параметр сбрасывает альфа-канал слоя в полную непрозрачность.
-
Выделение: маска создаётся в соответствии со значениями пикселей, найденных в выделении.
-
Копия слоя в градациях серого: маска создаётся в соответствии с представлением в градациях серого значений пикселей слоя.
-
Канал: маска слоя создаётся из маски выделения, созданной ранее и сохранённой в диалоге каналов.
-
Инвертировать маску: при выборе этого параметра чёрный становится белым, а белый — чёрным.
Когда маска создана, она появляется в виде миниатюры рядом с миниатюрой самого слоя. Вы можете выбрать слой или маску для редактирования, щёлкнув на соответствующих миниатюрах. Активный элемент имеет белую рамку (которая может быть плохо видна при использовании белой маски).
При работе с масками вы должны видеть диалог слоёв, поскольку, глядя на холст, вы не сможете понять, активен ли слой или маска.
Нажатие клавиши Alt (или Ctrl+Alt и щелчок мышкой по миниатюре маски слоя) равносильно команде Показать маску слоя: при этом край маски слоя становится зелёным. При нажатии клавиши Ctrl край становится красным и результат равносилен команде Отключить маску слоя. Чтобы вернуться к обычному виду, повторите последнюю операцию. Эти параметры служат для большего удобства при работе.
-
- Пример маски слоя
-
Рисунок 15.4. Слой с маской слоя

Original image.

This image has a background layer with a flower and another blue layer, fully opaque. A white layer mask has been added to the blue layer. The blue layer remains visible because a white mask makes layer pixels visible.
Рисунок 15.5. Рисование на маске слоя

Foreground color set to black; Resulting image.

The layer mask is active. Painting with black makes the layer transparent: the underlying layer becomes visible.


