Чтобы использовать эти инструменты, выберите пункт главного меню → .
Диалог инструмента «Преобразование» содержит инструменты для изменения представления изображения или представления элемента изображения, выделения, слоя или контура. Каждый инструмент преобразования имеет диалог общих параметров и информационный диалог для указания специфических параметров.
Эта категория включает следующие инструменты:
Некоторые параметры являются общими для всех инструментов преобразования; они описаны в этой главе. Параметры, свойственные для отдельных инструментов, описаны в соответствующих главах для этих инструментов.
- Преобразование
-
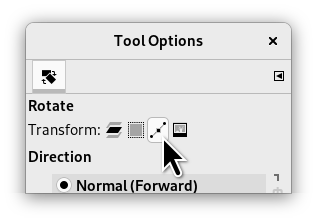
В панели параметров инструментов преобразования GIMP находятся четыре кнопки, переключающие тип объекта, с которым работает активный инструмент преобразования.
![[Примечание]](images/note.png)
Примечание Параметр преобразования для инструмента сохраняется после смены инструментов.
-
Слой
-
При выборе первой кнопки инструмент работает с активным слоем. Если в слое нет выделения, будет преобразован весь слой.
-
Выделение
-
При выборе второй кнопки инструмент работает только с выделением (или всем слоем, если нет выделения).
-
Контур
-
При выборе третьей кнопки инструмент работает только с контурами.
-
Изображение
-
При выборе четвёртой кнопки преобразование применяется ко всем слоям.
Рисунок 14.86. Пример вращения
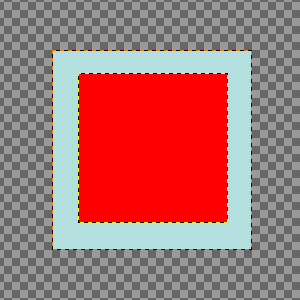
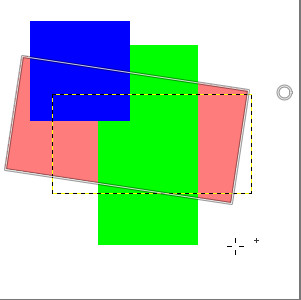
Два слоя, один из которых красный и меньшего размера. Флажок → установлен.
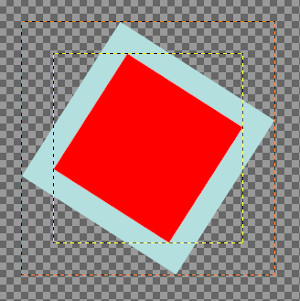
С нажатой четвёртой кнопкой применён инструмент «Вращение». Обратите внимание на адаптацию размеров слоёв.
-
- Направление
-
Этот параметр определяет, в какую сторону или в каком направлении изменяется слой:
Режим «Обычное (вперёд)» позволяет трансформировать изображение или слой совершенно предсказуемым образом. Нужно всего лишь перемещать ручки инструмента на холсте. При использовании сетки (см. ниже) изображение или слой будут изменены по форме и расположению сетки.
«Корректирующее (назад)» разворачивает направление. Используется преимущественно с инструментом вращения для выравнивания горизонта. См. Раздел 4.5, «Вращение».
При использовании инструментов «Вращение», «Масштаб», «Перспектива», «Трансформации» и «Преобразование по точкам» эти два параметра можно связать, что даёт возможность перемещения рычагов, не влияющего на трансформацию, и ручной перенастройки их местоположения.
- Интерполяция
-
Этот выпадающий список позволяет выбрать метод преобразования. Выбранный метод влияет на скорость и качество, хотя это также зависит от изображения и типа преобразования, который будет лучше всего работать в каждом случае.
- Нет
-
Цвет каждого пикселя копируется из ближайшег соседнего пикселя исходного изображения. Этот метод часто дает грубый результат (так называемый эффект лесенки), но является самым быстрым. Иногда метод также называют «ближайшим соседом».
- Линейная
-
Цвет каждого пикселя рассчитывается как среднее арифметическое четырёх ближайших пикселей исходного изображения. Результат такой интерполяции удовлетворителен и является хорошим компромиссом между скоростью и качеством. Иногда этот метод называют «билинейным».
- Кубическая
-
Цвет каждого пикселя рассчитывается как средний цвет восьми ближайших пикселей исходного изображения. Обычно это даёт хорошие результаты, но, естественно, занимает больше времени. Иногда этот метод называют «бикубическим».
- Слабое гало, Без гало
-
Эти методы обеспечивают высококачественную интерполяцию. Используйте метод Без гало, когда вы уменьшаете изображение до менее чем половины исходного размера, и Слабое гало, когда вы уменьшаете размер незначительно (вращение, наклон).
Гало — это непреднамеренное искажение, которое может возникнуть при интерполяции. Оно напоминает гало, которое может получиться при использовании Раздел 4.8, «Повысить резкость (нерезкая маска)». Вот что пишет Николя Робиду (Nicolas Robidoux), создатель новых качественных семплеров для GEGL and GIMP:
«Если появление гало не является проблемой в конкретных сценариях использования и рабочих ситуациях,
то какое решение из двух лучше попробовать сначала?
(Понятно, что если гало нужно уменьшить до минимума, то вашим выбором будет «Без гало»).
При уменьшении размера изображения «Слабое гало» обычно даёт лучший результат.
Если выполняемое преобразование не является чистым уменьшением, то есть, если, например,
выполняется увеличение, вращение или применение перспективы, которое сохраняет высокое разрешение
участков изображения, то я обычно предпочитаю «Без гало».
Но эти предпочтения меняются в зависимости от содержимого изображения. Если, например, изображение
содержит текст или текстоподобные объекты, или в изображении есть большие области с незначительным
числом разных цветов, например, старая добрая пиксельная графика, то я бы переключился на «Слабое гало».
То же самое и в случае, если в изображении много шума или оно сильно загрязнено искажениями, возникшими
при сжатии (а это подавляющее большинство JPEG в Интернете).
И наоборот, если в изображении нет шума и оно очень слабо размыто (то есть при выборе пикселей линии и
интерфейсы размазаны на два или более пикселя), и присутствуют тонкие оттенки телесных цветов, которые
нужно сохранить, то я бы сначала попробовал «Без гало».
По факту, если я вижу, что после трансформации с применением «Слабого гало» цвета были плохо
сохранены, то я сразу переключаюсь на «Без гало», даже при уменьшении.
В любом случае, эти рекомендации нельзя воспринимать как догму. Мне ещё очень многому нужно научиться и
многое понять. Например, что делать с прозрачностью и различными цветовыми пространствами — это я
скорее всего буду обдумывать ещё какое-то время.»
![[Примечание]](images/note.png)
Примечание Вы можете указать используемый по умолчанию метод интерполяции в диалоге настройки программы на вкладке Параметры инструментов.
- Обрезка
-
После преобразования размер изображения может увеличиться. Эта функция позволяет тем или иным способом обрезать преобразованное изображение до исходного размера.
Вы можете выбрать один из способов обрезки:
- С полями
-
Рисунок 14.87. Пример изменения исходного изображения

Исходное изображение
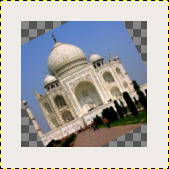
Вращение и обрезка с полями
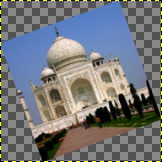
Вращение и обрезка с полями, холст подогнан до размеров слоя
С полями: слой расширяется до включения повёрнутого слоя целиком. Край нового слоя видим; весь слой становится видимым при помощи команды → .
- Без полей
-
Без полей: удаляется всё за пределами изображения.
- В прямоугольник
-
Рисунок 14.89. Пример обрезки в прямоугольник
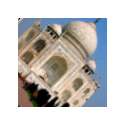
Вращение на 45° с обрезкой в прямоугольник
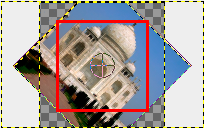
Предел обрезки помечен красным. Прозрачные области не включены.
Если выбран этот способ обрезки, изображение обрезается так, что все полупрозрачные области, появившиеся в результате трансформации, не включаются в конечное изображение.
- Пропорциональная
-
Рисунок 14.90. Пример пропорциональной обрезки
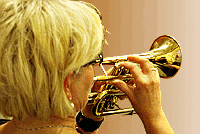
Исходное изображение
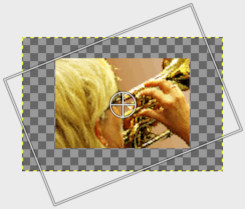
Вращение -22°
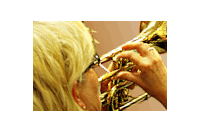
Повёрнутое изображение
Этот вариант обрезки работает так же как и предыдущий, но сохраняет исходное соотношение сторон изображения.
- Показывать предпросмотр
-
Если этот параметр отмечен (по умолчанию он отмечен), то трансформируемое изображение будет видно поверх исходного изображения или слоя. Также будет присутствовать ползунок, с помощью которого можно выбрать прозрачность предварительного просмотра.
- Комбинированный предварительный просмотр
-
Вдохновлено https://librearts.org/2020/02/gimp-2-10-18-full-review
Показывать предварительный просмотр как часть композиции изображения: если у вас несколько слоёв, каждый с собственным режимом смешения и непрозрачностью, их преобразование будет означать, что он окажется поверх каждого второго слоя. Поэтому в сложной композиции слоёв невозможно выровнять этот слой относительно других слоёв без множества попыток и ошибок.
Параметр «Комбинированный предварительный просмотр» устраняет эту проблему в пользу отображения преобразованного слоя точно там, где он находится в стопке слоёв, с точно выбранной непрозрачностью и режимом смешения.

Original image with four layers.

The red layer opacity is 80%.
Рисунок 14.91. Пример комбинированного предварительного просмотра
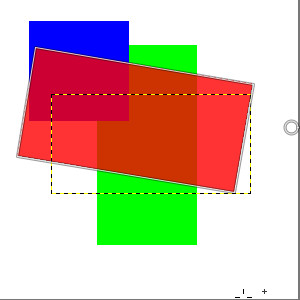
Параметр комбинированного предпросмотра отключён: в предварительном просмотре красный слой находится выше всех остальных слоёв.
Параметр комбинированного предпросмотра включён: в предварительном просмотре красный слой находится на своём месте, как в стопке слоёв.
Доступен один подпараметр:
-
Синхронный предварительный просмотр: этот параметр является экспериментальным. Идея заключается в том, чтобы визуализировать предварительный просмотр сразу же после изменения преобразования. Таким образом, вместо того, чтобы ждать, пока мышь перестанет двигаться, результат визуализируется немедленно. Если GIMP может визуализировать всё достаточно быстро, это обеспечит более плавную и мгновенную обратную связь.
Но этот параметр также блокирует всё, пока не будет завершена визуализация предварительного просмотра. Это означает, что GIMP может работать с сильной задержкой, как правило, если слой слишком большой. Поэтому этот параметр отключён по умолчанию.
-
- Направляющие
-
Это выпадающий список, в котором выбирается тип направляющих, подходящих для выполняемого преобразования. Все направляющие используют рамку, чтобы отметить границу изображения, в дополнение к линиям, используемым различными выделениями.
- Без направляющих
-
Направляющие не используются, что следует из названия.
- Линии по центру
-
Используется одна вертикальная и одна горизонтальная линия, которые пересекаются в центре изображения или слоя.
- Правило третей
-
Трансформируемая область разделяется на девять равных частей с помощью добавления двух горизонтальных и двух вертикальных линий на равном расстоянии друг от друга. Согласно этому правилу, наиболее интересные части изображения должны располагаться в точках пересечения.
- Правило пятых долей
-
Аналог «Правила третей», но область делится на пять частей.
- Золотые сечения
-
Также называется «Золотое отношение». Трансформируемая область разделяется на девять частей, согласно математической формуле, где каждая часть пропорциональна другим и трансформируемой области.
- Диагональные линии
-
Трансформируемая область разделяется с помощью диагоналей.
- Число линий
-
Размещает прямоугольную сетку с одинаковым числом вертикальных и горизонтальных линий. Число линий настраивается ползунком, который всплывает при выборе этого типа направляющих.
- Интервал между линиями
-
Размещает прямоугольную сетку в трансформируемой области, используя расстояние между линиями, настроенными с помощью ползунка.
Если по какой-то причине всплывает необходимость преобразования контуров, это можно сделать с помощью инструментов преобразования.
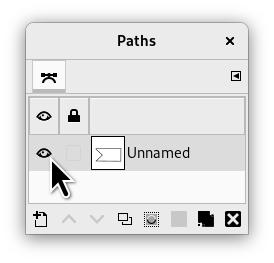
Во время рисования контура перейдите в диалог контуров и нажмите на первое поле перед обрисовкой контура в диалоговом окне, так, чтобы стал виден значок глаза. Затем выберите инструмент преобразования и в верхней части диалога параметров нажмите на значок контура, чтобы дать инструменту знать, что нужно воздействовать на контур.
Выполните преобразование как обычно, и подтвердите его по окончании процесса. Хорошей идеей может быть отметить параметр «Без направляющих», чтобы контур лучше выделялся.
По завершении преобразования выберите инструмент «Контуры» и нажмите на изменённый контур, чтобы снова его активировать для дальнейшей работы с ним.
