To access these tools, select → from the main menu.
Inside the Transformation tool dialog, you will find tools to modify the presentation of the image or the presentation of an element of the image, selection, layer or path. Each transform tool has an Option dialog and an Information dialog to set parameters.
This category includes the following tools:
オプションのいくつかは変形ツールに広く共有されています。 ここではそれらについて説明します。 各ツール固有のオプションについてはそれぞれのツールの節で個別に説明します。
- 変形対象
-
GIMP offers four buttons in the Tool Options which let you select which image element the transform tool will work on.
![[注記]](images/note.png)
注記 The Transform option for a tool persists after changing tools.
-
 レイヤー
レイヤー
-
When you activate the first button, the tool works on the active layer. If no selection exists in this layer, the whole layer will be transformed.
-
 選択
選択
-
When you activate the second button, the tool works on the selection only, or the whole layer if there is no selection.
-
 パス
パス
-
When you activate the third button, the tool works on the active path only.
-
 画像
画像
-
When you activate the fourth button, the transformation is applied to all layers.
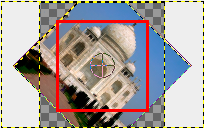
図14.86 Example with Rotate
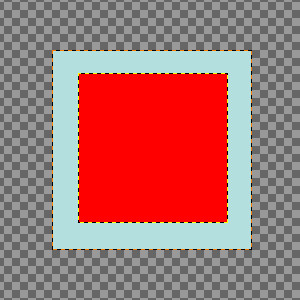
Two layers, the red one being smaller. → option checked.
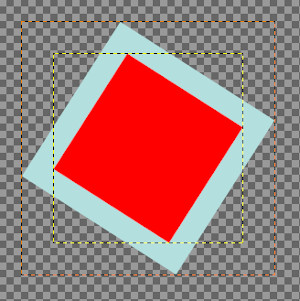
Fourth button pressed, Rotate tool applied. Note the adaptation of layer sizes.
-
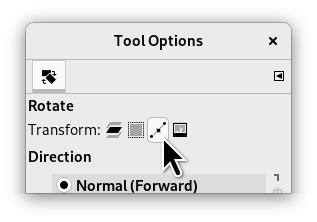
- 方向
-
レイヤーの変形方向を定めたり逆変換を可能にします。
モードは画像やレイヤーを指示したとおり順当に変換します。 変形作業はハンドルを操作して行ないます。 (後述する) 格子線を使うと、 格子で描かれていた位置と形状のとおりに画像もしくはレイヤーが変形されて収まります。
「Corrective (Backward)」 inverts the direction. Primarily used with the Rotation tool to repair digital images that have some geometric errors (a horizon not horizontal, a wall not vertical, etc). See 「回転」.
You can link these two options in Rotate, Scale, Perspective, Unified transform and Handle transform tools. This allows moving handles without affecting the transformation, letting you manually readjust their position.
- 補間アルゴリズム
-
This drop-down list lets you choose the method of the transformation. The chosen method influences the speed and quality, though it also depends on the image and the type of transformation what will work best in each case.
- なし
-
: 各画素の色には元画像で最も近くにある画素の色が使われます。 この方法はしばしばエイリアス化 (境界が「ギザギザ」になること) して画像が粗悪になりますが、 処理時間は最短です。 この方法を「最近傍補間」とも言います。
- 線形
-
各画素の色は元画像において最近傍の 4 つの画素の色を平均したものです。 ほとんどの画像でこの方法は満足のいく仕上がりになりますから、 処理速度と品質の両面に折り合いをつける良い方法です。 この方法を「双線形補間」とも言います。
- キュービック
-
The color of each pixel is computed as the average color of the eight closest pixels in the original image. This usually gives a good result, although there are some cases where it can actually look worse than Linear and it is also slower. Sometimes this method is called 「Bicubic」.
- LoHalo, NoHalo
-
These methods perform a high quality interpolation. Use the NoHalo method when you downscale an image to less than a half of the original size and the LoHalo method when you do not reduce the size much (rotate, shear).
A 「Halo」 is an artifact that can be created by interpolation. It reminds of the halo you can get when using 「Sharpen (Unsharp Mask)」. Here is a note from Nicolas Robidoux, the creator of these quality samplers for GEGL and GIMP:
"If haloing is not an issue with your content and use case,
which of the two should you try first?
(Clearly, if you want to minimize haloing, NoHalo is the
ticket.)
If you are reducing an image, LoHalo is generally better.
If your transformation is not an all around reduction, for
example if you enlarge, rotate or apply a perspective
transformation that keeps portions of the image at the same or
higher resolution, I generally prefer NoHalo. This preference,
however, changes depending on the image content. If, for
example, the image contains text or text-like objects or has
significant areas with only a handful of different colours,
like old school pixel art, I’d switch to LoHalo. Likewise if
the image is quite noisy or marred by compression artifacts
(as are most JPEGs found on the web). Conversely, if the
image is noise free, very slightly blurry (meaning that when
pixel peeking, the lines and interfaces are smeared over two
or more pixels), and there are delicate skin tones to be
preserved, I’d try NoHalo first. Actually, if I find that
colours have not been preserved nicely after transforming an
image with LoHalo, I’d immediately switch to NoHalo, even if
reducing.
In any case, these recommendations should not be taken as
gospel. I still have much to learn and figure out. For
example, how best to deal with transparency and different
colour spaces is something I’m likely to be thinking about
for a while."
注記 You can set the default interpolation method in the Tool Options Preferences.
- クリッピング
-
変形後の画像は大きくなりがちです。 このオプションは元の画像の大きさに合わせて切り揃えるためのものです。
切り抜く方法はいろいろありますので、 次の中から選んでください。
- 自動調整
-
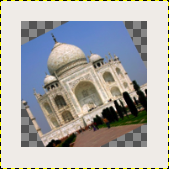
自動調整の場合は、 回転したレイヤー全体を取り込めるようにレイヤーを拡大します。 処理後のレイヤーは[隠れていても]境界部分まで可視ですから、 → とすればレイヤー全体が見えるようにできます (右図)。
- 変換前のレイヤーサイズ
-
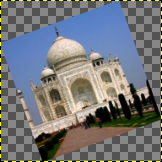
「変換前のレイヤーサイズ」の場合、 はみ出した画像は削除されます。
- 結果で切り抜き
-
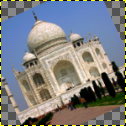
このオプションを選ぶと、 変形操作によって周辺部にできる透明部分が残らないように画像が切り詰められます。
- 縦横比で切り抜き
-
このオプションは上述の「結果で切り抜き」とよく似ていますが、 縦横比が維持されます。
- Show image preview
-
初期設定では有効になっています。 このプレビュー機能は変形の作業中に、 変形画像を元の画像かレイヤーの上に重ねて表示します。 また付属の プレビューの不透明度 スライダーで、 変形途中の画像の可視性を調整して表示を一時的に半透明化し、 元の画像まで見通せるようにできます。
- Composited preview
-
Inspired from https://librearts.org/2020/02/gimp-2-10-18-full-review
Show preview as part of the image composition: when you have multiple layers, each one with its own blending mode and opacity, transforming it means it pops up right above every other layer. So in a complex layers composition you can't align this layer against other layers without much trial and error.
The Composited Preview option removes this problem in favor of rendering the preview of the transformed layer exactly where it is in the layers stack, exactly with the opacity and blending mode of choice.

Original image with four layers.

The red layer opacity is 80%.
図14.91 Composited Preview Example
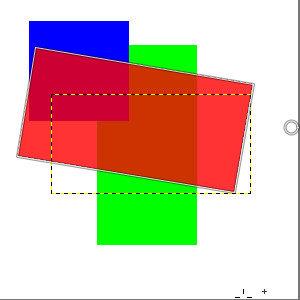
Composited option unchecked: in preview, red layer is above all other layers.
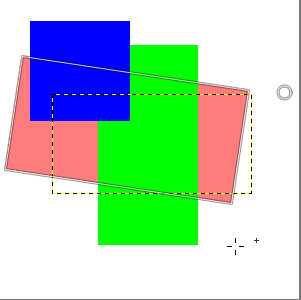
Composited option checked: in preview, red layer is at its right place, like in layer stack.
One sub option is available:
-
Synchronous preview: this option is experimental. The idea is to render the preview as soon as you change the transform. So instead of waiting for the mouse to stop moving, it renders the result immediately. If GIMP can render everything fast enough, this means a much smoother and more instant feedback.
But this option also blocks everything until the preview is done rendering. This means, GIMP can become much less responsive, usually when the layer is very large. That's why this is disabled by default.
-
- ガイド
-
This is a drop-down list where you select the type of guide lines which suits your transforming. All the guides use a frame to mark the image's outline in addition to the lines used by the different selections.
- 表示しない
-
補助線が表示されません。
- センターライン
-
補助線は画像かレイヤーを 2 等分する垂直な線と水平な線が各 1 本づつ、 中心で交差するように表示されます。
- 三分割法
-
補助線は外枠から等間隔に垂直と水平に 2 本づつ、 変形途中の区画をちょうど 9 つに等分するように表示されます。 この構図法に従うときは、 縦横をそれぞれ 3 等分する補助線が交差する 4 つの位置に重点を置くようにしましょう。
- 五分割法
-
しくみは「三分割法」と同じですが、 領域は 5×5 個の区画に等分されます。
- 黄金分割
-
補助線はある数式を利用して変形領域を大小さまざまな 9 つの区画に切り分けており、 各部が相互に均整をとり、 しかも変形後の領域全体に対しても釣り合うような区切りになります。
- 対角線構図
-
補助線は対角線が表示されます。
- グリッド線の数を指定
-
補助線は縦横同じ数に等分割する格子線を表示します。 この形式を選ぶと現れるスライダーにて線の数を指定します。
- グリッド間隔を指定
-
補助線は升目の幅が一定の格子線を変形領域内に表示します。 このオプションを選ぶと現れるスライダーで幅を指定します。


パスをあとで変形することになった場合、 変形ツールも利用できます。

When the path is drawn go to the Paths dialog and click on the first field before the path outline in the dialog window to get the eye icon visible. Then choose the transformation tool and in the upper part of the option dialog click on the path icon to tell the tool to act on the path.
その後は通常どおりに変形を加え、 一段落つくたびに実行します。 ガイドのオプションを「なし」にしておいた方がパスが見えやすくなるので良さそうです。
変形が済んだらパスツールを呼び出してパスをクリックして再び活性化しておきこのあとのパス作業にひきつぎましょう。


