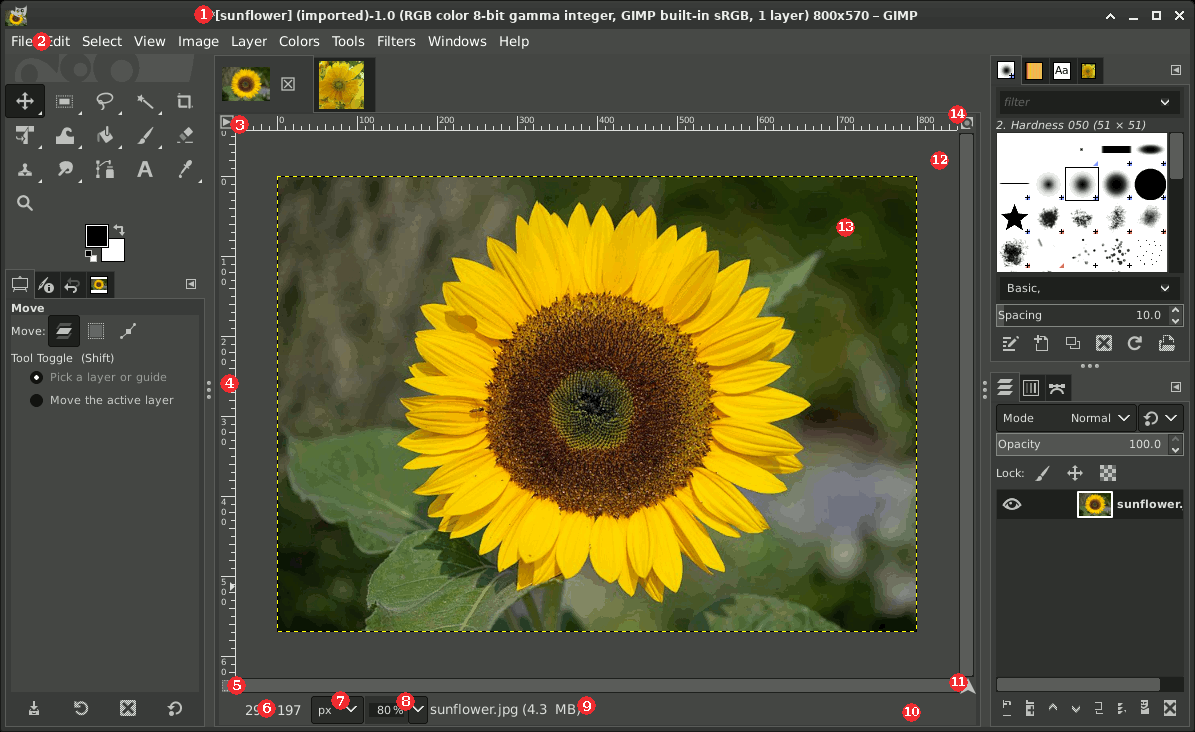
GIMP user interface is available in two modes: single-window mode (default), and multi-windows mode that you can get unchecking the → option.
当你在没有打开任何图像的情况下启动GIMP时,在单窗口模式下图像窗口似乎不存在;而在多窗口模式下,即使没有图像打开,图像窗口也存在。
我们将从对默认情况下出现在普通图像窗口中的组件的简要说明开始。可以使用视图菜单中的命令删除某些组件 。
![[注意]](images/note.png)
|
注意 |
|---|---|
|
尽管单窗口模式,我们将“图像窗口”作为“图像区域”。 |
-
Title Bar: The Title Bar in an image window without an image displays “GNU Image Manipulating Program”. An image window with an image displays the image name and its specifications in the title bar according to the settings in Preferences Dialog. The Title Bar is provided by the operating system, not by GIMP, so its appearance is likely to vary with the operating system, window manager, and/or theme.
如果您打开了一个非 xcf 图像,它会 以 .xcf 文件的形式“(导入)”,并且其原始名称出现在图像窗口底部的状态栏中。
When an image is modified, an asterisk appears in front of its title.
-
Main Menu: Directly below the Title Bar appears the Menu bar (unless it has been suppressed). The Main Menu provides access to nearly every operation you can perform on an image. You can also right-click on an image to display a pop-up menu, [1], or by left-clicking on the little “arrow-head” symbol in the upper left corner, called Menu Button, described just below. Many menu commands are also associated with keyboard shortcuts as shown in the menu. You can define your own custom shortcuts for menu actions in the Keyboard Shortcuts Dialog.
-
Menu Button: Click the Menu Button to display the Main Menu in a column, (essential in full screen mode). If you like to use keyboard shortcuts, use Shift+F10 to open the menu.
-
标尺:在默认布局中,标尺显示在图像的上方和左侧。使用标尺确定图像内的坐标。标尺的默认单位是像素;使用下面描述的设置来使用像素以外的单位。
One of the most important uses of rulers is to create guides. Click and drag a ruler into the image to create a guide. A guide is a line that helps you accurately position things—or verify that another line is truly horizontal or vertical. Using the Move tool, you can click and drag a guide. Drag a guide out of the image to delete it; you can always drag another guide into the image. You can even use multiple guides at the same time.
在标尺区域,鼠标指针位置标有两个垂直和水平方向的小箭头。
-
Quick Mask Toggle: The small button in the lower left corner of the image toggles the Quick Mask on and off. When the Quick Mask is on, the button is outlined in red. See Quick Mask for more details on this highly useful tool.
-
指针坐标:当指针(鼠标光标,如果您使用鼠标)在图像边界内时,窗口左下角的矩形区域显示当前指针坐标。单位与标尺相同。
-
单位菜单:使用单位菜单更改用于标尺和其他几个目的的单位。默认单位是像素,但您可以使用此菜单快速更改为英寸、厘米或其他几种可能。请注意,视图菜单中“点对点”的设置影响显示的缩放方式: 有关详细信息,请参阅点对点。
-
缩放按钮:有多种方法可以放大或缩小图像,但缩放按钮可能是最简单的。您可以直接在文本框中输入缩放级别进行精确控制。
-
状态区:状态区位于图像窗口的底部。默认情况下,状态区显示 image.xcf 文件的原始名称以及图像使用的系统内存量。请使用 → → → 来自定义状态区域中显示的信息。在耗时操作期间,状态区会临时显示正在运行的操作以及操作的完成情况。
注意 Note that the memory used by the image is very different from the image file size. For instance, a 70 kB .PNG image may occupy 246 kB in RAM when displayed. There are two primary reasons the difference in memory usage. First, a .PNG file is compressed format, and the image is reconstituted in RAM in uncompressed form. Second, GIMP uses extra memory, and copies of the image, for use by the Undo command.
-
取消按钮:在复杂耗时的操作中,通常是插件,窗口右下角会临时出现一个取消按钮。使用取消按钮停止操作。
注意 一些插件对被取消的响应很差,有时会留下损坏的图像片段。
-
Navigation Control: This is the
 button at the lower right corner of the image window.
Click and hold (do not release the mouse button)
on the navigation control to display the Navigation Preview.
The Navigation Preview has a miniature view of the image
with the displayed area outlined. Use the Navigation Preview
to quickly pan to a different part of the
image—move the mouse while keeping the button pressed.
The Navigation Window is often the most convenient way to
quickly navigate around a large image with only a small portion
displayed. See
Navigation Dialog
for other ways to access the Navigation Window.
button at the lower right corner of the image window.
Click and hold (do not release the mouse button)
on the navigation control to display the Navigation Preview.
The Navigation Preview has a miniature view of the image
with the displayed area outlined. Use the Navigation Preview
to quickly pan to a different part of the
image—move the mouse while keeping the button pressed.
The Navigation Window is often the most convenient way to
quickly navigate around a large image with only a small portion
displayed. See
Navigation Dialog
for other ways to access the Navigation Window.
-
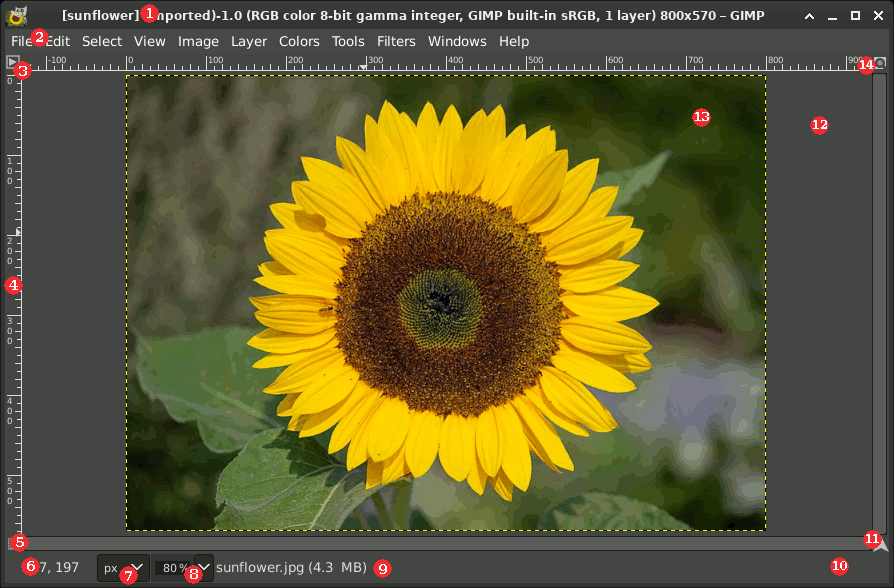
Inactive Padding Area: When the image dimensions are smaller than the image window, this padding area separates the active image display from the rest of the user interface, so you're able to distinguish between them. You cannot apply any Filters or Operations in general to the inactive area.
-
Image Display: The most important part of the image window is, of course, the image display or canvas. It occupies the central area of the window, surrounded by a yellow dotted line showing the image boundary, against a neutral gray background.
Besides the Navigation Control mentioned above, you can also pan across the image using a keyboard or mouse directly:
-
Hold the Shift key, then use the arrow keys to pan the view in that direction.
-
Use the scroll wheel on your mouse to pan the image vertically (up or down); hold the Shift key while using the scroll wheel to pan horizontally (left or right) instead.
-
If your mouse has a middle-button, click and drag with it to pan across the image.
-
Alternatively, you can press and hold Spacebar in combination with moving the mouse.
You can change the zoom level of the image display in a variety of ways, including using the Zoom Button mentioned above, and the Zoom setting described below. Other ways of adjusting the zoom are using Ctrl mousewheel, using the Zoom commands in the menu, and using the Zoom Tool.
-
-
图像窗口调整大小开关:在不启用此功能的情况下,如果您通过单击并拖动边框限制来更改图像窗口的大小,则图像大小和缩放不会改变。例如,如果您将窗口放大,那么您将看到更多的图像。但是,如果按下此按钮,则在调整窗口大小时图像会调整大小,以便(大部分)在调整窗口大小之前和之后显示图像的相同部分。
![[提示]](images/tip.png)
|
提示 |
|---|---|
|
将图像从文件浏览器拖放到工具箱窗口中,以在其自己的图像窗口或选项卡中打开图像。 Dragging an image file into the Layers dialog adds it to the image as a new layer. |
图像大小和图像窗口大小可以不同。您可以使用两个键盘快捷键使图像适合窗口,反之亦然:
-
Ctrl+J:此命令保持缩放级别;它使窗口大小适应图像大小。紧贴命令执行相同的操作。
-
Ctrl+Shift+J:此命令修改缩放级别以使图像显示适应窗口。


