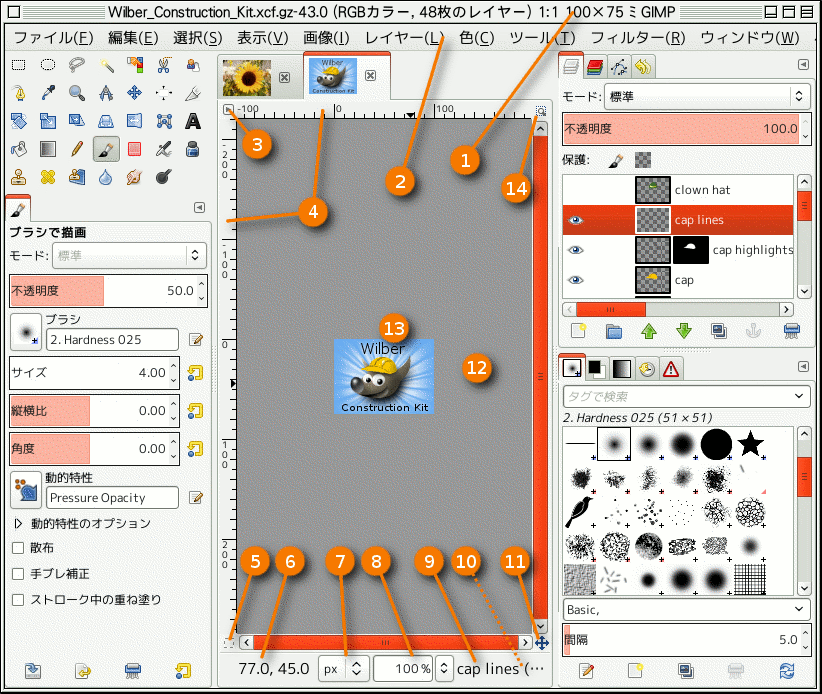
GIMP user interface is available in two modes: single-window mode (default), and multi-windows mode that you can get unchecking the → option.
開く画像を指定せずに GIMP を起動したとき、 シングルウィンドウモードでは画像ウィンドウが無い状態で開始しますが、 マルチウィンドウモードの場合はたとえ 1 枚も画像を開いていない状態でも画像ウィンドウが必ず 1 枚開かれます。
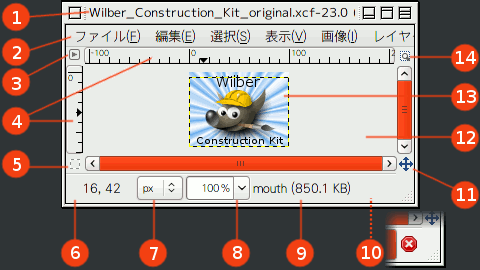
それでは一般的な画像ウィンドウについてその各部分の説明を手短にすすめてゆきましょう。 画像ウィンドウの部品のいくつかは画像ウィンドウの 表示 メニューのコマンドで隠せます。
![[注記]](images/note.png)
|
注記 |
|---|---|
|
シングル ウィンドウモードの場合に厳密には画像ウィンドウに代わって画像の表示を画像表示領域が担います。 したがってこのあとの説明で「画像ウィンドウ」と書いたところは「画像表示領域」と読み替えてください。 同様に「画像ウィンドウのメニュー」は「本体のメニュー」のことを指しています。 |
-
Title Bar: The Title Bar in an image window without an image displays 「GNU Image Manipulating Program」. An image window with an image displays the image name and its specifications in the title bar according to the settings in Preferences Dialog. The Title Bar is provided by the operating system, not by GIMP, so its appearance is likely to vary with the operating system, window manager, and/or theme.
XCF 以外の形式の画像ファイルを開いた場合は、 タイトルバー表示 (インポートされた画像) が示すとおり画像が
.xcf化され、 元のファイル名は画像ウィンドウの底部にあるステータスバーに表示されます。When an image is modified, an asterisk appears in front of its title.
-
Main Menu: Directly below the Title Bar appears the Menu bar (unless it has been suppressed). The Main Menu provides access to nearly every operation you can perform on an image. You can also right-click on an image to display a pop-up menu, [1], or by left-clicking on the little 「arrow-head」 symbol in the upper left corner, called Menu Button, described just below. Many menu commands are also associated with keyboard shortcuts as shown in the menu. You can define your own custom shortcuts for menu actions in the Keyboard Shortcuts Dialog.
-
Menu Button: Click the Menu Button to display the Main Menu in a column, (essential in full screen mode). If you like to use keyboard shortcuts, use Shift+F10 to open the menu.
-
定規: 初期設定での配置では左辺および上辺に定規があります。 画像上の座標を測るときにご利用ください。 初期設定ではピクセルを単位としていますが、 単位を変えるには後で述べる単位設定のところで行います。
One of the most important uses of rulers is to create guides. Click and drag a ruler into the image to create a guide. A guide is a line that helps you accurately position things—or verify that another line is truly horizontal or vertical. Using the Move tool, you can click and drag a guide. Drag a guide out of the image to delete it; you can always drag another guide into the image. You can even use multiple guides at the same time.
定規上には小さな黒い三角形がそれぞれひとつづつ表示され、 マウスポインターの現在地を常に示します。
-
Quick Mask Toggle: The small button in the lower left corner of the image toggles the Quick Mask on and off. When the Quick Mask is on, the button is outlined in red. See Quick Mask for more details on this highly useful tool.
-
ポインターの座標: ポインター (マウスをお使いならばマウスカーソル) を画像の枠内に置くと、 ウィンドウの左下の一区画に現在のポインターの座標が表示されます。 単位は定規と同じです。
-
単位メニュー: 定規をはじめいくつかの機能で使われる単位を単位メニューで変更できます。 初期設定ではピクセル単位ですが、 このメニューでインチやセンチメートルをはじめさまざまな尺度に素早く変更できます。 メニューの ピクセル等倍 を指定した場合に画像表示の大きさがどう変わるかに注意してください。 ピクセル等倍で表示 にさらに詳しい説明があります。)
-
ズームボタン: ズームで近づいたり離れたりする方法はたくさん用意されていますが、 ズームボタンが最も単純かもしれません。 表示倍率が数値記入欄で直接指定できますので非常に精密な伸縮が可能です。
-
状態情報: 状態情報は画像ウィンドウの底部のステータスバーに現れます。 初期設定では状態情報の区画に画像を XCF 化する前の元のファイル名やこの画像のために消費されているメモリー量が表示されています。 設定 ダイアログの「画像タイトルとステータスバーの形式」のページの下段で状態情報の区画に表示する情報の形式を設定できます。 時間を多く費す作業をしているときに、 状態情報は一時的にその作業が何であるかの表示に切り替わり、 進み具合を報告します。
![[注記]](images/note.png)
注記 Note that the memory used by the image is very different from the image file size. For instance, a 70 kB .PNG image may occupy 246 kB in RAM when displayed. There are two primary reasons the difference in memory usage. First, a .PNG file is compressed format, and the image is reconstituted in RAM in uncompressed form. Second, GIMP uses extra memory, and copies of the image, for use by the Undo command.
-
中止ボタン: 大抵はプラグインのような複雑で時間のかかる作業中に、 中止ボタンがウィンドウの右下の区画に一時的に現れます。 中止ボタンをクリックするとその作業を中止できます。
![[注記]](images/note.png)
注記 残念ながら中断するとまずいプラグインがまれにあり、 ときには壊れた画像を残して終了するおそれがあります。
-
Navigation Control: This is the
button at the lower right corner of the image window. Click and hold (do not release the mouse button) on the navigation control to display the Navigation Preview. The Navigation Preview has a miniature view of the image with the displayed area outlined. Use the Navigation Preview to quickly pan to a different part of the image—move the mouse while keeping the button pressed. The Navigation Window is often the most convenient way to quickly navigate around a large image with only a small portion displayed. See Navigation Dialog for other ways to access the Navigation Window.
-
Inactive Padding Area: When the image dimensions are smaller than the image window, this padding area separates the active image display from the rest of the user interface, so you're able to distinguish between them. You cannot apply any Filters or Operations in general to the inactive area.
-
Image Display: The most important part of the image window is, of course, the image display or canvas. It occupies the central area of the window, surrounded by a yellow dotted line showing the image boundary, against a neutral gray background.
Besides the Navigation Control mentioned above, you can also pan across the image using a keyboard or mouse directly:
-
Hold the Shift key, then use the arrow keys to pan the view in that direction.
-
Use the scroll wheel on your mouse to pan the image vertically (up or down); hold the Shift key while using the scroll wheel to pan horizontally (left or right) instead.
-
If your mouse has a middle-button, click and drag with it to pan across the image.
-
Alternatively, you can press and hold Spacebar in combination with moving the mouse.
You can change the zoom level of the image display in a variety of ways, including using the Zoom Button mentioned above, and the Zoom setting described below. Other ways of adjusting the zoom are using Ctrl mousewheel, using the Zoom commands in the menu, and using the Zoom Tool.
-
-
ウィンドウと画像の連動伸縮の切り替え: この機能を無効にしている場合は画像ウィンドウの表示枠をクリックしながらドラッグして大きさを変えても画像の表示倍率は変わりません。 たとえばウィンドウを大きくすれば画像の見える部分が増すか外周不活性区域が拡がります。 その逆にこのボタンをクリックして押した状態にすると、 画像ウィンドウの大きさを変えると画像の表示される区画が変形の前後で (ほぼ) 同じになるように画像の表示倍率が調整されます。
![[ヒント]](images/tip.png)
|
ヒント |
|---|---|
|
ファイルブラウザーの画像アイコンをツールボックスまでドラッグして放つとその画像が新たな画像ウィンドウになって、 あるいは画像表示領域の新たなタブとなって開かれます。 Dragging an image file into the Layers dialog adds it to the image as a new layer. |
画像表示の大きさと画像ウィンドウの大きさがいつも同じとは限りません。 画像を画像ウィンドウにすっぽり入る大きさで表示させたり、 逆に画像表示に合わせて画像ウィンドウの大きさを調節するキーボードショートカットがあります。
-
Ctrl+J: このコマンドは表示倍率を維持します。 画像ウィンドウの大きさが画像の表示寸法に合わせて変化します。 コマンドと同じ働きです。
-
Ctrl+Shift+J: このコマンドは表示倍率を変更して画像ウィンドウ内で画像の全体像が見える最大限の大きさにします。


