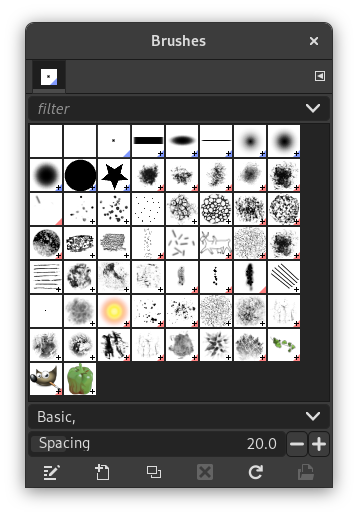
The „Brushes“ dialog is used to select and manage brushes. These brushes are used by the Paintbrush, Pencil and Airbrush tools. The MyPaint Brush uses its own kind of brushes. GIMP comes with a wide selection of brushes and more can be added easily. You can also create custom brushes using the Brush Editor, or by exporting an image as a brush.
See the Brushes section for basic information on brushes and how they are used in GIMP.
There can be only one brush active at any time. To make a brush active, select it in the list or grid. The name of the currently active brush is shown directly above the list of brushes. The active brush can also be recognized by a selection rectangle around the preview (which can sometimes be difficult to see, depending on your theme). The size, angle, spacing and several other characteristics of a brush can be set in the Tool Options Dialog when one of the relevant paint tools is active.
This dialog is a dockable dialog; see the section 2.3 – „Dokování dialogů“ for help on manipulating it.
-
From the main menu select → → .
-
From the Tab menu in any dockable dialog click the tab menu button
 and select
→ .
and select
→ .
-
If you enabled the „Show active brush, pattern & gradient“ option in the Toolbox Preferences, you can click on the active brush icon in the Brush, Pattern, Gradient area.
-
From the Tool Options dialog for the Paintbrush, Pencil and Airbrush tools, by clicking on the Brush icon button. This opens a popup with similar functionality that allows you to quickly choose a brush from the list. To open the actual brush dialog click on the button at the bottom right corner of the popup.
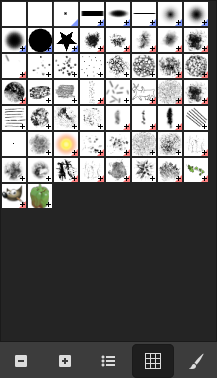
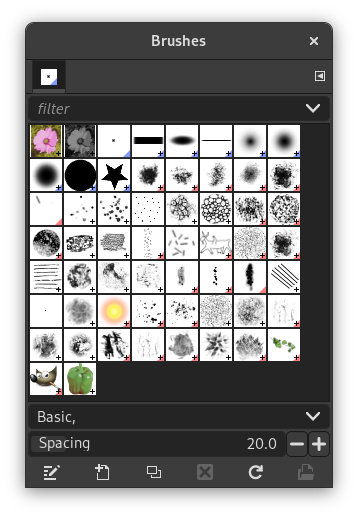
The simplified „Brushes“ dialog
The button bar at the bottom offers the following functionality:
-
 Smaller previews
-
 Larger previews
-
 View as list
-
 View as grid
-
 Open the brush selection dialog
Note that, depending on your Preferences, a brush selected with the popup may only apply to the currently active tool, not to other paint tools. See the Paint Options Shared Between Tools section in the Tool Options Preferences for more information.
-
In the Tab menu, you can choose between and . In Grid mode, the brush shapes are laid out in a rectangular array, making it easy to see many at once and find the one you are looking for. In List mode, the shapes are lined up in a list, with the names beside them.
In the Tab menu, the option Preview Size allows you to adjust the size of brush previews to your liking.
- Grid mode
-
V horní části dialogu je zobrazeno jméno aktivní stopy a její velikost v pixelech.
In the center a grid view of all available brushes appears, with the currently selected one outlined.
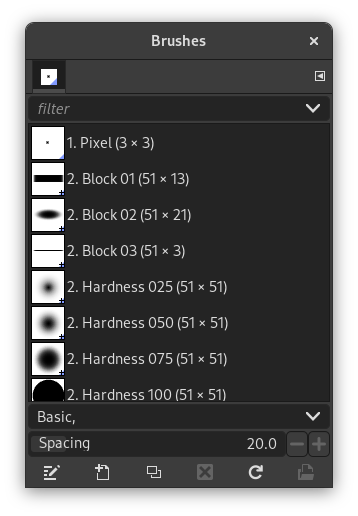
- režim seznamu
-
Dialog Stopy pracuje v režimu seznamu stejně, jako v režimu mřížky, s jednou výjimkou:
If you double-click on the name of a brush, you will be able to edit it. Note, however, that you are only allowed to change the names of brushes that you have created or installed yourself, not the ones that come pre-installed with GIMP. If you try to rename a pre-installed brush, you will be able to edit the name, but as soon as you hit return or click somewhere else, the name will revert to its original value. It is a general rule that you cannot alter the resources that GIMP pre-installs for you: brushes, patterns, gradients, etc; only ones that you create yourself.
When you click on a brush preview, it becomes the active brush that will be used when using one of the relevant painting tools. Double-clicking a brush preview, activates the Brush Editor.
Brushes can be managed in several ways using the buttons at the bottom of the dialog or the right-click context menu.
Meaning of the symbols at the bottom right corner of a brush preview
-
A plus sign indicates that the brush preview is shown at a reduced size. To preview the normal size, left click and hold the preview.
-
A blue corner indicates the brush is a parametric brush, created with the Brush Editor.
-
A red corner indicates this is an animated brush. To preview the animation, left click and hold the preview.
On the right side, next to the filter selection, there is a
![]() Use theme colors for preview button.
Use theme colors for preview button.
By default, brushes and fonts show a white background for each preview. If you prefer the background to be more in line with your theme, you can toggle that by clicking this button. GIMP will then use the background color as set by your theme.
The „filter“ drop-down allows you to select one or more tags to filter and reduce the number of brushes shown. The „tags“ can be managed below the preview area. For more information on tagging see 3.7 – „Tagging“.
This slider lets you set the distance between consecutive brush marks when you trace out a brushstroke with the mouse pointer. Spacing is a percentage of the brush width.
The button bar at the bottom offers the following functionality:
-
 Upravit stopu
-
This activates the Brush Editor. Pressing the button will open the Editor for any brush. It only works, however, for parametric brushes, which can be recognized by the blue bottom right corner in the preview. For other types of brushes the Editor will show you a preview, but not allow you to make any changes.
-
 Nová stopa
-
This creates a new parametric brush, initializes it with a small fuzzy round shape, and opens the Brush Editor so that you can modify it. The new brush is automatically saved in your personal Brushes Folder.
-
 Duplikovat stopu
-
This button is only enabled if the currently selected brush is a parametric brush. If so, the brush is duplicated, and the Brush Editor is opened so that you can modify the copy. The result is automatically saved in your personal Brushes Folder.
-
 Odstranit stopu
-
This option is active for parametric brushes only. This removes all traces of the brush, both from the dialog and the folder where its file is stored, if you have permission to do so. It asks for confirmation before doing anything. The brushes that come with GIMP can not be removed.
-
 Aktualizovat stopy
-
If you add brushes to your personal Brushes Folder or any other folder in your brush search path, by some means other than the Brush Editor, this button causes the list to be reloaded, so that the new entries will be available in the dialog.
-
 Open brush as image
-
Clicking this, opens the selected brush as a regular image that you can edit. It can be turned back into a brush by copying it and selecting → → , or by exporting it as a brush. This is different from 3.2.3 – „Editor stop“ that allows you to modify an existing parametric brush.
The functions performed by these buttons can also be accessed from the dialog pop-up menu, activated by right-clicking anywhere in the brush grid/list, or by choosing the top item, , from the tab menu.
Right clicking on a brush preview opens a context menu. Most of the commands of this submenu are described with the Buttons, except for the following.
- Copy Brush Location
-
Copy Brush Location allows you to copy the brush path to the clipboard. After that you can use the → , command, to open the brush as a new image.
- Show in File Manager
-
Show in File Manager opens the location of the brush in the default File Manager on your system.
- Elliptical, Feathered…, Elliptical…, Rectangular, Feathered…, Rectangular…
-
Options to create elliptical and rectangular brushes. These brushes can be feathered, but they are not parametric brushes.
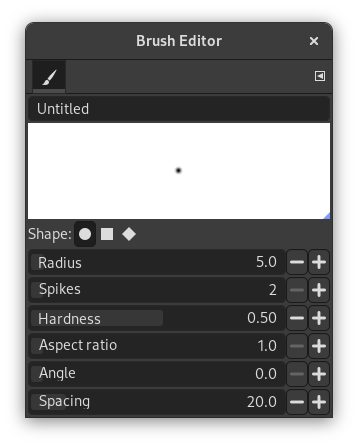
The Brush Editor allows you to view the brush parameters of a brush supplied by GIMP, and you can't change them. You can also create a custom brush: click on the New Brush button to activate the functions of the brush editor; you can select a geometrical shape, a circle, a square or a diamond. This editor has several elements:
The dialog bar:
As with all dialog windows, the
tab menu button
![]() opens a menu allowing you to access and set further related options.
opens a menu allowing you to access and set further related options.
The title bar: To give a name to your brush.
The preview area: Brush changes appear in real time in this preview.
Settings:
- Tvar
-
A circle, a square and a diamond are available. You will modify them by using the following options:
- Poloměr
-
Distance between brush center and edge, in the width direction. A square with a 10 pixels radius will have a 20 pixels side. A diamond with a 5 pixels radius will have a 10 pixels width.
- Paprsky
-
This parameter is useful only for square and diamond. With a square, increasing spikes results in a polygon. With a diamond, you get a star.
- Hardness
-
This parameter controls the feathering of the brush border. Value = 1.00 gives a brush with a sharp border (0.00-1.00).
- Aspect ratio
-
This parameter controls the brush Width/Height ratio. A diamond with a 5 pixels radius and an Aspect Ratio = 2, will be flattened with a 10 pixels width and a 5 pixels height (1.0-20.0).
- Úhel
-
This angle is the angle between the brush width direction, which is normally horizontal, and the horizontal direction, clock-wise. When this value increases, the brush width turns clock-wise (0° to 180°).
- Rozestup
-
When the brush draws a line, it actually stamps the brush icon repeatedly. If brush stamps are very close, you get the impression of a solid line: you get that with Spacing = 1. (1.00 to 200.0).
The Brush Editor has a context menu that can be opened with the
tab menu button
![]() and then choosing
. It only has one option.
and then choosing
. It only has one option.
When you use the Copy or Cut command on an image or a selection of it, a copy appears as a new brush in the upper left corner of the „Brushes“ dialog. This brush will persist until you use the Copy command again. It disappears when you close GIMP.
![[Poznámka]](images/note.png)
|
Poznámka |
|---|---|
|
You can save this clipboard brush with → → as soon as it appears in the „Brushes“ dialog. See 3.10.8 – „Paste as New Brush“. |


