The « Brushes » dialog is used to select and manage brushes. These brushes are used by the Paintbrush, Pencil and Airbrush tools. The MyPaint Brush uses its own kind of brushes. GIMP comes with a wide selection of brushes and more can be added easily. You can also create custom brushes using the Brush Editor, or by exporting an image as a brush.
See the Brushes section for basic information on brushes and how they are used in GIMP.
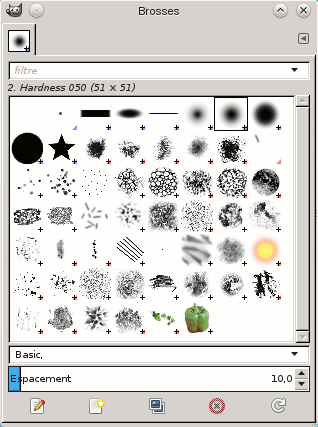
There can be only one brush active at any time. To make a brush active, select it in the list or grid. The name of the currently active brush is shown directly above the list of brushes. The active brush can also be recognized by a selection rectangle around the preview (which can sometimes be difficult to see, depending on your theme). The size, angle, spacing and several other characteristics of a brush can be set in the Tool Options Dialog when one of the relevant paint tools is active.
La fenêtre du Presse-papiers est une fenêtre ancrable, voyez la section Dialogues, fenêtres et onglets sur l’utilisation des ancrages.
-
From the main menu select → → .
-
From the Tab menu in any dockable dialog click the tab menu button
 and select
→ .
and select
→ .
-
If you enabled the « Show active brush, pattern & gradient » option in the Toolbox Preferences, you can click on the active brush icon in the Brush, Pattern, Gradient area.
-
From the Tool Options dialog for the Paintbrush, Pencil and Airbrush tools, by clicking on the Brush icon button. This opens a popup with similar functionality that allows you to quickly choose a brush from the list. To open the actual brush dialog click on the button at the bottom right corner of the popup.
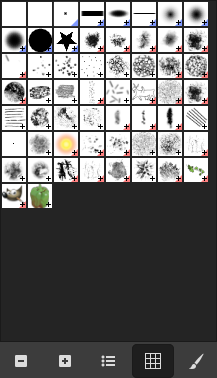
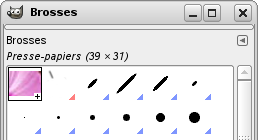
La fenêtre de dialogue des « Brosses » simplifiée
The button bar at the bottom offers the following functionality:
-
 Smaller previews
-
 Larger previews
-
 View as list
-
 View as grid
-
 Open the brush selection dialog
Note that, depending on your Preferences, a brush selected with the popup may only apply to the currently active tool, not to other paint tools. See the Paint Options Shared Between Tools section in the Tool Options Preferences for more information.
-
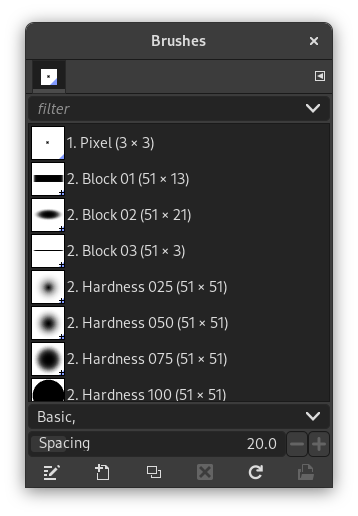
In the Tab menu, you can choose between and . In Grid mode, the brush shapes are laid out in a rectangular array, making it easy to see many at once and find the one you are looking for. In List mode, the shapes are lined up in a list, with the names beside them.
In the Tab menu, the option Preview Size allows you to adjust the size of brush previews to your liking.
- En mode grille
-
En haut apparaît le nom du motif sélectionné, et ses dimensions en pixels.
Au centre, un affichage en grille de toutes les brosses disponibles, avec la brosse active surlignée.
- Mode Grille et mode Liste
-
En gros, ce dialogue fonctionne de la même façon dans les modes Grille et Liste, avec une exception :
Le double-clic sur le nom d’une brosse vous permet de la modifier, à condition qu’il s’agisse d’une brosse que vous avez créée et non pas d’une brosse fournie par GIMP. Vous pouvez certes changer le nom d’une brosse de GIMP, mais elle retrouvera son nom d’origine lorsque vous relancerez GIMP. C’est une règle générale : vous ne pouvez pas modifier les ressources qui ont été fournies par GIMP lors de son installation.
When you click on a brush preview, it becomes the active brush that will be used when using one of the relevant painting tools. Double-clicking a brush preview, activates the Brush Editor.
Brushes can be managed in several ways using the buttons at the bottom of the dialog or the right-click context menu.
Meaning of the symbols at the bottom right corner of a brush preview
-
A plus sign indicates that the brush preview is shown at a reduced size. To preview the normal size, left click and hold the preview.
-
A blue corner indicates the brush is a parametric brush, created with the Brush Editor.
-
A red corner indicates this is an animated brush. To preview the animation, left click and hold the preview.
On the right side, next to the filter selection, there is a
![]() Use theme colors for preview button.
Use theme colors for preview button.
By default, brushes and fonts show a white background for each preview. If you prefer the background to be more in line with your theme, you can toggle that by clicking this button. GIMP will then use the background color as set by your theme.
The « filter » drop-down allows you to select one or more tags to filter and reduce the number of brushes shown. The « tags » can be managed below the preview area. For more information on tagging see Section 3.7, « Mots-clés ».
Ce curseur vous permet de régler la distance entre les coups de brosse successifs quand vous tracez un trait avec le pointeur de la souris. L’espacement est un pourcentage de la largeur de la brosse.
The button bar at the bottom offers the following functionality:
-
 Modifier la brosse
-
This activates the Brush Editor. Pressing the button will open the Editor for any brush. It only works, however, for parametric brushes, which can be recognized by the blue bottom right corner in the preview. For other types of brushes the Editor will show you a preview, but not allow you to make any changes.
-
 Nouvelle brosse
-
This creates a new parametric brush, initializes it with a small fuzzy round shape, and opens the Brush Editor so that you can modify it. The new brush is automatically saved in your personal Brushes Folder.
-
 Dupliquer la brosse
-
This button is only enabled if the currently selected brush is a parametric brush. If so, the brush is duplicated, and the Brush Editor is opened so that you can modify the copy. The result is automatically saved in your personal Brushes Folder.
-
 Supprimer la brosse
-
This option is active for parametric brushes only. This removes all traces of the brush, both from the dialog and the folder where its file is stored, if you have permission to do so. It asks for confirmation before doing anything. The brushes that come with GIMP can not be removed.
-
 Actualiser les brosses
-
If you add brushes to your personal Brushes Folder or any other folder in your brush search path, by some means other than the Brush Editor, this button causes the list to be reloaded, so that the new entries will be available in the dialog.
-
 Ouvrir la brosse en tant qu’image
-
Clicking this, opens the selected brush as a regular image that you can edit. It can be turned back into a brush by copying it and selecting → → , or by exporting it as a brush. This is different from Section 3.2.3, « Éditeur de brosse » that allows you to modify an existing parametric brush.
The functions performed by these buttons can also be accessed from the dialog pop-up menu, activated by right-clicking anywhere in the brush grid/list, or by choosing the top item, , from the tab menu.
Right clicking on a brush preview opens a context menu. Most of the commands of this submenu are described with the Buttons, except for the following.
- Copy Brush Location
-
Copy Brush Location allows you to copy the brush path to the clipboard. After that you can use the → , command, to open the brush as a new image.
- Afficher dans le gestionnaire de fichiers
-
Show in File Manager opens the location of the brush in the default File Manager on your system.
- Elliptical, Feathered…, Elliptical…, Rectangular, Feathered…, Rectangular…
-
Options to create elliptical and rectangular brushes. These brushes can be feathered, but they are not parametric brushes.
Figure 15.27. La fenêtre de dialogue Éditeur de brosse
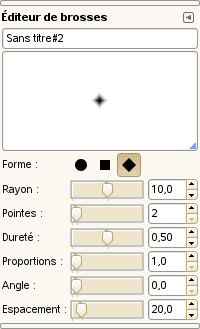
L’Éditeur de brosses, activé pour une nouvelle brosse
L’Éditeur de brosses vous permet de visualiser les paramètres d’une brosse fournie par GIMP sans pouvoir les modifier, ou de créer une brosse personnelle : cliquez sur le bouton ; vous pouvez choisir une forme géométrique : un cercle, un carré, un losange. Cet éditeur possède plusieurs éléments :
The dialog bar:
As with all dialog windows, the
tab menu button
![]() opens a menu allowing you to access and set further related options.
opens a menu allowing you to access and set further related options.
La Barre de titre pour donner un nom à votre brosse.
L’Aperçu : les changements apportés à la brosse y apparaissent en temps réel.
Réglages
- Forme
-
Un cercle, un carré et un losange sont disponibles. Vous les modifiez à l’aide des commandes suivantes :
- Rayon
-
Distance entre le centre de la brosse et le bord, dans la direction de la largeur. Un carré de 20 pixels de rayon aura des côtés de 20 pixels. Un losange avec un rayon de 5 pixels aura 10 pixels de largeur.
- Pointes
-
Ce paramètre n’est utile que pour le carré et le losange. Avec un carré, l’augmentation des pointes donne un polygone. Avec un losange, vous obtenez une étoile.
- Dureté
-
Ce paramètre contrôle l’adoucissement du bord de la brosse. Une valeur de 1.00 donne une bordure nette.
- Proportions
-
Ce paramètre contrôle le rapport entre la largeur et la hauteur. Un losange avec un rayon de 5 pixels et des proportions à 2 sera aplati avec une largeur de 10 pixels et une hauteur de 5 pixels.
- Angle
-
This angle is the angle between the brush width direction, which is normally horizontal, and the horizontal direction, clock-wise. When this value increases, the brush width turns clock-wise (0° to 180°).
- Espacement
-
Quand la brosse trace une ligne, elle tamponne en fait l’icône de brosse de façon répétée. Si ces coups de tampon sont très rapprochés, vous avez l’impression d’une ligne continue. Vous obtenez cela avec un espacement de 1.0.
The Brush Editor has a context menu that can be opened with the
tab menu button
![]() and then choosing
. It only has one option.
and then choosing
. It only has one option.
Quand vous utilisez la commande Copier ou Couper, une copie apparaît en tant que nouvelle brosse en haut à gauche de la fenêtre du dialogue des brosses. Cette brosse persistera jusqu’à la prochaine commande Copier (ou Couper). Elle disparaît quand vous fermez GIMP.
![[Note]](images/note.png)
|
Note |
|---|---|
|
You can save this clipboard brush with → → as soon as it appears in the « Brushes » dialog. See Section 3.10.8, « Coller comme Nouvelle brosse ». |


