The „Brushes” dialog is used to select and manage brushes. These brushes are used by the Paintbrush, Pencil and Airbrush tools. The MyPaint Brush uses its own kind of brushes. GIMP comes with a wide selection of brushes and more can be added easily. You can also create custom brushes using the Brush Editor, or by exporting an image as a brush.
See the Brushes section for basic information on brushes and how they are used in GIMP.
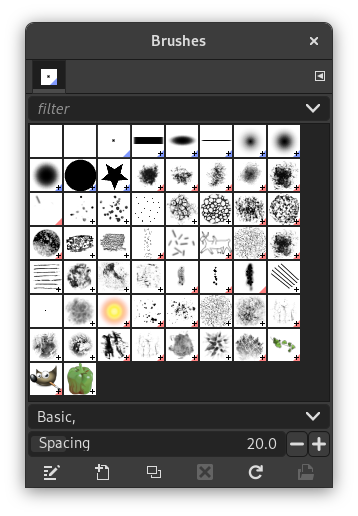
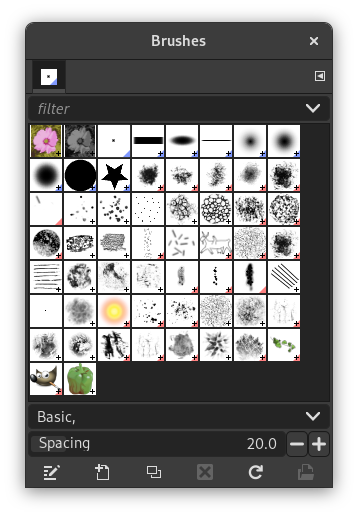
There can be only one brush active at any time. To make a brush active, select it in the list or grid. The name of the currently active brush is shown directly above the list of brushes. The active brush can also be recognized by a selection rectangle around the preview (which can sometimes be difficult to see, depending on your theme). The size, angle, spacing and several other characteristics of a brush can be set in the Tool Options Dialog when one of the relevant paint tools is active.
Acest dialog este un dialog andocabil; a se vedea secţiunea Secțiune 2.3, „Dialoguri și andocare” pentru ajutor privind manevrarea.
-
From the main menu select → → .
-
From the Tab menu in any dockable dialog click the tab menu button
 and select
→ .
and select
→ .
-
If you enabled the „Show active brush, pattern & gradient” option in the Toolbox Preferences, you can click on the active brush icon in the Brush, Pattern, Gradient area.
-
From the Tool Options dialog for the Paintbrush, Pencil and Airbrush tools, by clicking on the Brush icon button. This opens a popup with similar functionality that allows you to quickly choose a brush from the list. To open the actual brush dialog click on the button at the bottom right corner of the popup.
Dialogul „Peneluri” simplificat
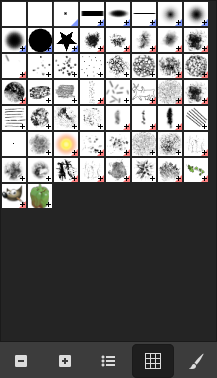
The button bar at the bottom offers the following functionality:
-
 Smaller previews
-
 Larger previews
-
 View as list
-
 View as grid
-
 Open the brush selection dialog
Note that, depending on your Preferences, a brush selected with the popup may only apply to the currently active tool, not to other paint tools. See the Paint Options Shared Between Tools section in the Tool Options Preferences for more information.
-
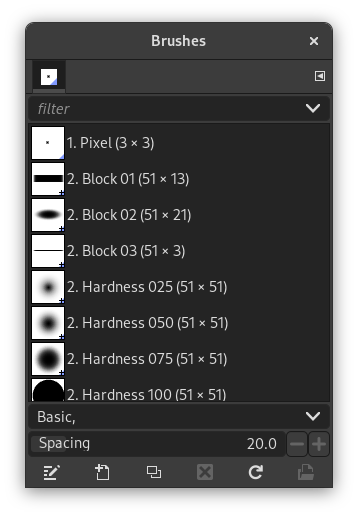
In the Tab menu, you can choose between and . In Grid mode, the brush shapes are laid out in a rectangular array, making it easy to see many at once and find the one you are looking for. In List mode, the shapes are lined up in a list, with the names beside them.
In the Tab menu, the option Preview Size allows you to adjust the size of brush previews to your liking.
- Mod Grilă
-
În partea de sus a dialogului apare numele penelului curent selectat și dimensiunea sa în pixeli.
În centru este afișată o vizualizare grilă a tuturor penelurilor disponibile, cu cea selectată în mod curent.
- Mod listă
-
În cea mai mare parte, dialogul funcționează în același mod în modul listă ca și în modul grilă, cu o singură excepție:
Dacă faceți dublu clic pe numele penelului, se va putea edita. Rețineți, totuși, că sunt permise modificări de nume pentru peneluri doar pe cele pe care le-ați creat sau instalat, nu și pentru cele care vin pre-instalate cu GIMP. Dacă încercați să redenumiți o perie preinstalată, veți avea posibilitatea să editați numele, dar de îndată ce dați Enter sau faceți clic în altă parte, numele va reveni la valoarea sa originală. Este o regulă generală că nu puteți modifica resursele pe care GIMP vi le pre-instalează: peneluri, modele, degradeuri, etc; doar pe cele pe care le creezi tu însuți.
When you click on a brush preview, it becomes the active brush that will be used when using one of the relevant painting tools. Double-clicking a brush preview, activates the Brush Editor.
Brushes can be managed in several ways using the buttons at the bottom of the dialog or the right-click context menu.
Meaning of the symbols at the bottom right corner of a brush preview
-
A plus sign indicates that the brush preview is shown at a reduced size. To preview the normal size, left click and hold the preview.
-
A blue corner indicates the brush is a parametric brush, created with the Brush Editor.
-
A red corner indicates this is an animated brush. To preview the animation, left click and hold the preview.
On the right side, next to the filter selection, there is a
![]() Use theme colors for preview button.
Use theme colors for preview button.
By default, brushes and fonts show a white background for each preview. If you prefer the background to be more in line with your theme, you can toggle that by clicking this button. GIMP will then use the background color as set by your theme.
The „filter” drop-down allows you to select one or more tags to filter and reduce the number of brushes shown. The „tags” can be managed below the preview area. For more information on tagging see Secțiune 3.7, „Etichetare”.
Acest cursor vă permite să setați distanța dintre marcajele de penel consecutive atunci când trasați o tușă cu indicatorul mausului. Spațierea este un procentaj din lățimea pensulei.
The button bar at the bottom offers the following functionality:
-
 Editare penel
-
This activates the Brush Editor. Pressing the button will open the Editor for any brush. It only works, however, for parametric brushes, which can be recognized by the blue bottom right corner in the preview. For other types of brushes the Editor will show you a preview, but not allow you to make any changes.
-
 Penel nou
-
This creates a new parametric brush, initializes it with a small fuzzy round shape, and opens the Brush Editor so that you can modify it. The new brush is automatically saved in your personal Brushes Folder.
-
 Duplicare penel
-
This button is only enabled if the currently selected brush is a parametric brush. If so, the brush is duplicated, and the Brush Editor is opened so that you can modify the copy. The result is automatically saved in your personal Brushes Folder.
-
 Ștergere penel
-
This option is active for parametric brushes only. This removes all traces of the brush, both from the dialog and the folder where its file is stored, if you have permission to do so. It asks for confirmation before doing anything. The brushes that come with GIMP can not be removed.
-
 Reîmprospătare peneluri
-
If you add brushes to your personal Brushes Folder or any other folder in your brush search path, by some means other than the Brush Editor, this button causes the list to be reloaded, so that the new entries will be available in the dialog.
-
 Deschiderea pensulei ca imagine
-
Clicking this, opens the selected brush as a regular image that you can edit. It can be turned back into a brush by copying it and selecting → → , or by exporting it as a brush. This is different from Secțiune 3.2.3, „Editor penel” that allows you to modify an existing parametric brush.
The functions performed by these buttons can also be accessed from the dialog pop-up menu, activated by right-clicking anywhere in the brush grid/list, or by choosing the top item, , from the tab menu.
Right clicking on a brush preview opens a context menu. Most of the commands of this submenu are described with the Buttons, except for the following.
- Copy Brush Location
-
Copy Brush Location allows you to copy the brush path to the clipboard. After that you can use the → , command, to open the brush as a new image.
- Show in File Manager
-
Show in File Manager opens the location of the brush in the default File Manager on your system.
- Elliptical, Feathered…, Elliptical…, Rectangular, Feathered…, Rectangular…
-
Options to create elliptical and rectangular brushes. These brushes can be feathered, but they are not parametric brushes.
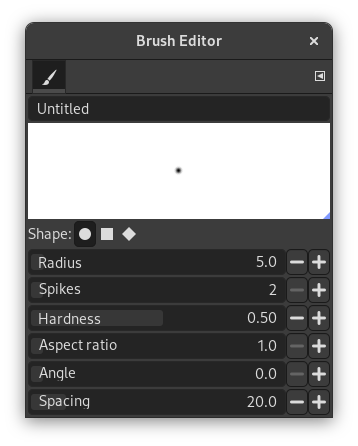
Editorul penel vă permite să vizualizați parametrii penelului furnizat de GIMP care nu se pot modifica. Puteți crea, de asemenea, penel personalizat: faceți clic pe butonul Penel nou buton pentru a activa funcțiile de editor penel; Puteți selecta o formă geometrică, un cerc, un pătrat sau un diamant. Acest editor are mai multe elemente:
The dialog bar:
As with all dialog windows, the
tab menu button
![]() opens a menu allowing you to access and set further related options.
opens a menu allowing you to access and set further related options.
Bara de titlu: pentru a da un nume penelului.
Zona de previzualizare: modificările penelului apar în timp real în această previzualizare.
Setări:
- Forma
-
Sunt disponibile un cerc, un pătrat și un diamant. Le veți modifica utilizând următoarele opțiuni:
- Rază
-
Distanța dintre centrul de penel și margine, în direcția lățimii. Un pătrat cu o rază de 10 pixeli va avea o latură de 20 pixeli. Un diamant cu o rază de 5 pixeli va avea o lățime de 10 pixeli.
- Vârfuri
-
Acest parametru este util numai pentru pătrat și diamant. Pentru un pătrat, creșterea numărului de vârfuri conduce la un poligon. Dintr-un diamant, primești o stea.
- Duritate
-
Acest parametru controlează conturarea bordurii penelului. Value = 1,00 oferă o perie cu o bordură ascuțită (0.00-1.00).
- Raport de aspect
-
Acest parametru controlează raportul lățime/înălțime pensulă. Un diamant cu o rază de 5 pixeli și un raport de aspect = 2, vor fi aplatizat cu o lățime de 10 pixeli și o înălțime de 5 pixeli (1,0-20.0).
- Unghi
-
This angle is the angle between the brush width direction, which is normally horizontal, and the horizontal direction, clock-wise. When this value increases, the brush width turns clock-wise (0° to 180°).
- Spațiere
-
Când penelul desenează o linie, de fapt ștampilează pictograma penel în mod repetat. În cazul în care ștampilele penel sunt foarte apropiate, veți obține impresia de linie solidă: se obține asta cu spațierea = 1. (1.00 la 200.0).
The Brush Editor has a context menu that can be opened with the
tab menu button
![]() and then choosing
. It only has one option.
and then choosing
. It only has one option.
Când utilizați comanda copiere sau decupare de imagine sau dintr-o selecție din ea, o copie apare ca un penel nou în colțul din stânga sus al dialogului „peneluri”. Acest penel va persista până când veți utiliza din nou comanda copiere. Dispare la închiderea GIMP.
![[Notă]](images/note.png)
|
Notă |
|---|---|
|
You can save this clipboard brush with → → as soon as it appears in the „Brushes” dialog. See Secțiune 3.10.8, „Lipește ca pensulă nouă”. |


