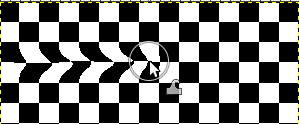
Warp Transform is a GEGL based brush-like tool which works directly on the image. You can use an erase mode to partially remove warping you applied. You have available options to adapt strength and size of warping.
Ci sono diverse possibilità per attivare lo strumento:
-
From the main menu: → → .
-
Facendo clic sull'icona dello strumento
 nel panello degli strumenti.
 -
Usando la scorciatoia da tastiera W.
Normally, tool options are displayed in a window attached under the Toolbox as soon as you activate a tool. If they are not, you can access them from the main menu through → → which opens the option window of the selected tool. The available tool options can also be accessed by double clicking the corresponding tool icon in the Toolbox.
- Sposta pixel
-
«Sposta pixel» è il primo elemento di un elenco a discesa che contiene vari tipi di metodi di warping:
-
Sposta pixel è il metodo predefinito.
-
Grow area
-
Shrink area
Figura 14.131. Shrink example

Facendo clic 5 volte al centro dell'immagine con un pennello di dimensione = dimensione immagine.
-
Torci orario/antiorario
Figura 14.132. Swirl example

Torsione in senso orario dell'intera immagine (dimensione pennello = dimensione immagine) con un movimento circolare del pennello.
-
Erase warping allows you to undo previously made warp strokes.
-
Smooth warping allows you to smooth previously made warp strokes.
-
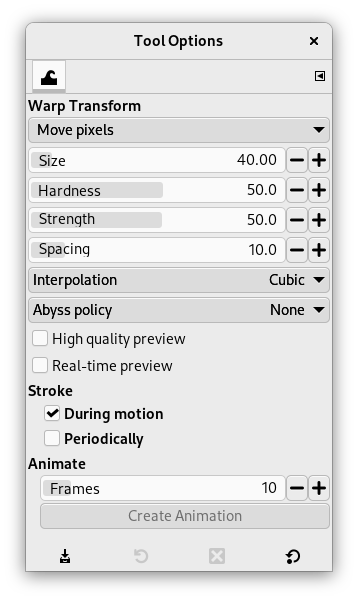
- Dimensione
-
The size of the brush.
- Hardness, Strength
-
These control how much of the pixels of the starting location of the warp are moved to the displacement location.
- Spacing
-
This controls the amount of movement when stroking.
- Interpolazione
-
![[Nota]](images/note.png)
Nota Nell'effetto warp viene usato un metodo di interpolazione. Vedere Interpolazione per una descrizione di questi metodi.
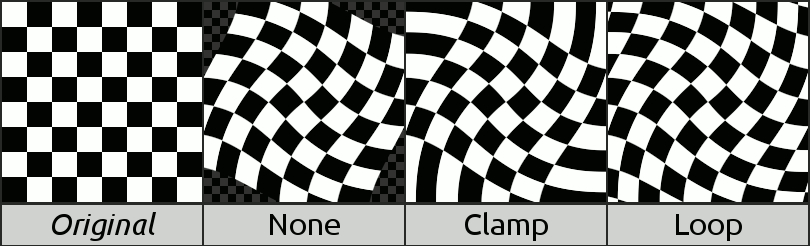
- Politica dell'abisso
-
L'«abisso» è un termine usato dagli sviluppatori GIMP per descrivere i «dati fuori dal buffer d'ingresso». Lo strumento warp sposta i pixel da un punto ad un altro. Alcuni pixel possono provenire dall'esterno del bordo del livello. Questi pixel non esistono da nessuna parte, e perciò non hanno associato alcun colore; perciò, un qualche colore deve essere loro assegnato.
La regolazione «politica dell'abisso» consta di un elenco a discesa che permette di riempire le aree vuote in modi diversi:
-
Nessuna: è l'opzione predefinita. Le aree vuote sono trasparenti. Per questa opzione è necessaria la presenza di un canale alfa.
-
Morsa: ogni bordo del livello trasformato si espande all'esterno indefinitivamente, così, per esempio, un pixel a sinistra del bordo del livello ha lo stesso colore del pixel più a sinistra del livello con la stessa coordinata y. Un modo alternativo di pensare questa funzione è che ogni pixel fuori dal bordo del livello ha lo stesso colore del pixel più vicino dentro il bordo del livello.
-
Ciclo: il livello trasformato si ripete in tutte le direzioni, in modo tale che, per esempio, uscendo dal bordo destro del livello riporta indietro al bordo sinistro.
-
- Anteprima di alta qualità
-
L'«anteprima» è la finestra immagine, dove si lavora, prima di premere Invio per confermare la trasformazione. Con questa opzione selezionata, l'anteprima è più accurata, ma più lenta.
- Real-time preview
-
When enabled, updates the preview immediately in real-time while warping, which can be slow. When disabled, there can be a slight delay in updating the preview.
- Tratto
-
-
During motion: applies the warp stroke while the brush is moving.
-
Periodically: applies the warp stroke periodically. When this is enabled, a Rate slider appears where you can adjust how often it is applied.
-
- Anima
-
This option allows you to create an animation by generating several intermediate images between the original image and the final transformation.
Frames: this determines the number of frames in the animation.
button: press this to create the animation in a new image window. You can export this to image formats that support animation, e.g. as a GIF image and then enabling the As animation option in the export dialog; or by exporting as webp image and enabling the Save animation option.
Note that you can only create an animation when the warp transform has not yet been finalized.