«Искажения» — это похожий на кисть инструмент на базе GEGL, который применяется непосредственно к изображению. Для частичного удаления искажений можно использовать режим ластика. Также есть параметры для настройки силы и размера искажения.
Инструмент можно вызвать следующими способами:
-
через главное меню → → ,
-
нажав на значок инструмента
 на панели инструментов,
 -
либо с помощью клавиши быстрого доступа W.
Обычно параметры инструмента отображаются в окне, прикреплённом под панелью инструментов, как только вы активируете инструмент. Если это не так, вы можете получить к ним доступ с помощью пункта главного меню → → , что откроет окно параметров выбранного инструмента. Доступ к параметрам инструмента также можно получить, дважды щёлкнув по соответствующему значку инструмента на панели инструментов.
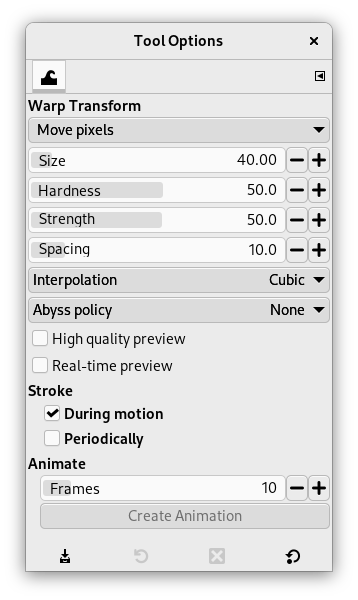
- Перемещение пикселей
-
«Перемещение пикселей» — это первый элемент в выпадающем списке, содержащем различные способы искажения:
-
Перемещение пикселей является способом по умолчанию.
-
Увеличение области
-
Уменьшение области
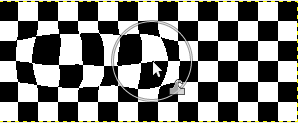
Рисунок 14.132. Пример уменьшения

5 щелчков по центру изображения, размер кисти = размер изображения
-
Закручивание по часовой/против часовой
Рисунок 14.133. Пример закручивания

Закручивание изображения целиком (размер кисти = размер изображения) круговым движением кисти.
-
Стирание искажений позволяет отменить сделанные ранее искажения.
-
Сглаживание искажений позволяет сгладить сделанные ранее искажения.
-
- Размер
-
Размер кисти.
- Жёсткость, Сила
-
Эти параметры определяют, какая часть пикселей начального положения искажения перемещается в положение смещения.
- Интервал
-
Этот параметр определяет величину перемещения при обводке.
- Интерполяция
-
![[Примечание]](images/note.png)
Примечание Во время применения искажения применяются способы интерполяции. Их описание смотрите здесь: Интерполяция.
- Политика «бездны»
-
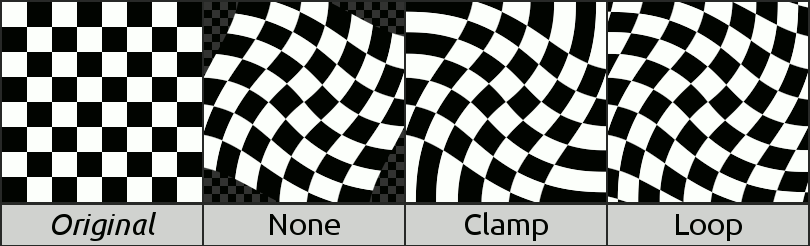
«Бездна (Abyss)» — это термин, используемый разработчиками GIMP для обозначения «данных вне буфера ввода». Инструмент «Искажения» перемещает пиксели из одной точки в другую. Некоторые пиксели могут переместиться из-за границ слоя. Такие пиксели фактически нигде не существуют и, соответственно, не имеют никакого связанного с собой цвета; тем не менее, им нужно присвоить какой-нибудь цвет.
У «политики «бездны»» есть выпадающий список, который позволяет заполнять пустые области разными способами:
-
Нет: параметр по умолчанию. Пустые области будут прозрачными. Для этого параметра нужен слой альфа.
-
Скрепка: каждый край трансформируемого слоя бесконечно растягивается наружу. Так, например, пиксель слева от границы слоя имеет тот же цвет, что и крайний левый слоя с той же координатой по Y. Ещё можно это представить таким образом, что каждый пиксель вне границы слоя имеет тот же цвет, что и ближайший к нему цвет с внутренней стороны слоя.
-
Петля: преобразованный слой повторяется во всех направлениях, так что, например, падение с правого края слоя возвращает вас на левый край.
-
- Высококачественный просмотр
-
«Предварительный просмотр» — это окно изображения, в котором происходит работа до нажатия клавиши Ввод для подтверждения преобразования. Если этот параметр отмечен, предварительный просмотр будет более точным, но и более медленным.
- Предпросмотр в реальном времени
-
При включении обновляет предварительный просмотр в режиме реального времени во время искажения, что может замедлить работу. При отключении может наблюдаться небольшая задержка в обновлении предварительного просмотра.
- Обводка
-
-
При движении: применяет искажение при движении кисти.
-
Периодически: применяет искажение периодически. При включении появляется ползунок Частота, с помощью которого можно настроить частоту применения.
-
- Анимация
-
Этот параметр даёт возможность создать несколько изображений, промежуточных между исходным изображением и окончательным его изменением.
Кадры: настраивает число кадров в этой анимации.
Кнопка : нажмите её, чтобы создать анимацию в новом окне изображения. Вы можете экспортировать её в форматы изображений, поддерживающие анимацию, например изображение GIF, и затем активировать опцию Как анимация в диалоговом окне экспорта; или экспортировать как изображение webp и включить опцию Сохранить анимацию.
Обратите внимание, что вы можете создать анимацию только в том случае, если искажение ещё не завершено.