This chapter is about getting images into GIMP. It explains how to create new images, how to load images from files, how to scan them and how to make screenshots.
But first we want to introduce you to the general structure of images in GIMP.
It is tempting to think of an image as something that corresponds with a single display window, or to a single file such as a JPEG file. In reality, however, a GIMP image is a complicated structure, containing a stack of layers plus several other types of objects: a selection mask, a set of channels, a set of paths, an "undo" history, etc. In this section we take a detailed look at the components of a GIMP image, and the things that you can do with them.
Proprietatea de bază a unei imagini este modul. Există trei moduri posibile: RGB, tonuri de gri și indexate. RGB se referă la roșu-verde-albastru, și indică faptul că fiecare punct din imagine este reprezentat de un nivel de „roșu”, unul de „verde”, și un nivel de „albastru”; reprezentând o imagine colorată complet. Fiecare canal de culoare are 256 de nivele de intensitate posibile. Mai multe detalii în Modele de culoare
Într-o imagine în tonuri de gri, fiecare punct este reprezentat de o valoare de luminozitate, variind de la 0 (negru) la 255 (alb), cu valori intermediare reprezentând niveluri diferite de gri.
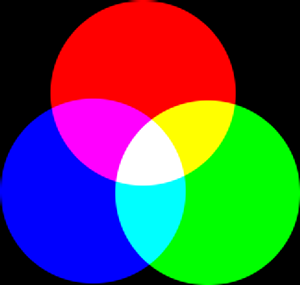
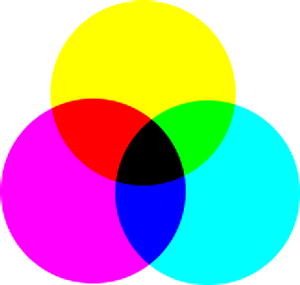
Fig. 5.1. Componente ale modelului de culoare RGB și CMY

În modelul de culoare RGB, amestecul de roșu, verde și albastru dă alb, ceea ce se întâmplă și pe ecran.

În modelul de culoare CMY (K), amestecul de cyan, magenta și galben dă negru, care este ceea ce se întâmplă atunci când tipăriți pe o hârtie albă. Imprimanta va utiliza efectiv cartușul negru din motive economice și o mai bună randare a culorilor.
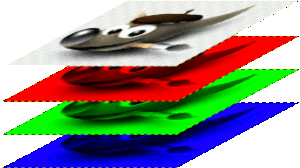
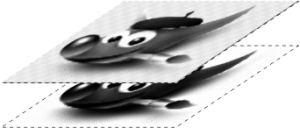
Conceptual, diferența dintre o imagine în tonuri de gri și o imagine RGB este numărul de „canale de culoare”: o imagine în tonuri de gri are doar unul; o imagine RGB are trei. O imagine RGB poate fi concepută ca trei imagini de tonuri de gri suprapuse, unul colorat roșu, unul verde, și unul albastru.
De fapt, ambele imagini RGB și în tonuri de gri au un canal de culoare suplimentar numit canalul alfa, care reprezintă opacitatea. Atunci când valoarea Alfa pentru o anumită locație într-un strat dat este zero, stratul este complet transparent (puteți vedea prin ea), și culoarea la acea locație este determinată de ceea ce se află dedesubt. Când alfa este maxim (255), stratul este opac (nu se poate vedea prin el), iar culoarea este determinată de culoarea stratului. Valorile intermediare alfa corespund diferitelor grade de transparență/opacitate: culoarea de la locație este un amestec proporțional de culoare din stratul și culoarea de dedesubt.
Fig. 5.2. Exemplu de imagine în modul RGB și în modul tonuri de gri

O imagine în modul RGB, cu canalele corespunzătoare roșu, verde și albastru.

O imagine în modul Tonuri de gri, cu canalul corespunzător luminozității.
In GIMP, in every color channel, including the alpha channel, possible values have a range depending on the image precision: 0 to 255 for a color depth of 8 bits. GIMP can load 16 and 32 bits images, and this range can be much larger.
Fig. 5.3. Exemplu de imagine cu un canal alfa

Canalul roșu

Canalul verde

Canalul albastru

Canalul alfa afișează zona de imagine care este transparentă.

O imagine color în modul RGB cu un canal alfa.
The third type, indexed images, is a bit more complicated to understand. In an indexed image, only a limited set of discrete colors are used, usually 256 or less (so, this indexed mode can be applied only to images with 8 bits precision). These colors form the „colormap” of the image, and each point in the image is assigned a color from the colormap. Indexed images have the advantage that they can be represented inside a computer in a way which consumes relatively little memory. As time goes on, they are used less and less, but they are still important enough to be worth supporting in GIMP. (Also, there are a few important kinds of image manipulation that are easier to implement with indexed images than with continuous-color RGB images.)
Some very commonly used types of files (including GIF and PNG) produce indexed images when they are opened in GIMP. Many of GIMP's tools don't work very well on indexed images–and many filters don't work at all–because of the limited number of colors available. Because of this, it is usually best to convert an image to RGB mode before working on it. If necessary, you can convert it back to indexed mode when you are ready to save it.
GIMP face ușor conversia de la un tip de imagine la altul, folosind comanda Mod din meniul Imagine. Unele tipuri de conversii, desigur (RGB în tonuri de gri sau indexate, de exemplu) pierd informații care nu pot fi recâștigate prin conversia înapoi în altă direcție.
![[Notă]](images/note.png)
|
Notă |
|---|---|
|
If you are trying to use a filter on an image, and the filter is disabled in the menu, usually the cause is that the image (or, more specifically, the layer) you are working on is the wrong type. Many filters can't be used on indexed images. Some can be used only on RGB images, or only on grayscale images. Some also require the presence or absence of an alpha channel. Usually the fix is to convert the image to a different type, most commonly RGB. |


