The Colorize filter renders the active layer or selection into a grayscale image as seen through a colored glass. You can use it to apply a « Sepia » effect to your image, for example.
![[Astuce]](images/tip.png)
|
Astuce |
|---|---|
|
This filter uses the HSL color model. Previous versions of GIMP included a similar filter, « Colorify », which used the HSV model instead. That effect can still be reproduced using specific parameters (such as Saturation=1.0 and Lightness=-0.5), or by specifying Saturation=0.0 and applying the color tint as a separate step. |
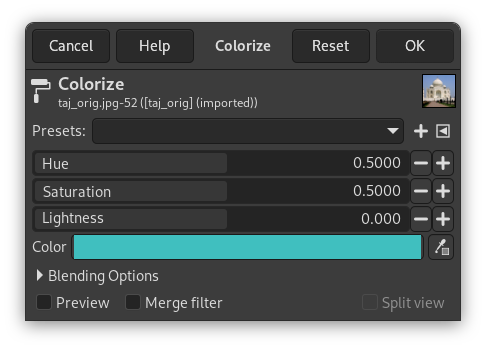
- Pré-réglages, Blending Options, Aperçu, Merge filter, Diviser la vue
-
![[Note]](images/note.png)
Note These options are described in Section 8.1.2, « Fonctions communes aux couleurs ».
- Teinte
-
Which tint to apply to the image. Note that while Hue is normally shown in degrees (from 0 to 360), here it is shown from 0.0 to 1.0. A Hue of 36° would be input as 0.1, for example.
- Saturation
-
The intensity of the color tint, if any. This is also expressed in a range of 0.0 to 1.0, with 0.0 yielding a grayscale conversion only, and 1.0 applying a pure RGB color tint (of the selected Hue).
- Luminosité
-
The brightness of the result. This is expressed in HSL terms, along a range of -1.0 (black) to 0.0 (normal) to +1.0 (white).
- Couleur
-
Using the color button (or the color picker) you can quickly select the color used to colorize your image: selecting a color here will adjust the sliders above to match.
|
|
Note |
|---|---|
|
See HSL for more information about Hue, Saturation, and Lightness generally. |


