JPEG files usually have an extension .jpg, .JPG, or .jpeg. It is a very widely used format, because it compresses images very efficiently, while minimizing the loss of image quality. No other format comes close to achieving the same level of compression. It does not, however, support transparency or multiple layers.
JPEG 알고리즘은 굉장히 복잡합니다. 또한 이 메뉴얼에서는 다 설명할 수 없을 정도로 많은 옵션들을 가지고 있습니다. 따라서 JPEG 전문가가 아니라면 화질 값을 조절하는 것 정도만 알아도 될 것입니다.
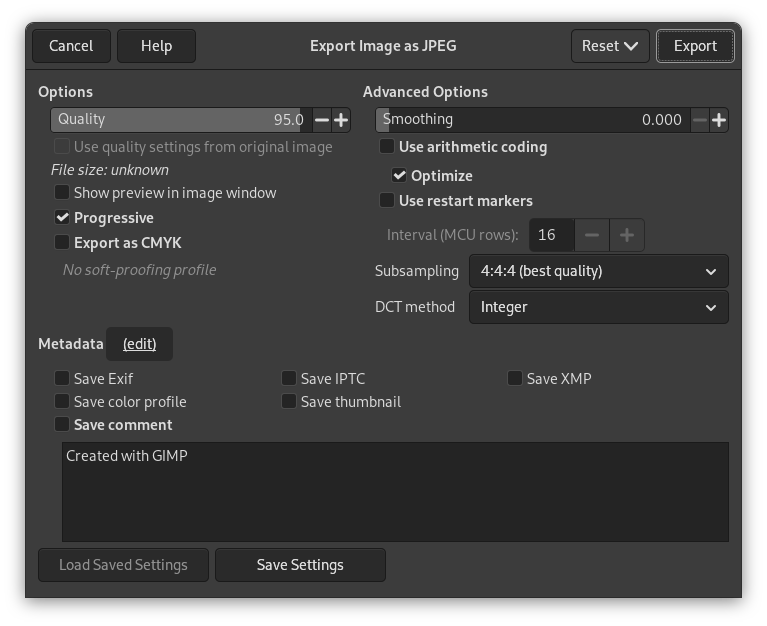
- 화질
-
JPEG 포맷으로 저장을 하면, 0 에서 100 까지의 압축률을 조절할 수 있는 대화 상자가 열립니다. 95 이상은 잘 안 쓰이고, 기본값은 85 로 가장 좋은 결과를 보여주지만, 많은 경우 그보다 이하의 값에서도 큰 화질 저하없이 저장이 가능합니다. JPEG 대화 상자의 이미지 창에 미리보기 보여주기 를 이용하면 값에 따른 화질을 미리 확인해 볼 수 있습니다. 이는 JPEG 의 각 옵션값에 따른 변화를 바로바로 보여주지만 이미지 자체를 변형시키지는 않습니다. 따라서 JPEG 대화 상자를 닫으면 원래의 이미지로 돌아갑니다.
![[참고]](images/note.png)
참고 Please note, that the numbers for the JPEG quality level have a different meaning in different applications. Saving with a quality level of 80 in GIMP is not necessarily comparable with saving with a quality level of 80 in a different application.
- 원본 이미지의 화질 설정값 사용
-
If a particular quality setting (or “quantization table”) was attached to the image when it was loaded, then this option allows you to use them instead of the standard ones.
이미지를 조금만 변형한 경우, 이 옵션을 사용하면 원본 이미지와 거의 동일한 화질과 크기로 저장할 수 있습니다. 이 옵션은 양자화 단계를 통해 다른 화질 설정을 사용할 때보다 이미지의 손실이 적게 만듭니다.
원본 이미지 파일에서 불러온 화질 설정이 기본값보다 나쁜 경우 “원본 이미지의 화질 설정값 사용” 옵션을 사용할 수 없습니다. 이는 항상 기본값보다 높은 화질을 얻을 수 있도록 하는 안전장치입니다.
- Show preview in image window
-
Checking this option causes each change in quality (or any other JPEG parameter) to be shown in the image display. (This does not alter the image: the image reverts back to its original state when the JPEG dialog is closed.)
- Advanced Options
-
고급 설정에 관한 정보:
- 부드럽게
-
JPG compression creates artifacts. By using this option, you can smooth the image when saving, reducing them. But your image becomes somewhat blurred.
- 점진적으로 표시
-
With this option enabled, the image chunks are stored in the file in an order that allows progressive image refinement during a slow connection web download. The progressive option for JPG has the same purpose as the interlace option for GIF. Unfortunately, the progressive option produces slightly larger JPG files (than without the progressive option).
참고 Beware that certain older TVs and photo frames (and maybe other devices) may not be able to show jpeg images that have been exported with the progressive setting enabled (which is the default).
- Export as CMYK
-
If you have a CMYK profile assigned to your image as soft-proofing profile, this setting can be checked to have your image exported using that CMYK profile. This is sometimes required when you have your image professionally printed. Your printing company will tell you if this is needed.
If this setting is disabled, you don't have a soft-proofing profile set for this image yet. See assigning a Soft-Proof Profile.
The name of the CMYK profile that is assigned to this image will be shown below this setting.
- Use arithmetic coding
-
Arithmetic encoding is a form of entropy encoding (a lossless data compression scheme) that can be used in exporting as JPEG. Images using arithmetic encoding can be 5 - 10 % smaller. But older software may have trouble opening these images.
- 최적화
-
If you enable this option, the optimization of entropy encoding parameters will be used. The result is typically a smaller file, but it takes more time to generate.
- Use restart markers
-
The image file can include markers which allow the image to be loaded as segments. If a connection is broken while loading the image in a web page, loading can resume from the next marker.
- Interval (MCU rows)
-
JPEG images are stored as a series of compressed square tiles named MCU (Minimum Coding Unit). You can set the size of these tiles (in pixels).
- 서브샘플링
-
The human eye is not sensitive in the same way over the entire color spectrum. The compression can use this to treat slightly different colors that the eye perceives as very close, as identical colors. The following methods are available:
- 4:4:4 (best quality)
-
This produces the best quality, preserving borders and contrasting colors, at the cost of not compressing as well as the other methods.
- 4:2:2 (chroma halved horizontally)
-
This is the standard subsampling, which usually provides a good ratio between image quality and file size. There are situations, however, in which using no subsampling (4:4:4) provides a noticeable increase in the image quality; for example, when the image contains fine details such as text over a uniform background, or images with almost-flat colors.
- 4:4:0 (chroma halved vertically)
-
This is similar to 4:2:2, but chroma is reduced in the vertical direction.
- 4:2:0 (chroma quartered)
-
This produces the smallest files. This suits images with weak borders but tends to denature colors.
- DCT 기법
-
DCT is “discrete cosine transform”, and it is the first step in the JPEG algorithm going from the spatial to the frequency domain. The choices are:
- Fast Integer
-
This method is much less accurate than the other methods, but faster.
- Integer
-
This method is faster than Floating-Point, but not as accurate. This is the default.
- Floating-Point
-
This is slightly more accurate than the integer method, but is much slower unless your machine has very fast floating-point hardware. Also note that the results of the floating-point method may vary slightly across machines, while the integer methods should give the same results everywhere.
- Metadata (edit)
-
You can click the “(edit)” link to open the metadata editor to change or add any metadata that you want to be included in the image. Note: you will also still need to enable the relevant metadata saving options listed below.
The metadata settings in the export dialog override the default values set in your Metadata Export Preferences.
- Save Exif data
-
When this option is enabled, EXIF metadata will be saved in the exported image.
- Save IPTC data
-
When this option is enabled, IPTC metadata will be saved in the exported image.
- XMP 데이터 저장
-
When this option is enabled, XMP metadata will be saved in the exported image.
- Save color profile
-
When this option is enabled, the color profile will be saved in the exported image.
- Save thumbnail
-
When this option is enabled a thumbnail will be saved in the exported image as part of the EXIF metadata. This will also cause certain EXIF tags to be saved, even if you have disabled saving EXIF metadata.
- Save comment
-
이미지 정보창을 통해 이 설명을 볼 수 있습니다.


