Arquivos JPEG em geral tem uma extensão .jpg, .JPG ou .jpeg. É um formato amplamente utilizado, por que ele comprime as imagens de forma bastante eficiente ao mesmo tempo em que minimiza a perda de qualidade. Nenhum outro formato chega próximo ao mesmo nível de compressão. No entanto, ele não suporta transparência ou multi-camadas.
O formato JPEG é bastante complexo, e envolve um grande número de opções que vão além do escopo desta documentação. A não ser que você seja um especialista em JPEG, o parâmetro “Qualidade” é provavelmente o único que você precisa ajustar.
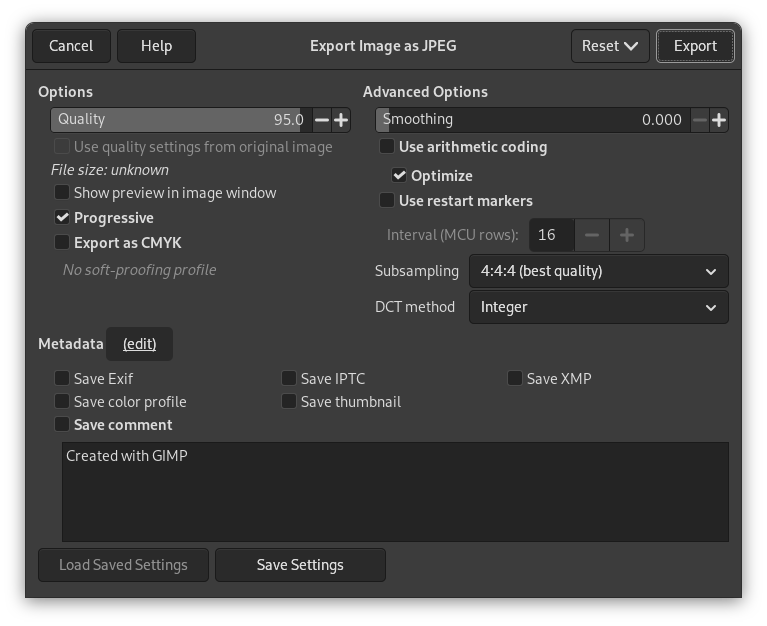
- Qualidade
-
Quando você exporta uma imagem no formato JPEG, surge um diálogo que permite que você configure o nível de qualidade, que vai de 0 a 100. Entretanto, valores acima de 95 em geral não são muito úteis: você vai ter um mínimo de perda de qualquer forma. Se quiser a imagem exata pixel-a-pixel como foi salva, é melhor usar um outro formato, sem perda nenhuma. A qualidade padrão, 85, em geral produz excelentes resultados, mas em geral é possível diminuir bastante esse valor sem degradar a imagem de maneira perceptível. Você pode testar o efeito de diferentes qualidades ativando a opção de Exibir pré-visualização na janela de imagem, no diálogo de JPEG.
![[Nota]](images/note.png)
Nota Por favor note que os números usados para o nível de qualidade do JPEG tem um significado diferente dependendo do aplicativo usado. Salvar uma imagem com qualidade 80 no GIMP pode ser diferente de fazer o mesmo em uma outra aplicação de imagens.
- Utilizar configurações de qualidade da imagem original
-
Se uma configuração particular de qualidade (ou da “tabela de quantização”) estava salva com a imagem quando ela foi importada, então esta opção permite que você use essas opções em vez das opções padrão.
Se você fez apenas algumas modificações na imagem, então re-utilizar a mesma configuração de qualidade vai resultar na mesma qualidade de imagem e tamanho de arquivo que a imagem original. Isso pode minimizar as perdas causadas pelo passo de quantização, comparado com o que aconteceria se você usar uma configuração de qualidade diferente.
Se a qualidade que existia no arquivo original não for melhor que a sua configuração padrão de qualidade, então a opção de “Utilizar configurações de qualidade da imagem original” vai estar disponível, mas não vai estar ligada por padrão. Isso assegura que você sempre vai ter pelo menos a qualidade especificada por padrão. Se você não fez maiores mudanças na imagem e quiser exporta-la usando a mesma qualidade que a original, então você pode ligar esta opção.
- Show preview in image window
-
Marcar esta opção faz com que cada mudança na Qualidade (ou qualquer outro parâmetro do JPEG) seja exibida na janela de imagem. Isso não altera a imagem: ela é revertida para o estado anterior quando o diálogo de JPEG for fechado. Se você não estiver vendo a imagem, arraste a janela de exportação para um canto da tela, de forma que você possa ver a janela do GIMP onde está sua imagem.
- Opções avançadas
-
Alguma informação sobre as configurações avançadas:
- Uniformização
-
A compressão do JPEG cria artefatos — ruído na imagem. Ao usar esta opção, você pode suavizar a imagem ao exportar, reduzindo-os. Mas sua imagem fica um pouco desfocada.
- Progressivo
-
Com esta opção habilitada, os trechos de imagem são guardados no arquivo de uma forma que se torna possível um refinamento progressivo quando a imagem é carregada - em geral em uma conexão lenta à Internet. O propósito desta opção é o mesmo que a opção de entrelaçar do GIF. Infelizmente, arquivos JPEG progressivos ficam um pouco maiores do que arquivos sem essa opção.
Nota Beware that certain older TVs and photo frames (and maybe other devices) may not be able to show jpeg images that have been exported with the progressive setting enabled (which is the default).
- Export as CMYK
-
If you have a CMYK profile assigned to your image as soft-proofing profile, this setting can be checked to have your image exported using that CMYK profile. This is sometimes required when you have your image professionally printed. Your printing company will tell you if this is needed.
If this setting is disabled, you don't have a soft-proofing profile set for this image yet. See assigning a Soft-Proof Profile.
The name of the CMYK profile that is assigned to this image will be shown below this setting.
- Use arithmetic coding
-
Arithmetic encoding is a form of entropy encoding (a lossless data compression scheme) that can be used in exporting as JPEG. Images using arithmetic encoding can be 5 - 10 % smaller. But older software may have trouble opening these images.
- Otimizar
-
Se você habilitar esta opção, a otimização dos parâmetros de codificação de entropia será usada. O resultado é um arquivo tipicamente menor, mas que leva mais tempo para ser gerado.
- Use restart markers
-
O arquivo de imagem pode incluir marcadores que permitem que uma imagem seja carregada como segmentos. Se uma conexão for perdida enquanto a imagem estiver sendo carregada numa página Web, o carregamento pode continuar a partir do próximo marcador.
- Interval (MCU rows)
-
JPEG images are stored as a series of compressed square tiles named MCU (Minimum Coding Unit). You can set the size of these tiles (in pixels).
- Sub-amostragem
-
The human eye is not sensitive in the same way over the entire color spectrum. The compression can use this to treat slightly different colors that the eye perceives as very close, as identical colors. The following methods are available:
- 4:4:4 (best quality)
-
This produces the best quality, preserving borders and contrasting colors, at the cost of not compressing as well as the other methods.
- 4:2:2 (chroma halved horizontally)
-
This is the standard subsampling, which usually provides a good ratio between image quality and file size. There are situations, however, in which using no subsampling (4:4:4) provides a noticeable increase in the image quality; for example, when the image contains fine details such as text over a uniform background, or images with almost-flat colors.
- 4:4:0 (chroma halved vertically)
-
This is similar to 4:2:2, but chroma is reduced in the vertical direction.
- 4:2:0 (chroma quartered)
-
This produces the smallest files. This suits images with weak borders but tends to denature colors.
- Método DCT
-
DCT is “discrete cosine transform”, and it is the first step in the JPEG algorithm going from the spatial to the frequency domain. The choices are:
- Fast Integer
-
This method is much less accurate than the other methods, but faster.
- Integer
-
This method is faster than Floating-Point, but not as accurate. This is the default.
- Floating-Point
-
This is slightly more accurate than the integer method, but is much slower unless your machine has very fast floating-point hardware. Also note that the results of the floating-point method may vary slightly across machines, while the integer methods should give the same results everywhere.
- Metadata (edit)
-
You can click the “(edit)” link to open the metadata editor to change or add any metadata that you want to be included in the image. Note: you will also still need to enable the relevant metadata saving options listed below.
The metadata settings in the export dialog override the default values set in your Metadata Export Preferences.
- Save Exif data
-
When this option is enabled, EXIF metadata will be saved in the exported image.
- Save IPTC data
-
When this option is enabled, IPTC metadata will be saved in the exported image.
- Salvar dados XMP
-
When this option is enabled, XMP metadata will be saved in the exported image.
- Save color profile
-
When this option is enabled, the color profile will be saved in the exported image.
- Save thumbnail
-
When this option is enabled a thumbnail will be saved in the exported image as part of the EXIF metadata. This will also cause certain EXIF tags to be saved, even if you have disabled saving EXIF metadata.
- Save comment
-
You can read this comment in the Image Properties.


