While the Color Picker can display color information about one pixel, the „Sample Points“ dialog can display the data of four pixels of the active layer or the image, at the same time. Another important difference is that the values of these points are changed in real time as you are working on the image.
Der Dialog „Ablagen“ ist dockbar. Informationen hierzu finden Sie im Abschnitt Abschnitt 2.3, „Docks und Dialoge“.
Er kann auf verschiedene Arten aufgerufen werden:
-
from the main menu: → → .
-
from the Tab menu in any dockable dialog by clicking the tab menu button
 and selecting
→ .
and selecting
→ .
To create a sample point, Ctrl-click on one of the two measure rulers of the image window and drag the mouse pointer. Two perpendicular guides appear. The sample point is where both guides intersect. You can see its coordinates in the lower left corner of the status area at the bottom. Release the mouse button.
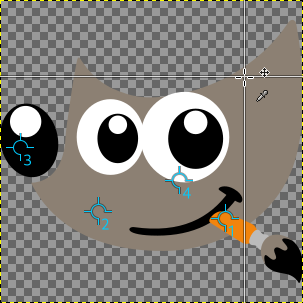
The image shows four already defined sample points and the reticle when you press Ctrl on a measure ruler and then click and drag.
Sample points are shown as a round mark with an order number. You can hide these marks by unchecking → in the main menu.
The „Sample Points“ dialog does not automatically open when you create a sample point.
To move or delete a sample point:
-
Using the Color Picker tool, click-and-drag the sample point up to a measure ruler to delete it.
-
Using a paint tool, Ctrl + click-and-drag the sample point up to a measure ruler to delete it.
By default, sampling is performed on all layers. If you want to sample on the active layer only, uncheck → from the tab menu.
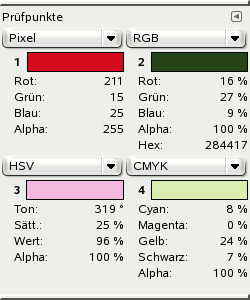
Information about all sample points is displayed in this window.
Die Farben der Prüfpunkte werden dort deutlich sichtbar angezeigt.
Im Klappmenü können Sie wählen zwischen:
- Pixel
-
Bei dieser Auswahl werden die Werte für Rot, Grün, Blau und Alpha des aktuellen Pixels als Zahlen von 0 bis 255 ausgegeben.
- RGB (%)
-
Hier werden die Werte für Rot, Grün, Blau und Alpha des Pixels in Prozent ausgegeben. Zusätzlich wird der Farbwert des Pixels in hexadezimaler Schreibweise angegeben.
- RGB (0..255)
-
This choice displays the Red, Green, Blue and Alpha values of the pixel, as hexadecimal values. It also shows the hexadecimal value of the pixel's color.
- Grayscale (%)
-
- HSV
-
Diese Auswahl zeigt die Pixelwerte für Farbton in Grad sowie für Sättigung, Wert (Helligkeit) und Alpha in Prozent.
- CIE LCh
-
- CIE LAB
-
- CIE xyY
-
- CIE Yu'v'
-
- CMYK
-
Bei dieser Auswahl werden die Werte für Cyan, Magenta, Gelb und Alpha des Pixels in Prozent ausgegeben.
Data are supplied for every channel in the chosen color model. The Alpha is present only if the image has an Alpha channel.
Hex appears only when one of the RGB modes is selected. It displays the hexadecimal code of the HTML Notation.


