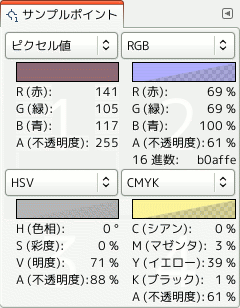
While the Color Picker can display color information about one pixel, the 「Sample Points」 dialog can display the data of four pixels of the active layer or the image, at the same time. Another important difference is that the values of these points are changed in real time as you are working on the image.
「バッファー」ダイアログはドッキング可能です。 その扱い方については 「ダイアログとその合体」 の節をご覧ください。
呼び出し方はつぎのとおりです。
-
from the main menu: → → .
-
from the Tab menu in any dockable dialog by clicking the tab menu button
and selecting → .
To create a sample point, Ctrl-click on one of the two measure rulers of the image window and drag the mouse pointer. Two perpendicular guides appear. The sample point is where both guides intersect. You can see its coordinates in the lower left corner of the status area at the bottom. Release the mouse button.

The image shows four already defined sample points and the reticle when you press Ctrl on a measure ruler and then click and drag.
Sample points are shown as a round mark with an order number. You can hide these marks by unchecking → in the main menu.
The 「Sample Points」 dialog does not automatically open when you create a sample point.
To move or delete a sample point:
-
Using the Color Picker tool, click-and-drag the sample point up to a measure ruler to delete it.
-
Using a paint tool, Ctrl + click-and-drag the sample point up to a measure ruler to delete it.
By default, sampling is performed on all layers. If you want to sample on the active layer only, uncheck → from the tab menu.
Information about all sample points is displayed in this window.
サンプルポイントの位置の画素の色が見本枠に示されます。
それぞれの引き出しリストには 4 つの選択肢があります。
- ピクセル値
-
この場合は画素の R (赤)、 G (緑)、 B (青)、 A (不透明度) の各チャンネルの値を 0 から 255 の範囲で示します。
- RGB (%)
-
これを選択すると画素の R (赤)、 G (緑)、 B (青)、 A (不透明度) の各チャンネルの値を百分率で表します。 さらに画素の色を 16進数 で表示します。
- RGB (0..255)
-
This choice displays the Red, Green, Blue and Alpha values of the pixel, as hexadecimal values. It also shows the hexadecimal value of the pixel's color.
- Grayscale (%)
-
- HSV
-
この選択肢は画素の H (色相) を角度で、 S (彩度)、 V (明度)、 A (不透明度) の各値を百分率で表示します。
- CIE LCh
-
- CIE LAB
-
- CIE xyY
-
- CIE Yu'v'
-
- CMYK
-
これを選択すると画素の C (シアン)、 M (マゼンタ)、 Y (イエロー)、 K (黒)、 A (不透明度) の各値が百分率で表されます。
Data are supplied for every channel in the chosen color model. The Alpha is present only if the image has an Alpha channel.
Hex appears only when one of the RGB modes is selected. It displays the hexadecimal code of the HTML Notation.


