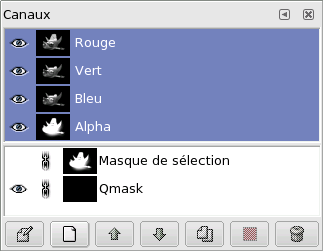
Le dialogue des Canaux est l’interface principale pour modifier et gérer vos canaux. Les canaux ont un double usage, c’est pourquoi le dialogue est divisé en 2 parties. La première partie contient les canaux chromatiques et la deuxième partie les Masques de sélection.
Color channels apply to the image and not to a specific layer. Basically, three primary colors are necessary to render all the wide range of natural colors. As other digital software, GIMP uses Red, Green, and Blue as primary colors. The first and primary channels display the Red, Green, and Blue values of each pixel in your image.
Next to the channel name is a thumbnail displaying a grayscale representation of each channel, where white is 100% and black is 0% of the primary color. Alternatively, if your image is not a colored but a Grayscale image, there is only one primary channel called Gray. For an Indexed image with a fixed number of known colors there is also only one primary channel called Indexed.
Then there is an optional channel called Alpha. This channel displays transparency values of each pixel in your image (See Alpha Channel in Glossary). In front of this channel is a thumbnail displaying a grayscale representation of the transparency where white is opaque and visible, and black is transparent and invisible. If you create your image without transparency then the Alpha channel is not present, but you can add it from the Layers Dialog context menu. Also, if you have more than one layer in your image, GIMP automatically creates an Alpha channel.
![[Note]](images/note.png)
|
Note |
|---|---|
|
GIMP ne peut pas utiliser un modèle de couleur de type CMJN ou YUV. |
Figure 15.7. Représentation d’une image avec les canaux
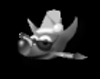
Canal Rouge
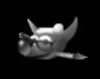
Canal Vert
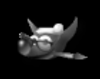
Canal Bleu
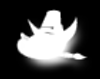
Canal alpha
Tous Canaux
L’image de droite est décomposée en trois canaux chromatiques rouge, vert et bleu auxquels s’ajoute le canal Alpha pour la transparence. Sur l’image de droite la transparence est artificiellement représentée par un damier gris. Dans les canaux chromatiques le blanc est toujours blanc car toutes les couleurs sont présentes alors que le noir est noir. Le chapeau rouge apparaît dans le canal rouge mais est presque invisible dans les autres canaux. Il en est de même pour le vert et le bleu purs qui apparaîtront respectivement dans le canal vert et le canal bleu et seront absents dans les autres.
La fenêtre du Presse-papiers est une fenêtre ancrable, voyez la section Dialogues, fenêtres et onglets sur l’utilisation des ancrages.
Vous pouvez y accéder :
-
From the main menu through → → .
-
From the Tab menu in any dockable dialog by clicking on
 and selecting
→ .
and selecting
→ .
In the menu, there is a list of detached windows which exists only if at least one dialog remains open. In this case, you can raise the « Channels » dialog from the main menu: → .
- Généralités
-
The Channels Dialog consists of a list of color channels and the optional Alpha channel. Below that is a list of selection mask channels. A right-click in a channel list entry opens the channel context menu.
The color channels are always organized in the same order. They cannot be removed. You can only change their visibility and select or unselect them. By default, all of these channels are visible and selected.
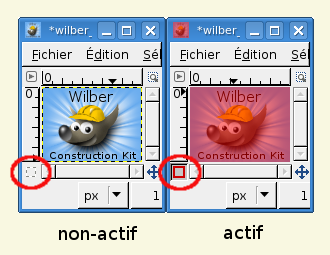
To select a channel, click on a color channel in the list. This toggles the selection of the channel, meaning a selected channel will become unselected and vice versa. The selected color channels appear highlighted in the dialog.
![[Attention]](images/caution.png)
Attention Unselecting one of the color channels red, blue, or green has severe consequences. For instance if you disable the blue channel, all pixels from now on added to the image will not have a blue component, and so a white pixel will have the yellow complementary color.
Making one of the color channels invisible does not influence how tools work and only changes what is currently displayed on your screen. For example, a brush will continue to paint as usual, and the eraser will change the alpha value of pixels also when the alpha channel is set to be not visible.
The selected color channels define which parts of a tool's action are applied to the layer. For example, the eraser will not change your image if the alpha channel is not selected.
Note The duplicate and selection commands documented below can also be used on the color channels. However, this only works when accessing the command from the right-click context menu, and only for one channel at a time.
- Selecting multiple channels
-
GIMP allows you to select multiple selection mask channels and perform actions on them. You can e.g. move them to a different location in the channels stack, and convert them to selections. Selecting multiple channels is done by using the mouse and Shift key, for adding a range of channels, or Ctrl key, for adding or removing the clicked channel.
- Channel list header
-
Directly above the list of selection masks is the header bar. On the left you see the icons that identify the visibility and lock columns. In the middle a text label will tell you how many channels are currently selected if it is more than one.
- Attributs d’un canal
-
Chaque canal apparaît dans la liste accompagné de ses attributs, très semblables à ceux décrits pour les Attributs des calques :
-
 Visibilité des canaux
-
By default, all color channels are visible, and color mask channels are invisible. Clicking on the eye-symbol, or the empty space if the channel is not visible, will toggle the visibility of the channel. Shift-clicking on the icon causes all other channels to be hidden.
-
 Channel lock attributes
-
Each selection mask channel has lock attributes. If one of its attributes is set, the respective lock icon will show up in front of the thumbnail.
When multiple attributes are set, a double lock icon will show here. Clicking in this column allows you to change these attributes.
-
 Verrouiller les pixels
-
This icon shows when « lock pixels » is enabled for the current channel. When this is enabled, the channel is locked for any action that changes pixels, meaning there will be no changes done to this channel.
-
 Verrouiller la position et la taille
-
This icon shows when « lock position and size » is enabled for the current channel. When this is enabled, the channel is locked for any action that changes its position or size.
-
 Lock visibility
-
This toggle button controls the « Lock » setting for the visibility of the channel. If this is enabled, the channel visibility cannot be changed until you disable the lock.
-
- Miniature
-
A small preview icon represents the effect of the channel. This preview can be enlarged by holding down the left mouse button on it.
- Nom du canal
-
The name of the channel, which must be unique within the image. Double-clicking on the name of a selection mask channel will allow you to edit it. The names of the primary channels (Red, Green, Blue, Alpha) can not be changed. Double-clicking on the preview icon will open a dialog where you can set all channel attributes.
-
- Gestion des canaux
-
The button bar at the bottom offers the following functionality:
-
 Nouveau canal
-
This creates a new channel. A dialog will open where you can set the Channel name, the Color tag, the channel attributes and lock attributes, and finally the Opacity and color used for the mask in the image window. A click on the color button displays the GIMP color selector where you can change the mask color.
If you press the Shift key while clicking the button, the New Channel dialog will not be opened. Instead the new channel will be created with the same settings as used previously. This new channel is a selection mask applied over the image. See for more details Selection Mask.
-
 Raise Channels
-
This moves the selected channels up in the list. Press the Shift key to move the selected channels to the top of the list.
-
 Lower Channels
-
This moves selected channels down in the list. Press the Shift key to move the selected channels to the bottom of the list.
-
 Duplicate Channels
-
This creates a copy of the selected channels. The name of the new channels is suffixed with a number.
![[Astuce]](images/tip.png)
Astuce You can also duplicate color channels or the Alpha channel. It's an easy way to keep a copy of them and to use them later as a selection in an image. Note that you can only duplicate one color channel at a time, and only using the right-click context menu.
-
 Replace the Selection with Selected Channels
-
This transforms the selected channels to become a selection. By default the selection derived from channels replaces the active selection. You can change this by using control keys.
-
Shift: the selection derived from a channel is added to the active selection. The final selection is merged from both.
-
Ctrl: the final selection is the subtraction of the selection derived from a channel from the active selection.
-
Shift+Ctrl: the final selection is the intersection of the selection derived from a channel with the active one. Only the selected parts common to both are kept.
-
-
 Delete Channels
-
This deletes the selected channels.
-
- Généralités
-
You can get the Channels context menu by right clicking on a channel. Several of the operations on channels are also available through buttons at the bottom of the channels list. Those operations are documented there.
These commands, except Edit Channel Attributes…, also work when multiple channels are selected.
- Edit Channel Attributes…
-
Only available for selection masks. Here you can change the Channel name, the Color tag, the channel attributes and lock attributes, and finally the Opacity and color used for the mask in the image window. A click on the color button displays the GIMP color selector where you can change the mask color.
- Color Tags
-
Only available for selection masks. This allows you to assign a color tag to one or more selected channels. If you have a lot of channels this can make it easier to identify them by giving related channels the same color tag. To remove the color tag choose None.
- New Channel…, Raise Channels, Lower Channels, Duplicate Channels, Delete Channels
-
Voir Gestion des canaux.
- Channels to Selection
-
The selection derived from the selected channels replaces the previously active selection.
- Add Channels to Selection
-
The selection derived from the selected channels is added to the active selection. The final selection is merged from both.
- Subtract Channels from Selection
-
The final selection is the subtraction of the selection derived from the selected channels from the active selection.
- Intersect Channels with Selection
-
The final selection is the intersection of the selection derived from the selected channels with the active one. Only the selected parts common to both are kept.


Channels can be used to save and restore your selections. In the Channels dialog you can see a thumbnail representing the selection. Selection Masks are a graphical way to build selections into a gray level channel where white pixels are selected and black pixels are not selected. Therefore gray pixels are partially selected. You can think of them as feathering the selection, a smooth transition between selected and not selected. This is important to avoid the ugly pixelization effect when you fill the selection or when you erase its content after isolating a subject from background.
- Création d’un masque de sélection
-
Il existe plusieurs méthodes pour initialiser un masque de sélection :
Once the channel is initialized, selected (highlighted in blue), visible
(eye-icon in the dialog), and displayed as you want (color and opacity
attributes), you can start to work with all the paint tools. The colors
used are important. If you paint with some color other than white, gray,
or black, the color Value (luminosity) will be used to define a gray
(medium, light, or dark). When your mask is painted, you can transform
it to a selection by clicking on the
![]() button (Channel to
Selection) or from the
context menu.
button (Channel to
Selection) or from the
context menu.
Il est tout à fait possible de travailler avec d’autres outils que les outils de dessin dans les masques de sélection. Par exemple vous pouvez utiliser les outils de sélection pour remplir des zones uniformément, avec des motifs ou avec des dégradés. En cumulant ainsi plusieurs masques de sélection dans votre liste vous pouvez arriver à composer des sélections vraiment complexes avec beaucoup de souplesse, on peut dire qu’un masque de sélection est à une sélection ce qu’un calque est à une image.
|
|
Attention |
|---|---|
|
Tant qu’un masque de sélection est activé vous travaillez dans le masque et non pas dans l’image. Pour travailler à nouveau dans l’image vous devez impérativement désactiver tous les masques de sélection. N’oubliez pas aussi de désactiver l’affichage des masques dans l’image en enlevant l’icône en forme d’œil. Vérifiez aussi que vos canaux RVB et Alpha sont bien actifs et affichés dans l’image. |
A Quick Mask is a Selection Mask intended to be used temporarily to paint a selection. Temporarily means that, unlike a normal selection mask, it will be deleted from the channel list after its transformation to selection. The selection tools sometimes show their limits when they have to be used for doing complex drawing selection, as progressive. In this case, using the Quick Mask is a good idea which can give very good results.
The Quick Mask can be activated in different ways:
-
From the main menu: → .
-
By clicking the bottom-left
 button highlighted in the screenshot.
-
depuis le raccourci clavier par défaut : Ctrl+L.
To initialize a Quick Mask,
click the bottom-left
![]() button in the image window. If a selection was
active in your image, then its content appears unchanged while the
border is covered with a translucent red color. If no selection was
active then all the image is covered with a translucent red color.
Another click on the bottom-left button will deactivate the quick mask.
button in the image window. If a selection was
active in your image, then its content appears unchanged while the
border is covered with a translucent red color. If no selection was
active then all the image is covered with a translucent red color.
Another click on the bottom-left button will deactivate the quick mask.
From the Channels dialog you can double click on the name or the
thumbnail to edit the QMask attributes. Then you
can change the Opacity and its filling color. At
every moment you can hide the mask by clicking on the eye icon
![]() in front of the QMask.
in front of the QMask.
Le masque est codé en niveaux de gris. Vous devez utiliser le blanc ou le gris pour réduire la surface limitée par le masque et en noir pour l’augmenter. Les zones peintes en gris seront des zones de transition pour la sélection, des zones d’adoucissement. Quand votre masque est prêt, cliquez à nouveau sur le bouton en bas à gauche de la fenêtre d’image ; le Masque rapide sera supprimé de la fenêtre des canaux et converti en sélection.
Le but du masque rapide est de peindre une sélection et ses transitions avec un outil de peinture sans se préoccuper de gérer un masque de sélection. C’est un bon moyen d’isoler un objet dans une image, car, une fois que la sélection est réalisée, il vous suffit de supprimer son contenu (ou d’inverser si l’objet est dans la sélection).
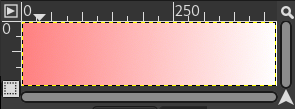
Screenshot of the image window with activated Quick Mask. As long as the Quick Mask is activated, all operations are done on it. A gradient from black (left) to white (right) has been applied to the mask.
The Quick Mask is now disabled. The selection occupies the right half part of the image (marching ants) because the limit of the selection is at the middle of the gradient.
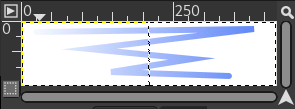
Un trait de pinceau a été ajouté par dessus la sélection. Bizarre ! Le dégradé, bien que non visible, reste actif sur toute l’image, dans les zones sélectionnées et non sélectionnées !
After the Quick Mask Button is pressed, the command generates a temporary 8-bit (0-255) channel, on which the progressive selection work is stored. If a selection is already present the mask is initialized with the content of the selection. Once Quick Mask has been activated, the image is covered by a red semi-transparent veil. This one represents the non-selected pixels. Any paint tool can be used to create the selection on the Quick Mask. They should use only grayscale color, conforming the channel properties, white enabling to define the future selected place. The selection will be displayed as soon as the Quick Mask will be toggled but its temporary channel will not be available anymore.
|
|
Astuce |
|---|---|
|
To save in a channel the selection done with the Quick Mask select in the main menu → . |
-
Ouvrir une image ou commencer un nouveau document.
-
Activate the Quick Mask using the left-bottom button in the image window. If a selection is present the mask is initialized with the content of the selection.
-
Choose a drawing tool and use it with grayscale colors on the Quick Mask.
-
Deactivate the Quick Mask using the left-bottom button in the image window.


