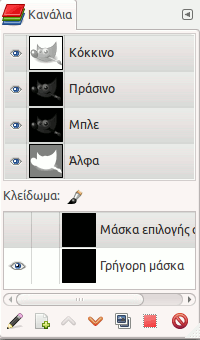
Ο διάλογος καναλιών είναι η κύρια διεπαφή για επεξεργασία, τροποποίηση και διαχείριση των καναλιών σας. Τα κανάλια έχουν διπλή χρήση. Γιαυτό ο διάλογος διαιρείται σε δύο μέρη: το πρώτο μέρος για χρωματιστά κανάλια και το δεύτερο μέρος για μάσκες επιλογής.
Τα χρωματικά κανάλια ισχύουν για την εικόνα και όχι για μια συγκεκριμένη στρώση. Βασικά, τρία βασικά χρώματα είναι απαραίτητα για την απόδοση όλου του ευρέος φάσματος των φυσικών χρωμάτων. Όπως και άλλα ψηφιακά λογισμικά, το GIMP χρησιμοποιεί το Κόκκινο, το Πράσινο και το γαλάζιο ως βασικά χρώματα. Το πρώτο και τα πρωτεύοντα κανάλια εμφανίζουν τις τιμές του Κόκκινου, του Πράσινου και του Γαλάζιου κάθε εικονοστοιχείου στην εικόνα σας.
Δίπλα στο όνομα του καναλιού υπάρχει μια μικρογραφία που εμφανίζει μια αναπαράσταση κλίμακας του γκρι για κάθε κανάλι, όπου το λευκό είναι 100% και το μαύρο είναι 0% του κύριου χρώματος. Εναλλακτικά, εάν η εικόνα σας δεν είναι έγχρωμη αλλά εικόνα σε κλίμακα του γκρι, υπάρχει μόνο ένα πρωτεύον κανάλι που ονομάζεται γκρι. Για μια εικόνα από ευρετήριο με σταθερό αριθμό γνωστών χρωμάτων υπάρχει επίσης μόνο ένα πρωτεύον κανάλι που ονομάζεται με ευρετήριο.
Έπειτα υπάρχει ένα προαιρετικό κανάλι που λέγεται άλφα. Αυτό το κανάλι εμφανίζει τιμές διαφάνειας κάθε εικονοστοιχείου στην εικόνα σας (Δείτε κανάλι άλφα στο γλωσσάρι). Μπροστά από αυτό το κανάλι είναι μια μικρογραφία που εμφανίζει μια αναπαράσταση γκρι κλίμακας της διαφάνειας, όπου το άσπρο είναι αδιαφανές και ορατό και το μαύρο είναι διαφανές και αόρατο. Εάν δημιουργείτε την εικόνα σας χωρίς διαφάνεια, τότε το κανάλι άλφα δεν είναι παρόν, αλλά μπορείτε να το προσθέσετε από το μενού περιβάλλοντος του Διαλόγου στρώσεων. Επίσης, εάν έχετε περισσότερες από μια στρώσεις στην εικόνα σας, το GIMP δημιουργεί αυτόματα ένα κανάλι άλφα.
![[Σημείωση]](images/note.png)
|
Σημείωση |
|---|---|
|
Το GIMP δεν υποστηρίζει χρωματικά πρότυπα CMYK ή YUV. |
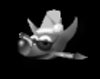
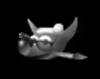
Σχήμα 15.7. Αναπαράσταση μιας εικόνας με κανάλια
Κόκκινο κανάλι
Πράσινο κανάλι

Γαλάζιο κανάλι

Κανάλι άλφα

Όλα τα κανάλια
Η δεξιά εικόνα αποσυντίθεται σε τρία χρωματικά κανάλια (κόκκινο, πράσινο και γαλάζιο) και το κανάλι άλφα για διαφάνεια. Στη δεξιά εικόνα η διαφάνεια εμφανίζεται ως γκρι σκακιέρα. Στο χρωματικό κανάλι το λευκό είναι πάντοτε λευκό, επειδή όλα τα χρώματα είναι παρόντα και το μαύρο είναι μαύρο. Το κόκκινο καπέλο είναι ορατό στο κόκκινο κανάλι, αλλά σχεδόν αόρατο στα άλλα κανάλια. Το ίδιο συμβαίνει και με τα απλά πράσινο και γαλάζιο που είναι ορατά μόνο στα δικά τους κανάλια και αόρατα στα άλλα.
Αυτός ο διάλογος είναι ένας προσαρτήσιμος διάλογος· δείτε την ενότητα Τμήμα 2.3, «Διάλογοι και προσάρτηση» για βοήθεια στο χειρισμό του.
Μπορείτε να τον προσπελάσετε:
-
Από το κύριο μενού μέσα από: → → .
-
Από το μενού καρτέλας σε οποιοδήποτε προσαρτήσιμο διάλογοπατώντας στο
 και επιλέγοντας → .
Στο μενού , υπάρχει ένας κατάλογος αποσπώμενα παράθυρα που υπάρχει μόνο εάν τουλάχιστον ένας διάλογος παραμένει ανοιχτός. Σε αυτήν την περίπτωση, μπορείτε να ανυψώσετε τον διάλογο «Κανάλια» από το κύριο μενού: → .
- Επισκόπηση
-
Το παράθυρο διαλόγου Καναλιών αποτελείται από έναν κατάλογο καναλιών χρώματος και το προαιρετικό κανάλι Άλφα. Παρακάτω βρίσκεται ένας κατάλογος καναλιών μάσκας επιλογής. Δεξιοπατώντας σε μια καταχώρηση καταλόγου καναλιών ανοίγει το μενού περιβάλλοντος καναλιού.
Τα κανάλια χρώματος είναι πάντα οργανωμένα με την ίδια σειρά. Δεν μπορούν να αφαιρεθούν. Μπορείτε μόνο να αλλάξετε την ορατότητά τους και να τα επιλέξετε ή να τα αποεπιλέξετε. Από προεπιλογή, όλα αυτά τα κανάλια είναι ορατά και επιλεγμένα.
Για να επιλέξετε ένα κανάλι, πατήστε σε ένα χρωματικό κανάλι στον κατάλογο. Αυτό αλλάζει την επιλογή του καναλιού, δηλαδή ένα επιλεγμένο κανάλι θα καταστεί μη επιλεγμένο και αντίστροφα. Τα επιλεγμένα χρωματικά κανάλια εμφανίζονται επισημασμένα στο παράθυρο διαλόγου.
![[Προσοχή]](images/caution.png)
Προσοχή Η αποεπιλογή ενός από τα κανάλια χρώματος κόκκινο, γαλάζιο ή πράσινο έχει σοβαρές συνέπειες. Για παράδειγμα, εάν απενεργοποιήσετε το γαλάζιο κανάλι, όλα τα εικονοστοιχεία που προστίθενται από εδώ και στο εξής στην εικόνα δεν θα έχουν γαλάζιο στοιχείο και έτσι ένα λευκό εικονοστοιχείο θα έχει το κίτρινο συμπληρωματικό χρώμα.
Το να κάνετε ένα από τα κανάλια χρώματος αόρατο δεν επηρεάζει τον τρόπο λειτουργίας των εργαλείων και αλλάζει μόνο αυτό που εμφανίζεται εκείνη τη στιγμή στην οθόνη σας. Για παράδειγμα, ένα πινέλο θα συνεχίσει να βάφει ως συνήθως και η γόμα θα αλλάξει την τιμή άλφα των εικονοστοιχείων ακόμα και όταν το κανάλι άλφα έχει ρυθμιστεί να είναι αόρατο.
Τα επιλεγμένα κανάλια χρώματος καθορίζουν ποια μέρη της ενέργειας ενός εργαλείου εφαρμόζονται στη στρώση. Για παράδειγμα, η γόμα δεν θα αλλάξει την εικόνα σας εάν το κανάλι άλφα δεν είναι επιλεγμένο.
Σημείωση Οι εντολές αντιγραφής και επιλογής που περιγράφονται παρακάτω μπορούν επίσης να χρησιμοποιηθούν στα κανάλια χρώματος. Ωστόσο, αυτό λειτουργεί μόνο όταν η πρόσβαση στην εντολή γίνεται από το μενού περιβάλλοντος που εμφανίζεται δεξιοπατώντας και μόνο για ένα κανάλι κάθε φορά.
- Επιλογή πολλαπλών καναλιών
-
Το GIMP σας επιτρέπει να επιλέξετε πολλαπλά κανάλια μάσκας επιλογής και να εκτελέσετε ενέργειες σε αυτά. Μπορείτε, για παράδειγμα, να τα μετακινήσετε σε διαφορετική θέση στη στοίβα καναλιών και να τα μετατρέψετε σε επιλογές. Η επιλογή πολλαπλών καναλιών γίνεται χρησιμοποιώντας το ποντίκι και το πλήκτρο Shift, για την προσθήκη μιας σειράς καναλιών, ή το πλήκτρο Ctrl, για την προσθήκη ή αφαίρεση του καναλιού που έχετε πατήσει.
- Κεφαλίδα καταλόγου καναλιών
-
Ακριβώς πάνω από τον κατάλογο των μασκών επιλογής βρίσκεται η γραμμή κεφαλίδας. Στα αριστερά βλέπετε τα εικονίδια που υποδεικνύουν τις στήλες ορατότητας και κλειδώματος. Στη μέση, μια ετικέτα κειμένου θα σας δείξει πόσα κανάλια είναι επιλεγμένα αυτήν τη στιγμή, εάν είναι περισσότερα από ένα.
- Γνωρίσματα καναλιού
-
Κάθε κανάλι φαίνεται στη λίστα με τα δικά του γνωρίσματα, που είναι πολύ παρόμοια με το γνωρίσματα στρώσης:
-
 Ορατότητα καναλιού
-
Από προεπιλογή, όλα τα κανάλια χρώματος είναι ορατά και τα κανάλια μάσκας χρώματος είναι αόρατα. Πατώντας στο σύμβολο του ματιού ή στον κενό χώρο εάν το κανάλι δεν είναι ορατό, θα εναλλαχθεί η ορατότητα του καναλιού. Shift- πατώντας στο εικονίδιο, όλα τα άλλα κανάλια θα αποκρυφτούν.
-
 Γνωρίσματα κλειδώματος καναλιού
-
Κάθε κανάλι μάσκας επιλογής έχει χαρακτηριστικά κλειδώματος. Εάν ένα από τα χαρακτηριστικά του είναι ενεργοποιημένο, το αντίστοιχο εικονίδιο κλειδώματος θα εμφανιστεί μπροστά από τη μικρογραφία.
Όταν έχουν οριστεί πολλαπλά χαρακτηριστικά, εμφανίζεται εδώ ένα εικονίδιο διπλού κλειδώματος. Πατώντας σε αυτήν τη στήλη μπορείτε να αλλάξετε αυτά τα χαρακτηριστικά.
-
 Κλείδωμα εικονοστοιχείων
-
Αυτό το εικονίδιο εμφανίζεται όταν είναι ενεργοποιημένο το «κλείδωμα εικονοστοιχείων» για το τρέχον κανάλι. Όταν αυτό είναι ενεργοποιημένο, το κανάλι κλειδώνεται για οποιαδήποτε ενέργεια που αλλάζει εικονοστοιχεία, πράγμα που σημαίνει ότι δεν θα γίνουν αλλαγές σε αυτό το κανάλι.
-
 Κλείδωμα θέσης και μεγέθους
-
Αυτό το εικονίδιο εμφανίζεται όταν η επιλογή «Κλείδωμα θέσης και μεγέθους» είναι ενεργοποιημένη για το τρέχον κανάλι. Όταν αυτή η επιλογή είναι ενεργοποιημένη, το κανάλι κλειδώνεται για οποιαδήποτε ενέργεια που αλλάζει τη θέση ή το μέγεθός του.
-
 Κλείδωμα ορατότητας
-
Αυτό το πλήκτρο ελέγχου εναλλάσσει τη ρύθμιση «κλειδώματος» για την ορατότητα του καναλιού. Εάν είναι ενεργοποιημένο, η ορατότητα του καναλιού δεν μπορεί να αλλάξει έως ότου απενεργοποιήσετε το κλείδωμα.
-
- Μικρογραφία
-
Ένα μικρό εικονίδιο προεπισκόπησης αντιπροσωπεύει το αποτέλεσμα του καναλιού. Αυτή η προεπισκόπηση μπορεί να μεγεθυνθεί κρατώντας πατημένο το αριστερό πλήκτρο του ποντικιού πάνω της.
- Όνομα καναλιού
-
Το όνομα του καναλιού πρέπει να είναι μοναδικό μες την εικόνα. Διπλοπατώντας το όνομα ενός καναλιού μάσκας επιλογής θα επιτρέψει την επεξεργασία του. Τα ονόματα των βασικών καναλιών (κόκκινο, πράσινο, γαλάζιο, άλφα) δεν μπορούν να μεταβληθούν. Διπλοπατώντας το εικονίδιο προεπισκόπησης, θα ανοίξει ένα παράθυρο διαλόγου, όπου μπορείτε να ορίσετε όλα τα γνωρίσματα του καναλιού.
-
- Διαχείριση καναλιών
-
Η γραμμή πλήκτρων στο κάτω μέρος προσφέρει τις ακόλουθες λειτουργίες:
-
 Νέο κανάλι
-
Αυτό δημιουργεί ένα νέο κανάλι. Θα ανοίξει ένα παράθυρο διαλόγου όπου μπορείτε να ορίσετε το Όνομα καναλιού, την Ετικέτα χρώματος, τα χαρακτηριστικά καναλιού και τα χαρακτηριστικά κλειδώματος και τέλος την Αδιαφάνεια και το χρώμα που χρησιμοποιείται για τη μάσκα στο παράθυρο εικόνας. Πατώντας στο πλήκτρο χρώματος εμφανίζεται ο επιλογέας χρώματος GIMP, όπου μπορείτε να αλλάξετε το χρώμα της μάσκας.
Εάν πατήσετε το πλήκτρο Shift ενώ πατάτε το πλήκτρο , το παράθυρο διαλόγου Νέο Κανάλι δεν θα ανοίξει. Αντίθετα, το νέο κανάλι θα δημιουργηθεί με τις ίδιες ρυθμίσεις που χρησιμοποιήθηκαν προηγουμένως. Αυτό το νέο κανάλι είναι μια μάσκα επιλογής που εφαρμόζεται πάνω στην εικόνα. Δείτε για περισσότερες λεπτομέρειες Μάσκα Επιλογής.
-
 Ανύψωση καναλιών
-
Αυτό μετακινεί τα επιλεγμένα κανάλια προς τα πάνω στον κατάλογο. Πατήστε το πλήκτρο Shift για να μετακινήσετε τα επιλεγμένα κανάλια στην κορυφή του καταλόγου.
-
 Βύθιση καναλιών
-
Αυτό μετακινεί τα επιλεγμένα κανάλια προς τα κάτω στον κατάλογο. Πατήστε το πλήκτρο Shift για να μετακινήσετε τα επιλεγμένα κανάλια στο κάτω μέρος του καταλόγου.
-
 Διπλασιασμός καναλιών
-
Αυτό δημιουργεί ένα αντίγραφο των επιλεγμένων καναλιών. Το όνομα των νέων καναλιών συνοδεύεται από έναν αριθμό.
![[Υπόδειξη]](images/tip.png)
Υπόδειξη Μπορείτε επίσης να διπλασιάσετε κανάλια χρωμάτων ή το κανάλι άλφα. Είναι ένας εύκολος τρόπος για να διατηρήσετε ένα αντίγραφο αυτών και να τα χρησιμοποιήσετε αργότερα ως επιλογή σε μια εικόνα. Σημειώστε ότι μπορείτε να αντιγράψετε μόνο ένα κανάλι χρωμάτων κάθε φορά και μόνο χρησιμοποιώντας το μενού περιβάλλοντος με δεξί πάτημα.
-
 Αντικατάσταση της επιλογής με τα επιλεγμένα κανάλια
-
Αυτό μετασχηματίζει τα επιλεγμένα κανάλια σε επιλογή. Από προεπιλογή, η επιλογή που προκύπτει από τα κανάλια αντικαθιστά την ενεργή επιλογή. Μπορείτε να το αλλάξετε αυτό χρησιμοποιώντας τα πλήκτρα ελέγχου.
-
Shift: η επιλογή που παράγεται από ένα κανάλι προστίθεται στην ενεργή επιλογή. Η τελική επιλογή συγχωνεύεται και από τις δύο.
-
Ctrl: η τελική επιλογή είναι η αφαίρεση της επιλογής που παράγεται από ένα κανάλι από την ενεργή επιλογή.
-
Shift+Ctrl: η τελική επιλογή είναι η τομή της επιλογής που παράγεται από ένα κανάλι με την ενεργή επιλογή. Μόνο τα κοινά επιλεγμένα μέρη και στα δύο διατηρούνται.
-
-
 Διαγραφή καναλιών
-
Αυτό διαγράφει τα επιλεγμένα κανάλια.
-
- Επισκόπηση
-
Μπορείτε να πάρετε το μενού περιβάλλοντος του καναλιών δεξιοπατώντας σε ένα κανάλι. Αρκετές από τις λειτουργίες στα κανάλια είναι επίσης διαθέσιμες μέσω πλήκτρων στο κάτω μέρος του καταλόγου καναλιών. Αυτές οι λειτουργίες τεκμηριώνονται εκεί.
Αυτές οι εντολές, εκτός από την Επεξεργασία χαρακτηριστικών καναλιού…, λειτουργούν επίσης όταν έχουν επιλεγεί πολλά κανάλια.
- Επεξεργασία γνωρισμάτων καναλιού…
-
Διατίθεται μόνο για μάσκες επιλογής. Εδώ μπορείτε να αλλάξετε το όνομα του καναλιού, την ετικέτα Χρώμα, τα γνωρίσματα του καναλιού και τα γνωρίσματα κλειδώματος και, τέλος, την αδιαφάνεια και το χρώμα που χρησιμοποιείται για τη μάσκα στο παράθυρο εικόνας. Πατώντας το πλήκτρο χρώματος εμφανίζεται η επιλογή χρωμάτων του GIMP, όπου μπορείτε να αλλάξετε το χρώμα της μάσκας.
- Ετικέτες χρώματος
-
Διατίθεται μόνο για μάσκες επιλογής. Αυτό σας επιτρέπει να εκχωρήσετε μια ετικέτα χρώματος σε ένα ή περισσότερα επιλεγμένα κανάλια. Εάν έχετε πολλά κανάλια, αυτό μπορεί να διευκολύνει την αναγνώρισή τους, δίνοντας στα σχετικά κανάλια την ίδια ετικέτα χρώματος. Για να αφαιρέσετε την ετικέτα χρώματος επιλέξτε Καμία.
- Νέο κανάλι…, Ανύψωση καναλιών, Βύθιση καναλιών, Διπλασιασμός καναλιών, Διαγραφή καναλιών
-
Δείτε Διαχείριση καναλιών.
- Κανάλια στην επιλογή
-
Η επιλογή που προέρχεται από τα επιλεγμένα κανάλια αντικαθιστά την προηγούμενη ενεργή επιλογή.
- Προσθήκη καναλιών στην επιλογή
-
Η επιλογή που προέρχεται από τα επιλεγμένα κανάλια προστίθεται στην ενεργή επιλογή. Η τελική επιλογή συγχωνεύεται και από τις δύο.
- Αφαίρεση καναλιών από την επιλογή
-
Η τελική επιλογή είναι η αφαίρεση της επιλογής που παράγεται από τα επιλεγμένα κανάλια από την ενεργή επιλογή.
- Τομή καναλιών με την επιλογή
-
Η τελική επιλογή είναι η τομή της επιλογής που προκύπτει από τα επιλεγμένα κανάλια με την ενεργή επιλογή. Διατηρούνται μόνο τα επιλεγμένα μέρη που είναι κοινά και για τις δύο.


Τα κανάλια μπορούν να χρησιμοποιηθούν για αποθήκευση και επαναφορά των επιλογών σας. Στο διάλογο καναλιού μπορείτε να δείτε μια μικρογραφία που αντιπροσωπεύει την επιλογή. Οι μάσκες επιλογής είναι ένας γραφικός τρόπος για δημιουργία επιλογών σε ένα κανάλι στάθμης του γκρι, όπου τα λευκά εικονοστοιχεία επιλέγονται και τα μαύρα εικονοστοιχεία δεν επιλέγονται. Άρα τα γκρι εικονοστοιχεία είναι μερικώς επιλεγμένα. Μπορείτε να τα θεωρήσετε ως απαλύνσεις της επιλογής, μια ήπια μετάβαση μεταξύ επιλεγμένων και μη επιλεγμένων. Αυτό είναι σημαντικό για αποφυγή του άσχημου αποτελέσματος θολούρας, όταν γεμίζετε την επιλογή, ή όταν σβήνετε τα περιεχόμενα του μετά την απομόνωση ενός υποκειμένου από το παρασκήνιο.
- Δημιουργία μασκών επιλογής
-
Υπάρχουν πολλοί τρόποι αρχικοποίησης μιας μάσκας επιλογής.
-
Από το κύριο μενού → εάν υπάρχει μια ενεργή επιλογή.
-
Στο παράθυρο εικόνας το κάτω αριστερό πλήκτρο
 δημιουργεί μια Γρήγορη μάσκα· το περιεχόμενο θα αρχικοποιηθεί με την ενεργή επιλογή.
 -
Από το διάλογο καναλιού, πατώντας στο πλήκτρο Νέο κανάλι, ή από το μενού περιβάλλοντος. Όταν δημιουργηθεί, αυτή η μάσκα επιλογής εμφανίζεται στον διάλογο καναλιών, ονομαζόμενη «Αντίγραφο μάσκας επιλογής» με έναν αριθμό-ουρά. Μπορείτε να το αλλάξετε χρησιμοποιώντας το μενού περιβάλλοντος που παίρνετε δεξιοπατώντας στο κανάλι.
-
Με το κανάλι αρχικοποιημένο, επιλεγμένο (επισημασμένο με γαλάζιο), ορατό (εικονίδιο ματιού στο διάλογο) και εμφανιζόμενο όπως θέλετε (γνωρίσματα χρώματος και διαφάνειας), μπορείτε να αρχίσετε να δουλεύετε με όλα τα εργαλεία βαφής. Τα χρησιμοποιούμενα χρώματα είναι σημαντικά. Εάν βάψετε με κάποιο χρώμα εκτός από το λευκό, γκρι ή μαύρο, η τιμή χρώματος (luminosity - φωτεινότητα) θα χρησιμοποιηθεί για να ορίσει ένα γκρι (μεσαίο, ανοιχτό ή σκούρο). Όταν η μάσκα σας βάφεται, μπορείτε να την μετασχηματίσετε σε μια επιλογή πατώντας το πλήκτρο
![]() (Κανάλι σε επιλογή) ή από το μενού περιβάλλοντος.
(Κανάλι σε επιλογή) ή από το μενού περιβάλλοντος.
Μπορείτε να δουλέψετε με μάσκες επιλογής όχι μόνο με το εργαλείο ζωγραφικής αλλά επίσης με άλλα εργαλεία. Π.χ., μπορείτε να χρησιμοποιήσετε τα εργαλεία επιλογής για να γεμίσετε ομοιόμορφα περιοχές με διαβαθμίσεις ή μοτίβα. Προσθέτοντας πολλές μάσκες επιλογής στη λίστα σας μπορείτε εύκολα να συνθέσετε πολύ περίπλοκες επιλογές. Κάποιος μπορεί να πει ότι μια μάσκα επιλογής είναι μια επιλογή όπως μια στρώση σε μια εικόνα.
|
|
Προσοχή |
|---|---|
|
Όσο η μάσκα επιλογής είναι ενεργοποιημένη δουλεύετε στη μάσκα και όχι στην εικόνα. Για να δουλέψετε στην εικόνα, πρέπει να απενεργοποιήσετε όλες τις επιλογές μάσκας. Μην ξεχάσετε επίσης να σταματήσετε την εμφάνιση μασκών στην εικόνα αφαιρώντας το εικονίδιο μάσκας. Ελέγξτε επίσης ότι όλα τα κανάλια RGB και άλφα είναι ενεργοποιημένα και εμφανίζονται στην εικόνα. |
Μια Γρήγορη μάσκα είναι μια Μάσκα επιλογής με σκοπό τη προσωρινή χρήση βαφής της επιλογής. Προσωρινά σημαίνει ότι, αντίθετα με τη κανονική μάσκα επιλογής, θα διαγραφεί από τον κατάλογο καναλιού, μετά το μετασχηματισμό του σε επιλογή. Τα Εργαλεία επιλογής εμφανίζουν μερικές φορές τα όρια τους, όταν πρέπει να χρησιμοποιηθούν για την εκτέλεση σύνθετων επιλογών σχεδίασης, ως σταδιακών. Σε αυτήν την περίπτωση, χρήση της γρήγορης μάσκας είναι μια καλή ιδέα που δίνει πολύ καλά αποτελέσματα.
Η γρήγορη μάσκα μπορεί να ενεργοποιηθεί με διάφορους τρόπους:
-
Από το κύριο μενού: → .
-
Πατώντας στο κάτω αριστερά πλήκτρο
που επισημαίνεται στο στιγμιότυπο οθόνης. -
Χρησιμοποιώντας τη συντόμευση Shift+Q.
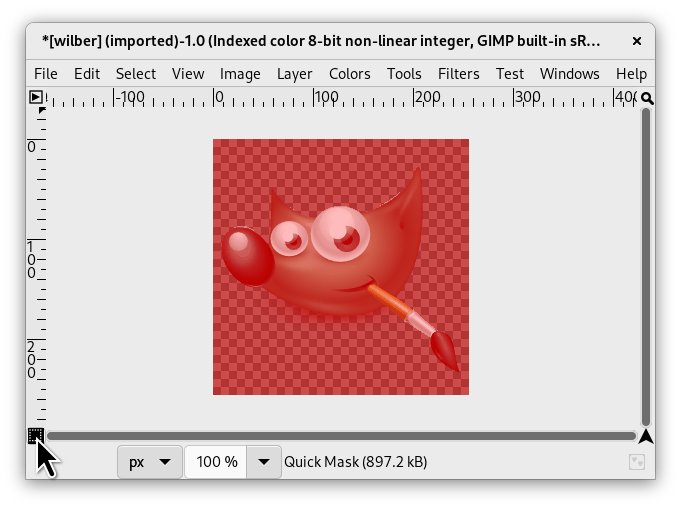
Για να αρχικοποιήσετε μια Γρήγορη μάσκα, πατήστε στο κάτω αριστερά πλήκτρο
![]() στο παράθυρο της εικόνας. Εάν μια επιλογή ήταν ενεργή στην εικόνα σας, τότε το περιεχόμενό της εμφανίζεται αμετάβλητο, ενώ το περίγραμμα καλύπτεται με ένα ημιδιαφανές κόκκινο χρώμα. Εάν δεν ήταν ενεργή καμία επιλογή, τότε όλη η εικόνα καλύπτεται με ένα ημιδιαφανές κόκκινο χρώμα. Ένα άλλο πάτημα στο πλήκτρο κάτω αριστερά θα απενεργοποιήσει τη γρήγορη μάσκα.
στο παράθυρο της εικόνας. Εάν μια επιλογή ήταν ενεργή στην εικόνα σας, τότε το περιεχόμενό της εμφανίζεται αμετάβλητο, ενώ το περίγραμμα καλύπτεται με ένα ημιδιαφανές κόκκινο χρώμα. Εάν δεν ήταν ενεργή καμία επιλογή, τότε όλη η εικόνα καλύπτεται με ένα ημιδιαφανές κόκκινο χρώμα. Ένα άλλο πάτημα στο πλήκτρο κάτω αριστερά θα απενεργοποιήσει τη γρήγορη μάσκα.
Από το παράθυρο διαλόγου Κανάλια, μπορείτε να διπλοπατήσετε στο όνομα ή στη μικρογραφία για να επεξεργαστείτε τα χαρακτηριστικά Γρήγορης μάσκας. Στη συνέχεια, μπορείτε να αλλάξετε την Αδιαφάνεια και το χρώμα γέμισής της. Μπορείτε ανά πάσα στιγμή να αποκρύψετε τη μάσκα πατώντας στο εικονίδιο του ματιού
![]() μπροστά από την Γρήγορη μάσκα.
μπροστά από την Γρήγορη μάσκα.
Η μάσκα κωδικοποιείται σε γκρι τόνους, έτσι πρέπει να χρησιμοποιήσετε άσπρο ή γκρι για να μειώσετε την περιοχή που περιορίζεται από τη μάσκα και μαύρο για να την αυξήσετε. Η βαμμένη περιοχή σε ανοιχτό ή σκούρο γκρι θα είναι μεταβατικές περιοχές για την επιλογή όπως απάλυνση. Όταν η μάσκα σας είναι έτοιμη, κλικ ξανά στο κάτω αριστερό κουμπί στο παράθυρο εικόνας και η γρήγορη μάσκα θα αφαιρεθεί από τη λίστα καναλιού και θα μετατραπεί σε επιλογή.
Ο σκοπός της γρήγορης μάσκας είναι να βάψει μια επιλογή και τις μεταπτώσεις της με τα εργαλεία ζωγραφικής χωρίς ανησυχίες για τη διαχείριση των μασκών επιλογής. Είναι ένας καλός τρόπος για απομόνωση ενός υποκειμένου σε μια εικόνα, επειδή αφού γίνει η επιλογή πρέπει να αφαιρέσετε μόνο το περιεχόμενό της (ή να αντιστρέψετε εάν το υποκείμενο είναι στην επιλογή).

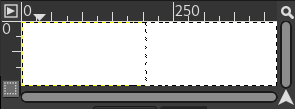
Στιγμιότυπο οθόνης του παραθύρου εικόνας με ενεργοποιημένη τη Γρήγορη μάσκα. Όσο η Γρήγορη μάσκα είναι ενεργοποιημένη, όλες οι λειτουργίες εκτελούνται σε αυτήν. Έχει εφαρμοστεί μια διαβάθμιση από μαύρο (αριστερά) σε λευκό (δεξιά) στη μάσκα.
Η Γρήγορη μάσκα είναι πλέον απενεργοποιημένη. Η επιλογή καταλαμβάνει το δεξί μισό της εικόνας (διακεκομμένες γραμμές) επειδή το όριο της επιλογής βρίσκεται στη μέση της διαβάθμισης.
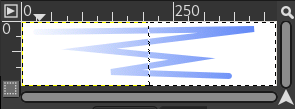
Μια πινελιά έχει τώρα προστεθεί κατά την ενεργοποιημένη επιλογή. Περίεργο! Η διαβάθμιση, αν και αόρατη, παραμένει ενεργή πάνω από την εικόνα, σε επιλεγμένες και μη επιλεγμένες περιοχές!
Μετά το πάτημα του πλήκτρου γρήγορης μάσκας, η εντολή παράγει ένα προσωρινό κανάλι 8 δυαδικών (0-255), στο οποίο η προοδευτική επιλογή εργασίας αποθηκεύεται. Εάν η επιλογή είναι ήδη παρούσα η μάσκα αρχικοποιείται με το περιεχόμενο της επιλογής. μόλις η γρήγορη μάσκα ενεργοποιηθεί, η εικόνα καλύπτεται από ένα κόκκινο ημιδιαφανές πέπλο. Αυτό αναπαριστά τα ανεπίλεκτα εικονοστοιχεία. Οποιοδήποτε Εργαλείο βαφής μπορεί να χρησιμοποιηθεί για δημιουργία επιλογής στη γρήγορη μάσκα. Πρέπει να χρησιμοποιήσουν μόνο χρώμα γκρι κλίμακας, σύμφωνο με τις ιδιότητες του καναλιού, ενεργοποίηση του λευκού για καθορισμό της μελλοντικής επιλεγμένης τοποθεσίας. Η επιλογή θα εμφανιστεί μόλις η γρήγορη μάσκα εναλλαγεί, αλλά το προσωρινό της κανάλι δε θα είναι πια διαθέσιμο.
|
|
Υπόδειξη |
|---|---|
|
Για να αποθηκεύσετε σε ένα κανάλι την επιλογή που έγινε με τη Γρήγορη μάσκα επιλέξτε στο κύριο μενού → . |
-
Άνοιγμα μιας εικόνας ή εκκίνηση ενός νέου εγγράφου.
-
Ενεργοποίηση της γρήγορης μάσκας χρησιμοποιώντας το κάτω αριστερό πλήκτρο στο παράθυρο εικόνας. Εάν η επιλογή είναι παρούσα, η μάσκα αρχικοποιείται με το περιεχόμενο της επιλογής.
-
Επιλέξτε ένα εργαλείο σχεδίασης και χρησιμοποιήστε το με χρώματα γκρι κλίμακας στη γρήγορη μάσκα.
-
Απενεργοποίηση της γρήγορης μάσκας χρησιμοποιώντας το κάτω αριστερό πλήκτρο στο παράθυρο εικόνας.


