
La finestra dei canali è l'interfaccia principale per alterare, modificare e gestire i canali. I canali hanno un duplice uso, per questo motivo la finestra è divisa in due parti: la prima parte per i canali dei colori e la seconda parte per le "maschere di selezione.
I canali dei colori si riferiscono all'immagine e non ad uno specifico livello. Fondamentalmente per generare l'intera gamma dei colori naturali sono necessari tutti tre i colori primari. Come altri programmi digitali, GIMP usa come colori primari il rosso, il verde ed il blu. I primi che troviamo sono i canali dei colori primari e mostrano il valore del Rosso, del Verde, e del Blu di ogni pixel dell'immagine.
Accanto ad ogni canale c'è una miniatura che visualizza una rappresentazione in scala di grigi di ogni canale, nella quale il bianco equivale al 100% ed il nero allo 0% del colore primario. In alternativa, quando l'immagine non è a colori ma in scala di grigi, ci sarà solo un canale primario il Grigio. Anche per un'immagine indicizzata, con un numero fisso di colori noti, ci sarà un solo canale primario, chiamato Indicizzato.
Esiste anche un canale secondario opzionale chiamato Alfa. Questo canale mostra i valori di trasparenza di ogni pixel nell'immagine (consultare nel glossario la voce Canale alfa). Di fronte a questo canale c'è una miniatura che visualizza una rappresentazione della trasparenza dove il bianco è opaco e visibile, il nero è trasparente ed invisibile. Se si crea un'immagine senza trasparenza il canale alfa non è presente, ma può essere aggiunto dal menu contestuale della finestra dei livelli. Inoltre, se l'immagine ha più di un livello, GIMP crea automaticamente un canale alfa.
![[Nota]](images/note.png)
|
Nota |
|---|---|
|
GIMP non supporta (ancora) i modelli di colore CMYK o YUV. |
Figura 15.7. Rappresentazione di un'immagine con canali

Canele rosso
Canale verde
Canale blu
Canale alfa

Tutti i canali
L'immagine di destra viene scomposta nei canali dei tre colori primari (rosso, verde, e blu) oltre al canale alfa per la trasparenza. Nell'immagine di destra la trasparenza viene visualizzata a scacchi grigi. Nei canali dei colori il bianco è sempre bianco, perché sono presenti tutti i colori, ed il nero è nero. Il capello rosso è distinguibile nel canale rosso, ma è quasi impercettibile negli altri canali. Questo vale anche per le parti completamente verdi e blu che sono distinguibili solo nei loro rispettivi canali ed impercettibili negli altri.
Questa finestra di dialogo è di tipo agganciabile; vedere la sezione sulle Finestre agganciabili per le istruzioni su come gestire questo tipo di finestre.
È accessibile:
-
Dal menu principale tramite: → → .
-
Dal menu scheda di un qualsiasi pannello agganciabile facendo clic su
 e selezionando → .
Nel menu , c'è un elenco di pannelli staccati che esiste sono se almeno un pannello rimane aperto. In questo caso, è possibile portare in primo piano il pannello «Canali» dal menu principale agendo su: → .
- Panoramica
-
La finestra di dialogo Canali contiene un elenco di canali colore e il canale alfa opzionale. Sotto si trova un elenco di canali di maschera di selezione. Facendo clic con il pulsante destro del mouse su una voce dell'elenco canali si apre il menu contestuale del canale.
I canali colore sono sempre organizzati nello stesso ordine. Non possono essere rimossi. È possibile solo modificarne la visibilità e selezionarli o deselezionarli. Per impostazione predefinita, tutti questi canali sono visibili e selezionati.
Per selezionare un canale, fare clic su un canale colore nell'elenco. In questo modo si attiva/disattiva la selezione del canale, ovvero un canale selezionato diventerà deselezionato e viceversa. I canali colore selezionati appaiono evidenziati nella finestra di dialogo.
![[Attenzione]](images/caution.png)
Attenzione Deselezionare uno dei canali colore rosso, blu o verde ha pesanti conseguenze. Ad esempio, se si disabilita il canale blu, tutti i pixel aggiunti all'immagine da ora in poi non avranno una componente blu, e quindi un pixel bianco avrà il colore complementare giallo.
Rendere invisibile uno dei canali colore non influenza il funzionamento degli strumenti e modifica solo ciò che è attualmente visualizzato sullo schermo. Ad esempio, un pennello continuerà a dipingere normalmente e la gomma modificherà il valore alfa dei pixel anche quando il canale alfa è impostato su non visibile.
I canali colore selezionati definiscono quali parti dell'azione di uno strumento vengono applicate al livello. Ad esempio, la gomma non modificherà l'immagine se il canale alfa non è selezionato.
Nota I comandi di duplicazione e selezione descritti di seguito possono essere utilizzati anche sui canali colore. Tuttavia, questo funziona solo se si accede al comando dal menu contestuale del tasto destro del mouse e solo per un canale alla volta.
- Selezione multipla dei canali
-
GIMP consente di selezionare più canali di maschera di selezione ed eseguire azioni su di essi. Ad esempio, è possibile spostarli in una posizione diversa nella pila dei canali e convertirli in selezioni. La selezione di più canali avviene utilizzando il mouse e il tasto Maiusc, per aggiungere un intervallo di canali, o il tasto Ctrl, per aggiungere o rimuovere il canale cliccato.
- Intestazione elenco dei canali
-
Direttamente sopra l'elenco delle maschere di selezione si trova la barra dell'intestazione. Sulla sinistra sono presenti le icone che identificano le colonne di visibilità e blocco. Al centro, un'etichetta di testo indica quanti canali sono attualmente selezionati, se più di uno.
- Proprietà dei canali
-
Ogni canale viene mostrato nell'elenco con i suoi attributi, che sono molto simili agli attributi di livello:
-
 Visibilità canale
-
Per impostazione predefinita, tutti i canali colore sono visibili e i canali maschera colore sono invisibili. Facendo clic sul simbolo dell'occhio, o sullo spazio vuoto se il canale non è visibile, si attiva/disattiva la visibilità del canale. Premendo Maiusc e facendo clic sull'icona, tutti gli altri canali vengono nascosti.
-
 Attributi di blocco dei canali
-
Ogni canale della maschera di selezione ha attributi di blocco. Se uno di questi attributi è impostato, la rispettiva icona di blocco apparirà davanti alla miniatura.
Quando sono impostati più attributi, qui verrà visualizzata un'icona a forma di doppio lucchetto. Cliccando in questa colonna è possibile modificare questi attributi.
-
 Blocca i pixel
-
Questa icona mostra quando l'opzione «blocca pixel» è abilitata per il canale corrente. Quando questa opzione è abilitata, il canale è bloccato per qualsiasi azione che modifichi i pixel, il che significa che non verranno apportate modifiche a questo canale.
-
 Blocca posizione e dimensioni
-
Questa icona mostra quando «Blocca posizione e dimensione» è abilitata per il canale corrente. Quando questa opzione è abilitata, il canale è bloccato per qualsiasi azione che ne modifichi la posizione o le dimensioni.
-
 Blocca visibilità
-
Questo pulsante controlla l'impostazione «Blocco» per la visibilità del canale. Se questa opzione è abilitata, la visibilità del canale non può essere modificata finché non si disabilita il blocco.
-
- Miniatura
-
Una piccola icona-anteprima rappresenta l'effetto del canale. Questa anteprima può essere allargata mantenendo il pulsante del mouse premuto su di essa.
- Nome canale
-
Il nome del canale, che deve essere unico all'interno dell'immagine. Facendo doppio clic sul nome di un canale maschera di selezione permette di modificarlo. I nomi dei canali primari (Rosso, Verde, Blu e Alfa) non possono essere modificati. Facendo doppio clic sull'icona dell'anteprima si aprirà una finestra di dialogo dove si potrà impostare tutti gli attributi di canale.
-
- Gestione dei canali
-
La barra dei pulsanti in basso offre le seguenti funzionalità:
-
 Nuovo canale
-
Questo crea un nuovo canale. Si aprirà una finestra di dialogo in cui è possibile impostare il Nome del canale, l' Etichetta colore, gli attributi del canale e gli attributi di blocco, e infine l'Opacità e il colore utilizzato per la maschera nella finestra dell'immagine. Facendo clic sul pulsante Colore si apre il selettore colori di GIMP, dove è possibile modificare il colore della maschera.
Se si preme il tasto Maiusc mentre si fa clic sul pulsante , la finestra di dialogo Nuovo canale non verrà aperta. Verrà invece creato un nuovo canale con le stesse impostazioni utilizzate in precedenza. Questo nuovo canale è una maschera di selezione applicata all'immagine. Per maggiori dettagli, consultare la sezione sulla Maschera di selezione.
-
 Alza i canali
-
Questo sposta i canali selezionati in alto nella lista. Premendo il tasto Maiusc si sposta il canale in cima alla lista.
-
 Abbassa i canali
-
Questo sposta il canale in basso nella lista. Premendo il tasto Maiusc si sposta il canale in fondo alla lista.
-
 Duplica canali
-
Crea una copia dei canali selezionati. Al nome dei nuovi canali viene aggiunto un numero.
![[Suggerimento]](images/tip.png)
Suggerimento È possibile duplicare anche il canale di un colore o il canale alfa. È un modo semplice per conservare una loro copia da usare in seguito come selezione all'interno dell'immagine. Si noti che si può duplicare solo un canale colore alla volta e solo utilizzando il menu contestuale del tasto destro del mouse.
-
 Rimpiazza la selezione con i canali selezionati
-
Questo trasforma i canali selezionati in una selezione. Per impostazione predefinita la selezione derivata dai canali sostituisce la selezione attiva. È possibile modificare questo comportamento premendo i tasti di controllo.
-
Maiusc: la selezione derivata da un canale viene aggiunta alla selezione attiva. La selezione risultante è data dalla somma di entrambe.
-
Ctrl: la selezione finale è la sottrazione della selezione derivata da un canale dalla selezione attiva.
-
Maiusc+Ctrl: la selezione finale è data dall'intersezione della selezione derivata da un canale con quella attiva. Vengono mantenute solo le parti in comune.
-
-
 Elimina canali
-
Questo rimuove i canali selezionati.
-
- Panoramica
-
È possibile richiamare il menu contestuale dei canali facendo clic con il tasto destro su un canale. Diverse delle operazioni sui canali sono operazioni disponibili anche attraverso i pulsanti presenti in fondo all'elenco dei canali. Queste operazioni sono documentate qui.
Questi comandi, ad eccezione di Modifica gli attributi di canale..., funzionano anche quando sono selezionati più canali.
- Modifica gli attributi di canale...
-
Disponibile solo per le maschere di selezione. Da qui si può modificare il Nome del canale, l'Etichetta colore, gli Attributi di canale e gli attributi di blocco, ed infine l'Opacità ed il colore utilizzato per la maschera nella finestra dell'immagine. Un clic sul pulsante del colore fa apparire il selettore dei colori di GIMP dal quale è possibile cambiare il colore della maschera.
- Etichette colore
-
Disponibile solo per le maschere di selezione. Consente di assegnare una etichetta colore a uno o più canali. Se si dispone di molti canali, ciò può semplificarne l'identificazione assegnando ai canali correlati la stessa etichetta colore. Per rimuovere l'etichetta colore scegliere Nessuna.
- Nuovo canale..., Alza i canali, Abbassa i canali, Duplica canali, Elimina canali
-
Vedere gestione dei canali.
- Canali a selezione
-
La selezione derivata dai canali selezionati sostituisce la selezione precedentemente attiva.
- Aggiungi canali alla selezione
-
La selezione derivata dai canali selezionati viene aggiunta alla selezione attiva. La selezione risultante è data dall'unione di entrambe.
- Sottrai canali dalla selezione
-
La selezione finale viene derivata data dalla sottrazione della selezione dei canali selezionati dalla selezione attiva.
- Interseca canali con la selezione
-
La selezione finale viene derivata dall'intersezione della selezione dei canali selezionati con quella l'attiva. Vengono mantenute solo le parti selezionate in comune.


I canali possono essere usati per salvare e ripristinare le selezioni. Nella finestra di dialogo dei canali si può osservare una miniatura rappresentante la selezione. Le maschere di selezione rappresentano un modo di costruire le selezioni graficamente: all'interno di un canale in scala di grigi i pixel bianchi rappresentano i pixel selezionati ed i pixel neri quelli non selezionati. Di conseguenza i pixel grigi rappresentano quelli parzialmente selezionati. Si può pensare ad essi come ad una sfumatura della selezione, una transizione graduale tra ciò che è selezionato e ciò che non lo è. Ciò è fondamentale per evitare il brutto effetto scalinato dei pixel quando si riempie una selezione o quando si cancella il suo contenuto dopo aver isolato un soggetto dallo sfondo.
- Creazione delle maschere di selezione
-
Ci sono diversi metodi per inizializzare una maschera di selezione.
-
Dalla menu principale → se c'è una selezione attiva.
-
Nella finestra immagine il pulsante presente in basso a sinistra
 crea una Maschera veloce; il contenuto sarà inizializzato con la selezione attiva.
 -
Dalla finestra di dialogo dei canali, quando si fa clic sul pulsante Nuovo canale o dal menu contestuale. Una volta creato, appare questa maschera di selezione nella finestra di dialogo dei canali, con il nome di «Qmask copia» seguito da un simbolo cancelletto # e da un numero progressivo ad ogni ulteriore aggiunta. Si può cambiare questa etichetta usando il menu contestuale che si ottiene con il tasto destro del mouse sulla voce del canale.
-
Una volta che il canale è stato creato, selezionato (evidenziato in blu), visibile (icona con l'occhio nella finestra), e visualizzato nel modo desiderato (attributi di colore ed opacità), si può iniziare a lavorarvi con tutti gli strumenti di disegno. I colori utilizzati sono importanti: se si dipinge con colori diversi da bianco, grigio o nero, il valore del colore (luminosità) sarà usato per definire un grigio (medio, chiaro o scuro). Quando la maschera è stata dipinta, la si può trasformare in una selezione, facendo clic sul pulsante
![]() (Canale a selezione) o dal menu contestuale.
(Canale a selezione) o dal menu contestuale.
È possibile lavorare sulle maschere di selezione non solo con gli strumenti di disegno ma anche con altri strumenti. Per esempio, si può usare gli strumenti di selezione per riempire aree uniformemente con gradienti o motivi. Aggiungendo molte maschere di selezione nel nostro elenco è facile comporre selezioni molto complesse. Si può dire che la maschera di selezione sta alla selezione come un livello sta ad un'immagine.
|
|
Attenzione |
|---|---|
|
Fintanto che una maschera di selezione è attiva si lavora sulla maschera e non sull'immagine. Per lavorare sull'immagine è necessario disattivare tutte le maschere di selezione. Non va dimenticato anche di disabilitare la visualizzazione delle maschere nell'immagine, eliminando l'icona con l'occhio. Va anche controllato che tutti i canali RGB e alfa sia attivi e visualizzati nell'immagine. |
Una Maschera veloce è una Maschera di Selezione pensata per essere utilizzata temporaneamente per disegnare una selezione. Con il termine temporaneamente si intende che, a differenza delle normali maschere di selezione, questa non viene salvata nella lista dopo essere stata trasformata in selezione. Alle volte gli strumenti di selezione mostrano i loro limiti nel disegnare progressivamente delle selezioni complesse. In questi casi, l'utilizzo della maschera veloce è una buona idea che può portare a dei risultati molto buoni.
La maschera veloce può essere attivata in modi diversi:
-
Dal menu principale: → .
-
Facendo clic sul pulsante in basso a sinistra
evidenziato nella schermata. -
Attraverso la combinazione di tasti (predefinita): Ctrl+L.
Per inizializzare una maschera veloce, fare clic sul pulsante in basso a sinistra
![]() della finestra immagine. Se una selezione era attiva nell'immagine, i suoi contenuti appaiono intatti mentre il suo bordo è ricoperto da un colore rosso trasparente. Se non c'è nessuna selezione attiva allora tutta l'immagine appare ricoperta di un colore rosso trasparente. Un altro clic sul pulsante in basso a sinistra e si riporta la situazione allo stato iniziale disattivando la maschera veloce.
della finestra immagine. Se una selezione era attiva nell'immagine, i suoi contenuti appaiono intatti mentre il suo bordo è ricoperto da un colore rosso trasparente. Se non c'è nessuna selezione attiva allora tutta l'immagine appare ricoperta di un colore rosso trasparente. Un altro clic sul pulsante in basso a sinistra e si riporta la situazione allo stato iniziale disattivando la maschera veloce.
Dal pannello canali si può fare doppio clic sul none o sulla miniatura per modificare gli attributi della Maschera veloce. Poi si può cambiare l'opacità ed il suo colore di riempimento. In ogni momento è possibile nascondere la maschera facendo clic sull'icona a forma di occhio  di fronte alla Maschera veloce.
La maschera è codificata in tonalità di grigi, perciò è necessario usare il bianco o il grigio per decrementare l'area limitata dalla maschera e il nero per incrementarla. L'area disegnata in grigio chiaro o scuro sarà l'area di transizione per la selezione come succede per la selezione sfumata. Quando la maschera è pronta, fare clic nuovamente sul pulsante in basso a sinistra nella finestra immagine e la maschera veloce verrà rimossa dall'elenco dei canali e convertita in una selezione.
Lo scopo della maschera veloce è di disegnare una selezione e le sue transizioni con gli strumenti di disegno senza preoccuparsi della gestione delle maschere di selezione. È un buon metodo per isolare un soggetto in una immagine visto che una volta che la selezione è stata effettuata non rimane che rimuovere il suo contenuto (o la parte esterna se il soggetto è nella selezione).
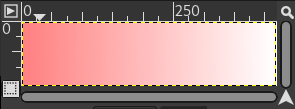
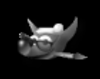
Schermata della finestra immagine con la maschera veloce attivata. Durante l'attivazione della maschera veloce, tutte le operazioni vengono svolte su di essa. È stato applicato ad essa un gradiente che va dal nero (a sinistra) fino al bianco (a destra).
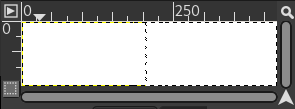
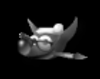
La maschera veloce ora è disabilitata. La selezione occupa la metà destra dell'immagine (è visibile il bordo lampeggiante della selezione) dato che il limite della selezione è a metà del gradiente.

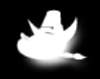
Un tratto viene ora aggiunto durante la selezione abilitata. Strano! Il gradiente, malgrado non sia visibile, rimane attivo su tutta l'immagine, sia nelle aree selezionate che in quelle che non lo sono!
Appena viene premuto il pulsante della maschera veloce, il comando genera un canale temporaneo a 8 bit (0-255), nel quale viene salvato il lavoro sulla selezione progressiva. Se è già presente una selezione, la maschera viene creata con il contenuto della selezione. Una volta che è stata attivata la maschera veloce, l'immagine viene ricoperta da un velo rosso semitrasparente, che rappresenta i pixel non selezionati. Per creare la selezione nella maschera veloce può essere usato qualsiasi strumento di disegno. Questo dovrà usare solo colori in scala di grigi, in conformità alle caratteristiche del canale, abilitando in bianco le zone che verranno selezionate. Appena la maschera veloce viene disabilitata appare la selezione, ma il canale temporaneo non sarà più disponibile.
|
|
Suggerimento |
|---|---|
|
Per salvare in un canale la selezione effettuata con la maschera veloce selezionare nel menu principale → . |
-
Aprire un'immagine oppure iniziare una nuova immagine.
-
Attivare la maschera veloce usando il pulsante in basso a sinistra nella finestra immagine. Se è presente una selezione la maschera viene creata con il contenuto della selezione.
-
Scegliere uno strumento di disegno ed usarlo sulla maschera veloce con colori in scala di grigi.
-
Disattivare la maschera veloce usando il pulsante in basso a sinistra nella finestra immagine.


