
Dialogen Kanaler er den primære måde at redigere, ændre og administrere dine kanaler på. Kanaler har en dobbelt anvendelse. Det er derfor, dialogen er opdelt i to dele: den første del til farvekanaler og den anden del til markeringsmasker.
Farvekanaler gælder for billedet og ikke for et bestemt lag. Grundlæggende er tre primære farver nødvendige for at gengive hele den brede vifte af naturlige farver. Som anden digital software bruger GIMP rød, grøn og blå som primære farver. De første og primære kanaler viser værdierne rød, grøn og blå for hver pixel i billedet.
Ved siden af kanalnavnet er der en miniature, der viser en gråtonerepræsentation af hver kanal, hvor hvid er 100 % og sort er 0 % af den primære farve. Alternativt, hvis dit billede ikke er et farvet billede, men et gråtonebillede, er der kun én primær kanal kaldet Grå. For et indekseret billede med et fast antal kendte farver er der også kun én primær kanal kaldet Indekseret.
Så er der en ekstra kanal kaldet Alfa. Denne kanal viser gennemsigtighedsværdier for hver pixel i billedet (se alfakanal i ordlisten). Foran denne kanal er der en miniature, der viser en gråtonerepræsentation af gennemsigtigheden, hvor hvid er uigennemsigtig og synlig, og sort er gennemsigtig og usynlig. Hvis du opretter dit billede uden gennemsigtighed, er alfakanalen ikke til stede, men du kan tilføje den fra dialogen Lags genvejsmenu. Hvis du har mere end ét lag i billedet, opretter GIMP automatisk en alfakanal.
![[Bemærk]](images/note.png)
|
Bemærk |
|---|---|
|
GIMP understøtter ikke CMYK- og YUV-farvemodeller. |
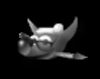
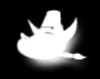
Figur 15.7. Repræsentation af et billede med kanaler
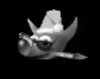
Rød kanal
Grøn kanal
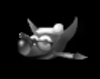
Blå kanal
Alfakanal

Alle kanaler
Billedet til højre er opdelt i tre farvekanaler (rød, grøn og blå) og alfakanalen for gennemsigtighed. På det højre billede vises gennemsigtigheden som et gråt skakbræt. I farvekanalen er hvid altid hvid, fordi alle farverne er til stede, og sort er sort. Den røde hat er synlig i den røde kanal, men helt usynlig i de andre kanaler. Det samme gælder for grøn og blå, som kun er synlige i deres egne kanaler og usynlige i de andre.
Dialogen kan dokkes. Se hvordan i afsnittet Afsnit 2.3, “Dialoger og dokning”.
Du kan tilgå den:
-
gennem hovedmenuen: → → .
-
fra fanebladsmenuen i enhver dokbar dialog ved at klikke på
 og vælge → .
I menuen er der en liste over frigjorte vinduer, som kun findes, hvis mindst én dialog forbliver åben. I dette tilfælde kan du åbne dialogen “Kanaler” i hovedmenuen: → .
- Overblik
-
Dialogen Kanaler består af en liste over farvekanaler og den valgfrie alfakanal. Nedenunder den er en liste over markeringsmaskekanaler. Et højreklik på et element i kanallisten åbner kanalens genvejsmenu.
Farvekanalerne er altid organiseret i samme rækkefølge. De kan ikke fjernes. Man kan kun ændre deres synlighed og vælge eller fravælge dem. Som standard er alle disse kanaler synlige og valgt.
For at vælge en kanal skal du klikke på en farvekanal på listen. Dette skifter valg af kanal, hvilket betyder, at en valgt kanal bliver fravalgt og omvendt. De valgte farvekanaler vises fremhævet i dialogen.
![[Pas på]](images/caution.png)
Pas på Det har alvorlige konsekvenser at fravælge en af farvekanalerne rød, blå eller grøn. Hvis du f.eks. deaktiverer den blå kanal, vil alle pixels, der føjes til billedet fra nu af, ikke have en blå komponent, og en hvid pixel vil derfor have den gule komplementærfarve.
Gøres en af farvekanalerne usynlig, har det ingen indflydelse på, hvordan værktøjerne fungerer, og ændrer kun det, der aktuelt vises på skærmen. For eksempel vil en pensel fortsætte med at male som normalt, og viskelæderet vil ændre pixlernes alfaværdi, også når alfakanalen er indstillet til ikke at være synlig.
De valgte farvekanaler definerer, hvilke dele af et værktøjs handling der anvendes på laget. F.eks. vil viskelæderet ikke ændre dit billede, hvis alfakanalen ikke er valgt.
Bemærk De duplikerings- og markeringskommandoer, der er dokumenteret nedenfor, kan også bruges på farvekanalerne. Det virker dog kun, når man åbner kommandoen fra højrekliksgenvejsmenuen, og kun for én kanal ad gangen.
- Vælg flere kanaler
-
GIMP giver dig mulighed for at vælge flere markeringsmaskekanaler og udføre handlinger på dem. Du kan f.eks. flytte dem til en anden placering i kanalstakken og konvertere dem til markeringer. Man vælger flere kanaler ved at bruge musen og Skift for at tilføje en række kanaler eller Ctrl for at tilføje eller fjerne det lag, man har klikket på.
- Kanallistens overskriftslinje
-
Lige over makeringsmaskelisten er overskriftslinjen. Til venstre er der ikoner, som identificerer kolonnerne for synlighed og lås. I midten fortæller en tekstetiket, hvor mange lag der er valgt i øjeblikket, hvis det er mere end ét.
- Kanalegenskaber
-
Hver kanal vises i listen med sine egne egenskaber, som er meget lig lagegenskaber:
-
 Kanalers synlighed
-
Som standard er alle farvekanaler synlige, og farvemaskekanaler er usynlige. Ved at klikke på øjesymbolet eller det tomme felt, hvis kanalen ikke er synlig, ændrer man kanalens synlighed. Skift-klik på ikonet får alle andre kanaler til at blive skjult.
-
 Egenskaber for kanallås
-
Hver markeringsmaskekanal har låseegenskaber. Hvis en af egenskaberne er indstillet, vises det respektive låseikon foran miniaturebilledet.
Når flere egenskaber er indstillet, vises et dobbelt låseikon her. Ved at klikke i denne kolonne kan du ændre disse egenskaber.
-
 Lås pixels
-
Dette ikon viser, om “lås pixels” er aktiveret for den aktuelle kanal. Når denne funktion er aktiveret, er kanalen låst for enhver handling, der ændrer pixels, hvilket betyder, at der ikke vil blive foretaget ændringer i denne kanal.
-
 Lås placering og størrelse
-
Dette ikon viser, om “lås position og størrelse” er aktiveret for den aktuelle kanal. Når denne funktion er aktiveret, er kanalen låst for enhver handling, der ændrer positionen eller størrelsen.
-
 Lås synlighed
-
Denne knap styrer indstillingen “Lås” for kanalens synlighed. Hvis den er aktiveret, kan kanalens synlighed ikke ændres, før låsen deaktiveres.
-
- Miniature
-
Et lille forhåndsvisningsikon repræsenterer kanalens effekt. Denne forhåndsvisning kan forstørres ved at holde venstre museknap nede på ikonet.
- Kanalnavn
-
Navnet på kanalen, som skal være unikt i billedet. Hvis du dobbeltklikker på navnet på en markeringsmaskekanal, kan du redigere det. Navnene på de primære kanaler (rød, grøn, blå, alfa) kan ikke ændres. Hvis du dobbeltklikker på forhåndsvisningsikonet, åbnes en dialog, hvor du kan indstille alle kanalegenskaber.
-
- Håndtering af kanaler
-
Knapbjælken i bunden tilbyder følgende funktioner:
-
 Ny kanal
-
Opretter en ny kanal. En dialog åbnes, hvor du kan angive Kanalnavn, Farvemærkat, kanalegenskaber, lås af egenskaber og uigennemsigtighed samt den farve, der bruges til masken i billedvinduet. Et klik på farveknappen viser GIMPs farvevælger, hvor du kan ændre maskens farve.
Hvis du trykker på Skift, mens du klikker på knappen , åbnes dialogen Ny kanal ikke. I stedet oprettes den nye kanal med de samme indstillinger som tidligere. Denne nye kanal er en markeringsmaske, der anvendes over billedet. Se flere detaljer i Markeringsmaske.
-
 Hæv kanaler
-
Flytter de valgte kanaler op på listen. Tryk på Skift-tasten for at flytte de valgte kanaler til toppen af listen.
-
 Sænk kanaler
-
Flytter de valgte kanaler ned på listen. Tryk på Skift-tasten for at flytte de valgte kanaler til bunden af listen.
-
 Duplikér kanaler
-
Opretter en kopi af de valgtee kanaler. Navnet på de nye kanaler er efterfulgt af et nummer.
![[Vink]](images/tip.png)
Vink Du kan også duplikere farvekanaler eller alfakanalen. Det er en nem måde at beholde en kopi af dem på og bruge dem senere som en markering i et billede. Bemærk, at man kun kan duplikere én farvekanal ad gangen og kun ved hjælp af højrekliksgenvejsmenuen.
-
 Erstat markeringen med valgte kanaler
-
Omdanner de valgte kanaler til en markering. Som standard erstatter markeringen fra kanaler den aktive markering. Du kan ændre dette ved at bruge ændringstaster.
-
Skift: Markeringen, der stammer fra en kanal, føjes til den aktive markering. Den endelige markering er en sammenlægning af de to.
-
Ctrl: Den endelige markering er subtraktionen af markeringen, der stammer fra en kanal, fra den aktive markering.
-
Skift+Ctrl: Den endelige markering er gennemskæringen mellem markeringen fra en kanal og den aktive markering. Kun de markerede dele, der er fælles for begge, bevares.
-
-
 Slet kanaler
-
Sletter de valgte kanaler.
-
- Overblik
-
Du kan få kanalernes genvejsmenu frem ved at højreklikke på en kanal. Flere af operationerne på kanaler er også tilgængelige via knapper i bunden af kanallisten. Disse operationer er dokumenteret her.
Disse kommandoer, undtagen Redigér kanalegenskaber …, fungerer også, når der er valgt flere kanaler.
- Redigér kanalegenskaber …
-
Kun tilgængelig for markeringsmasker. Her kan du ændre Kanalnavn, Farvemærkat, kanalegenskaber, lås af egenskaber og Udfyldningens uigennemsigtighed samt den farve, der bruges til masken i billedvinduet. Et klik på farveknappen viser GIMPs farvevælger, hvor du kan ændre maskens farve.
- Farvemærkater
-
Kun tilgængelig for markeringsmasker. Dette giver dig mulighed for at tildele en farvemærkat til en eller flere valgte kanaler. Hvis du har mange kanaler, kan det gøre det lettere at identificere dem ved at give relaterede kanaler det samme farvemærkat. For at fjerne farvemærkaten skal du vælge Ingen.
- Ny kanal …, Hæv kanaler, Sænk kanaler, Duplikér kanaler, Slet kanaler
- Kanaler til markering
-
Markeringen, der stammer fra de valgte kanaler, erstatter den tidligere aktive markering.
- Tilføj kanaler til markering
-
Markeringen fra de valgte kanaler føjes til den aktive markering. Den endelige markering består af en sammenlægning af de to.
- Træk kanaler fra markering
-
Den endelige markering består af den aktive markering minus en markering, der stammer fra de valgte kanaler.
- Gennemskær kanaler med markering
-
Den endelige markering er gennemskæringen af markeringen, der stammer fra de valgte kanaler, og den aktive markering. Kun de markerede dele, der er fælles for begge, bevares.


Kanaler kan bruges til at gemme og gendanne dine markeringer. I dialogen Kanaler kan du se en miniature, der repræsenterer markeringen. Markeringsmasker er en grafisk måde at opbygge markeringer i en gråtonekanal, hvor hvide pixels er markeret, og sorte pixels ikke er markeret. Derfor er grå pixels delvist markeret. Du kan tænke på dem som en udjævning af markeringen, en jævn overgang mellem markeret og ikke markeret. Det er vigtigt for at undgå den grimme pixeleringseffekt, når du udfylder markeringen, eller når du sletter dens indhold efter at have isoleret et motiv fra baggrunden.
- Opret markeringsmasker
-
Der er flere måder at initialisere en markeringsmaske på.
-
Gennem hovedmenuen → , hvis der er en aktiv markering.
-
I billedvinduet opretter
 knappen nederst til venstre en Ekspresmaske; indholdet vil blive initialiseret med den aktive markering.
 -
I dialogen Kanaler, når du klikker på knappen Ny kanal eller fra genvejsmenuen. Når den er oprettet, vises markeringsmasken i dialogen Kanaler med navnet “Markeringsmaske-kopi” og et løbenummer, hvis der oprettes mere end en kanal. Du kan ændre dette ved at bruge genvejsmenuen, som du får ved at højreklikke på kanalen.
-
Når kanalen er initialiseret, valgt (fremhævet med blåt), synlig (øjeikon i dialogen) og vist, som du ønsker (farve- og uigennemsigtighedsegenskaber), kan du begynde at arbejde med alle maleværktøjerne. De anvendte farver er vigtige. Hvis du maler med en anden farve end hvid, grå eller sort, vil farveværdien (luminositet) blive brugt til at definere en grå (medium, lys eller mørk). Når din maske er malet, kan du omdanne den til en markering ved at klikke på knappen
![]() (Kanal til markering) eller via genvejsmenuen.
(Kanal til markering) eller via genvejsmenuen.
Du kan arbejde i markeringsmasker ikke kun med maleværktøjet, men også med andre værktøjer. For eksempel kan du bruge markeringsværktøjerne til at udfylde områder ensartet med farveovergange eller mønstre. Ved at tilføje mange markeringsmasker i din liste kan du nemt sammensætte meget komplekse markeringer. Man kan sige, at en markeringsmaske er for en markering, som et lag er for et billede.
|
|
Pas på |
|---|---|
|
Så længe en markeringsmaske er aktiveret, arbejder du i masken og ikke i billedet. For at arbejde i billedet skal du deaktivere alle markeringsmasker. Glem heller ikke at stoppe visningen af masker i billedet ved at fjerne øjeikonet. Tjek også, at alle RGB- og alfakanaler er aktiveret og vises i billedet. |
En Ekspresmaske er en Markeringsmaske, der er beregnet til at blive brugt midlertidigt til at male en markering. Midlertidigt betyder, at den i modsætning til en normal markeringsmaske vil blive slettet fra kanallisten, når den er omdannet til en markering. Markeringsværktøjerne viser nogle gange deres begrænsninger, når de skal bruges til at lave komplekse markeringer. I dette tilfælde er det en god idé at bruge Ekspresmaske, som kan give meget gode resultater.
Ekspresmasken kan aktiveres på flere måder:
-
I hovedmenuen: Vælg → .
-
Ved at klikke på knappen
nederst til venstre som fremhævet på skærmbilledet. -
Ved at bruge genvejen Skift+Q.
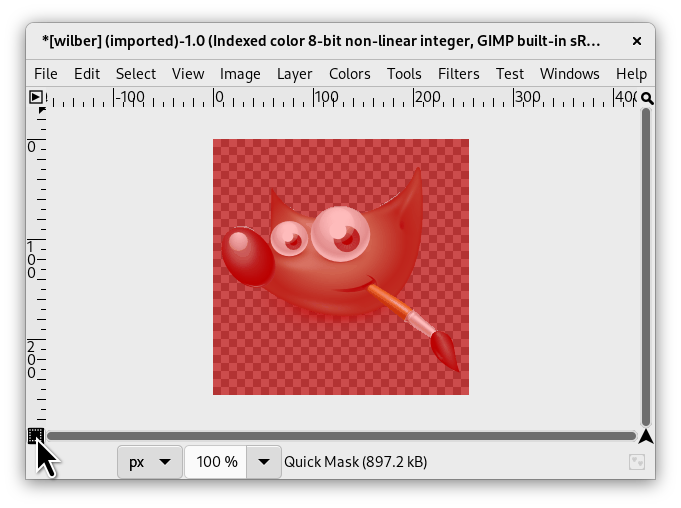
For at slå Ekspresmasken til skal du klikke på knappen
![]() nederst til venstre i billedvinduet. Hvis en markering var aktiv i dit billede, vises indholdet uændret, mens kanten er dækket af en gennemskinnelig rød farve. Hvis ingen markering var aktiv, dækkes hele billedet med en gennemskinnelig rød farve. Endnu et klik på knappen nederst til venstre deaktiverer ekspresmasken.
nederst til venstre i billedvinduet. Hvis en markering var aktiv i dit billede, vises indholdet uændret, mens kanten er dækket af en gennemskinnelig rød farve. Hvis ingen markering var aktiv, dækkes hele billedet med en gennemskinnelig rød farve. Endnu et klik på knappen nederst til venstre deaktiverer ekspresmasken.
I dialogen Kanaler kan du dobbeltklikke på navnet eller miniaturen for at redigere Ekspresmaske-egenskaberne. Derefter kan du ændre Uigennemsigtighed og dens udfyldningsfarve. Du kan til enhver tid skjule masken ved at klikke på øjeikonet
![]() foran Ekspresmasken.
foran Ekspresmasken.
Masken er kodet i gråtoner, så du skal bruge hvid eller grå for at mindske det område, der afgrænses af masken, og sort for at øge det. Det område, der er malet i lys eller mørk grå, vil være overgangsområder for markeringen som udtynding. Når din maske er klar, klikker du igen på knappen nederst til venstre i billedvinduet, og ekspresmasken fjernes fra kanallisten og konverteres til en markering.
Formålet med Ekspresmaske er at male en markering og dens overgange med maleværktøjerne uden at skulle bekymre sig om at håndtere markeringsmasker. Det er en god måde at isolere et motiv i et billede på, for når først markeringen er lavet, behøver du kun at fjerne indholdet (eller omvendt, hvis motivet er i markeringen).
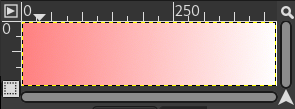
Skærmbillede af billedvinduet med aktiveret Ekspresmaske. Så længe Ekspresmasken er aktiveret, udføres alle operationer på den. En farveovergang fra sort (venstre) til hvid (højre) er blevet lagt på masken.
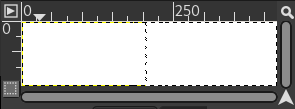
Ekspresmasken er nu deaktiveret. Markeringen optager den højre halvdel af billedet (marcherende myrer), fordi grænsen for markeringen er midt i farveovergangen.
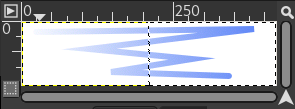
Der tilføjes nu et penselstrøg, mens markeringen er aktiveret. Mærkeligt! Selvom farveovergangen ikke er synlig, forbliver den aktiv over hele billedet, både i markerede og umarkerede områder!
Når der trykkes på Ekspresmaske-knappen, genererer kommandoen en midlertidig 8-bit (0–255) kanal, hvor det progressive markeringsarbejde gemmes. Hvis der allerede er en markering, initialiseres masken med markeringens indhold. Når Ekspresmaske er blevet aktiveret, bliver billedet dækket af et rødt, halvgennemsigtigt slør. Dette slør repræsenterer de ikkevalgte pixels. Alle maleværktøjer kan bruges til at skabe markeringen på Ekspresmasken. De bør kun bruge gråtoner i overensstemmelse med kanalegenskaberne. Hvid gør det muligt at definere det fremtidige valgte sted. Markeringen vises, så snart Ekspresmasken slås fra, men dens midlertidige kanal vil ikke længere være tilgængelig.
|
|
Vink |
|---|---|
|
For at gemme den markering, du har lavet med Ekspresmaske, i en kanal skal du vælge → i hovedmenuen. |
-
Åbn et billede eller opret et nyt dokument.
-
Aktivér ekspresmaske med knappen nederst til venstre i billedvinduet. Er der allerede en markering, initialiseres masken med markeringens indhold.
-
Vælg et maleværktøj og brug det med gråtonefarver på Ekspresmasken.
-
Deaktivér Ekspresmasken med knappen nederst til venstre i billedvinduet.


