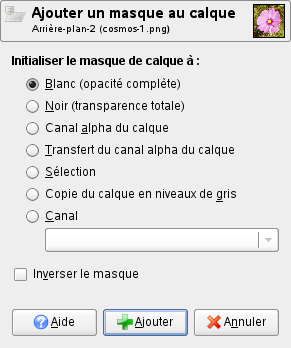
The command adds layer masks to the selected layers. It displays a dialog in which you can set the initial properties of the masks. If the layers already have a layer mask, this menu entry is disabled.
A layer mask lets you define which parts of the layer are opaque, semi-transparent or transparent.
See the Layer Masks section for more information.
You can access this command
-
From the main menu through → → .
-
From the Layers Dialog, you can access it through the command of its context menu, or by clicking on the
icon button on the bottom of that dialog.
- Initialiser le masque de calque à
-
Le menu déroulant vous offre plusieurs choix pour régler le contenu initial du calque de masque :
- Blanc (opacité complète)
-
Cette option produira un masque qui ne sera pas visible puisque, dans un masque de calque, les parties blanches laissent voir les zones correspondantes du calque.
- Noir (transparence totale)
-
Dans un masque de calque, les parties noires masquent totalement le calque. Sur l’image, elles sont représentées par un damier de transparence sur lequel vous peindrez (en blanc) pour faire apparaître certaines parties du calque.
- Canal Alpha du calque
-
Avec cette option, le contenu du canal Alpha est utilisé pour remplir le masque de calque. Notez que le canal Alpha lui-même ne sera pas modifié et que la transparence des zones semi-transparentes est augmentée ce qui aboutit à un calque plus transparent.
- Transfert du canal Alpha du calque
-
Cette option fait la même chose que la précédente sauf qu’elle remet le canal Alpha du calque en pleine opacité. Le résultat est donc le transfert de l’information de transparence du canal Alpha vers le masque de calque, tout en laissant au calque la même apparence qu’avant. La seule différence est que la visibilité du calque est maintenant déterminée par le masque de calque et non par le canal Alpha. En cas de doute, choisissez cette option au lieu de « Canal Alpha du calque », parce qu’elle conservera l’apparence.
- Sélection
-
This option converts the current selection into a layer mask, so that selected areas are opaque, and unselected areas are transparent. If any areas are partially selected, you can click on the Quick Mask button to help you predict what the effects will be.
- Copie du calque en Niveaux de gris
-
Cette option convertit le calque lui-même en un masque de calque. Elle est surtout utile quand vous envisagez d’ajouter un nouveau contenu au calque après coup.
- Canal
-
With this option the layer mask is initialized with a selection mask you have created before, stored in the Channels dialog. Note: that the normal RGBA channels are not part of this list, it only lists the extra channels you have created.
- Inverser le Masque
-
If you check the Invert mask box at the bottom of the dialog, the resulting mask is inverted, so that transparent areas become opaque and vice versa.
When you click on the button, a thumbnail of the layer mask appears to the right of the thumbnail of the layer in the Layers Dialog.


