The command adds layer masks to the selected layers. It displays a dialog in which you can set the initial properties of the masks. If the layers already have a layer mask, this menu entry is disabled.
A layer mask lets you define which parts of the layer are opaque, semi-transparent or transparent.
See the Layer Masks section for more information.
-
You can access this command from the main menu through → → .
-
From the Layers Dialog, you can access it through the command of its context menu, or by clicking on the
 icon button on the bottom of that dialog.
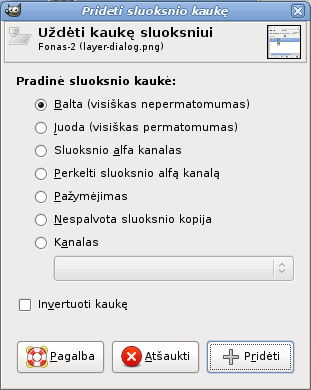
- Pradinė sluoksnio kaukė
-
Šiame dialoge galite pasirinkti pradinį sluoksnio kaukės turinį:
- Balta (visiškas nepermatomumas)
-
Su šia parinktimi sluoksnio kaukė padarys visą sluoksnį nepermatomą. Tai reiškia, kad nepastebėsite jokio sluoksnio skirtumo, kol nepradėsite piešti sluoksnio kaukėje.
- Juoda (visiškas permatomumas)
-
Su šia parinktimi sluoksnio kaukė padarys sluoksnį visiškai permatomą. Tai paveikslėlyje parodyta kaip languotas raštas, kuriame turėsite piešti, kad būtų matoma kokia nors sluoksnio dalis.
- Sluoksnio alfa kanalas
-
Su šia parinktimi sluoksnio kaukė yra užpildoma alfa kanalo turiniu. Pats alfa kanalas nepakeičiamas, todėl dalinai permatomų sričių permatomumas padidinamas, dėl ko gaunamas labiau permatomas sluoksnis.
- Perkelti sluoksnio alfa kanalą
-
Ši parinktis nustato sluoksnio kaukę kaip ankstesnė parinktis, tačiau po to atstato sluoksnio alfa kanalą į visišką nepermatomumą. Poveikis yra perkelti permatomumo informaciją iš alfa kanalo į sluoksnio kaukę, paliekant sluoksnį tokios pat išvaizdos kaip ir anksčiau. Dabar sluoksnio matomumą lemia tik sluoksnio kaukę, o ne alfa kanalas. Jei abejojate, vietoje parinkties „Sluoksnio alfa kanalas“ pasirinkite šią, kadangi ji nepakeis išvaizdos.
- Pažymėjimas
-
This option converts the current selection into a layer mask, so that selected areas are opaque, and unselected areas are transparent. If any areas are partially selected, you can click on the Quick Mask button to help you predict what the effects will be.
- Pilkų atspalvių sluoksnio kopija
-
Ši parinktis konvertuoja patį sluoksnį į sluoksnio kaukę. Ji yra ypač naudinga, kai ketinate po to sluoksnyje pridėti naują turinį.
- Kanalas
-
With this option the layer mask is initialized with a selection mask you have created before, stored in the Channels dialog. Note: that the normal RGBA channels are not part of this list, it only lists the extra channels you have created.
- Invertuoti kaukę
-
If you check the Invert mask box at the bottom of the dialog, the resulting mask is inverted, so that transparent areas become opaque and vice versa.
When you click on the button, a thumbnail of the layer mask appears to the right of the thumbnail of the layer in the Layers Dialog.


