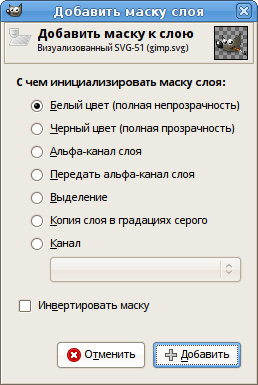
Команда добавляет маски к выбранным слоям. Отображается диалог, в котором можно задать начальные свойства масок. Если слои уже имеют маску, этот пункт меню отключён.
Маска слоя позволяет задать степень прозрачности разным областям слоя.
Подробнее см. в разделе Маски слоя.
Доступ к этой команде можно получить
-
из главного меню → → ,
-
из контекстного меню диалога слоёв, пункт , и нажатием кнопки со значком
внизу этого диалога.
- С чем инициализировать маску слоя
-
Этот диалог позволяет задать начальные свойства маски слоя:
- Белый цвет (полная непрозрачность)
-
Этим параметром маска слоя сделает весь слой полностью непрозрачным. Это значит, что вы не заметите никаких изменений, пока не начнёте рисовать на маске.
- Чёрный цвет (полная прозрачность)
-
Этим параметром маска слоя сделает весь слой полностью прозрачным. На изображении это представлено в виде шахматного узора, который нужно закрасить, чтобы сделать видимой любую часть слоя.
- Альфа-канал слоя
-
При выборе этого параметра маска заполняется альфа-каналом слоя. Сам альфа-канал не изменяется, поэтому прозрачность частично видимых частей увеличивается, что делает слой более прозрачным.
- Передать альфа-канал слоя
-
При выборе этого параметра маска заполняется каналом альфа слоя, как и с предыдущим параметром. Однако в этом случае канал альфа слоя становится полностью непрозрачным. Это, по существу, передаёт маске информацию о прозрачности, не изменяя внешнего вида слоя. Видимость разных частей слоя теперь полностью определяется маской слоя, а не каналом альфа. Если вы не уверены, выбирайте этот параметр вместо параметра «Альфа-канал слоя», так как это не изменить внешнего вида слоя.
- Выделение
-
Этот параметр преобразует активное выделение в маску слоя так, что выделенные области полностью непрозрачные, а невыделенные — полностью прозрачные. Если некоторые области выделены частично, кнопка Быстрая маска позволит предугадать эффект этого параметра.
- Копия слоя в градациях серого
-
Этот параметр преобразует сам слой в маску слоя. Он особенно полезен, когда планируется добавить к слою содержимое.
- Канал
-
С помощью этого параметра маска слоя задаётся маской выделения, созданной ранее и сохранённой в диалоге каналов. Примечание: обычные каналы RGBA не входят в этот список, в нём перечислены только дополнительные каналы, созданные вами.
- Инвертировать маску
-
При выборе параметра Инвертировать маску те области маски, которые бы стали прозрачными, станут непрозрачными, и наоборот.
При нажатии кнопки миниатюра маски появится справа от миниатюры слоя в диалоге слоёв.


