Il pannello «tracciati» si usa per tutte le operazioni di gestione di questi ultimi; esso permette di creare o cancellare tracciati, di convertirli da e in selezioni, ecc. Vedere Sezione 4, « Tracciati » per ulteriori informazioni sui tracciati.
Questa finestra di dialogo è di tipo agganciabile; vedere la sezione sulle Finestre agganciabili per le istruzioni su come gestire questo tipo di finestre.
È accessibile:
-
Dal menu principale, come → → .
-
Da un menu scheda di un qualsiasi pannello agganciabile facendo clic su
 e selezionando → .
Nel menu , c'è una lista di pannelli staccati che esiste fintantoché una finestra di dialogo rimane aperta. In questo caso, è possibile portare in primo piano il pannello «Tracciati» dal menu principale tramite: → .
- Panoramica
-
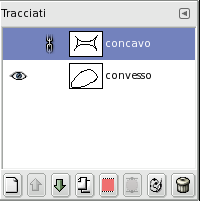
Questa finestra di dialogo mostra un elenco di tutti i tracciati presenti nell'immagine corrente. Per ogni tracciato si possono impostare gli attributi, come spiegato di seguito, ed eseguire determinate azioni usando i pulsanti in fondo alla finestra di dialogo, oppure usando il menu contestuale.
In modalità multi-finestra, si può visualizzare il nome dell'immagine attiva nella parte superiore del pannello scegliendo «Mostra selezione immagine» dal menu Schede. Questo permette di vedere a colpo d'occhio a quale immagine appartengono i tracciati su cui si sta lavorando.
Se la lista non è vuota, in ogni momento uno degli elementi è il tracciato attivo dell'immagine, quello che è soggetto a qualsiasi operazione venga eseguita usando il menu della finestra o i pulsanti in fondo ad essa: il tracciato attivo viene evidenziato nella lista. Facendo clic su uno degli elementi della lista lo si rende il canale attivo.
Facendo clic con il tasto destro su uno qualsiasi degli elementi della lista si porta in evidenza il menu dei tracciati. È possibile accedere al menu dei tracciati anche dal menu scheda.
- Selezione tracciati multipli
-
GIMP consente di selezionare più tracciati ed eseguire azioni su di essi, come il contorno o il riempimento. La selezione di più tracciati avviene utilizzando il mouse e il tasto Maiusc, per aggiungere un intervallo di tracciati, o il tasto Ctrl, per aggiungere o rimuovere il tracciato selezionato.
- Intestazione elenco tracciati
-
Direttamente sopra l'elenco dei tracciati si trova la barra dell'intestazione. A sinistra si trovano le icone che identificano le colonne di visibilità e blocco. Al centro, un'etichetta di testo indica quanti tracciati sono correntemente selezionati, se ne è selezionato più di uno.
- Attributi tracciato
-
Ogni tracciato viene mostrato nell'elenco con i suoi attributi, che sono molto simili agli attributi di livello:
-
 Visibilità del tracciato
-
Per impostazione predefinita, i tracciati non sono visibili. Questa icona viene visualizzata quando il tracciato è visibile. Facendo clic su di essa si passa dalla modalità visibile a quella invisibile. Quando un tracciato è «visibile», viene disegnato un bordo su ogni segmento del tracciato visualizzato nell'immagine. Questo non modifica i dati dei pixel dell'immagine. Facendo clic sull'icona tenendo premuto Maiusc, tutti gli altri tracciati vengono nascosti.
-
 Attributi di blocco tracciati
-
Ogni tracciato ha attributi di blocco. Se uno di questi attributi è impostato, la relativa icona del lucchetto apparirà davanti alla miniatura.
Quando sono impostati più attributi, qui verrà visualizzata un'icona a forma di doppio lucchetto. Cliccando in questa colonna è possibile modificare questi attributi.
-
 Blocca tracciato
-
Questa icona mostra se «Blocca pixel» è abilitata per il tracciato corrente. Quando è abilitata, il tracciato è bloccato per qualsiasi azione che lo modifichi, che significa che non verranno apportate modifiche a questo tracciato. Facendo clic sull'icona si commuta tra abilitata e disabilitata.
-
 Blocca posizione e dimensioni
-
Questa icona mostra quando l'opzione «blocca posizione tracciato» è abilitata per il tracciato corrente. Quando questa opzione è abilitata, il tracciato viene bloccato per qualsiasi azione che ne modifichi la posizione. Cliccando sull'icona si attiva o disattiva la funzione.
-
 Blocca visibilità
-
Questo pulsante controlla l'impostazione «Blocca» per la visibilità del tracciato. Se abilitata, la visibilità del tracciato non può essere modificata finché non si disattiva il blocco.
-
- Miniatura
-
Una piccola icona di anteprima rappresenta l'effetto del tracciato. Questa anteprima può essere ingrandita tenendo premuto il tasto sinistro del mouse. Trascinando la miniatura nella finestra di dialogo Livelli, verrà creato un nuovo livello con una copia rasterizzata del tracciato.
- nome del tracciato
-
Il nome del tracciato, che deve essere univoco all'interno dell'immagine. Facendo un doppio clic sul nome sarà possibile modificarlo. Se il nome impostato esiste già, gli verrà aggiunto un numero (ad es. «#1») per renderlo univoco.
-
- Gestione tracciati
-
La barra dei pulsanti in basso offre le seguenti funzionalità:
Questi pulsanti corrispondono alle voci del menu contestuale (a cui si accede facendo clic con il pulsante destro del mouse su una voce nell'elenco), ma alcuni di essi dispongono di opzioni aggiuntive ottenibili tenendo premuti i tasti modificatori mentre si preme il pulsante.
-
 Nuovo tracciato
-
Vedere Nuovo tracciato. Tenendo premuto il tasto Maiusc si crea un nuovo tracciato (vuoto) con gli ultimi valori usati, senza aprire la finestra di dialogo Nuovo tracciato.
-
 Alza tracciati
-
Vedere Alza tracciati. Tenendo premuto il tasto Maiusc si sposta il tracciato in cima all'elenco.
-
 Abbassa tracciati
-
Vedere Abbassa tracciati. Tenendo premuto il tasto Maiusc si sposta il tracciato in fondo all'elenco.
-
 Duplica tracciati
-
Vedere Duplica tracciati.
-
 Tracciati a selezione
-
Converte i tracciati in una selezione; vedere Tracciati a selezione per una spiegazione completa. È possibile usare i tasti modificatori per impostare il modo in cui la nuova selezione interagisce con la selezione esistente:
Modificatori Azione Nessuno Sostituisce la selezione esistente Maiusc Aggiunge alla selezione Ctrl Sottrae dalla selezione Maiusc+Ctrl Interseca con la selezione. -
 Selezione a tracciato
-
Facendo clic su questo pulsante tenendo premuto Maiusc, si porta in evidenza la finestra delle Impostazioni avanzate, che consente di regolare il modo in cui la selezione viene convertita in un tracciato.
-
 Disegno lungo i tracciati
-
Vedere Disegno lungo il tracciati. Tenendo premuto il tasto Maiusc si disegna il tracciato con gli ultimi valori usati senza aprire la finestra di dialogo di Disegno lungo i tracciati.
-
 Cancella tracciati
-
Cancella tracciati elimina i tracciati correntemente selezionati.
-
Il menu dei tracciati si può richiamare facendo clic con il tasto destro su un elemento della lista nella finestra dei tracciati, oppure scegliendo la prima voce ("Menu tracciati") dal menu della scheda dei tracciati. Questo menu fornisce l'accesso alla maggior parte delle operazioni che influenzano i tracciati.
- Modifica tracciato
-
Modifica tracciato rappresenta un modo alternativo di attivare l'omonimo strumento tracciato, usato per creare e manipolare i tracciati. Può essere attivato anche dalla barra degli strumenti, oppure usando la scorciatoia da tastiera B (N.d.T. per Bezier).
- Modificare gli attributi del tracciato
-
Modifica attributi tracciato richiama una piccola finestra che permette di modificare il nome del tracciato. È possibile fare ciò anche facendo un doppio clic sul nome nella lista all'interno della finestra dei tracciati.
- Etichette colore
-
Etichette colore porta in evidenza un sottomenu, simile a quello nella finestra di dialogo dei livelli, che permette di selezionare una etichetta colorata per i tracciati selezionati.
- Nuovo tracciato
-
Nuovo tracciato crea un nuovo tracciato, lo aggiunge alla lista nella finestra dei tracciati e lo rende attivo nell'immagine. Fa apparire una finestra che permette di dare un nome al tracciato. Il nuovo tracciato viene creato senza punti di ancoraggio, quindi, prima di poterlo usare, sarà necessario usare lo strumento tracciato per inserirne alcuni.
- Alza tracciati
-
Alza tracciati sposta i tracciati selezionati di una posizione più in alto nell'elenco della finestra Tracciati.
La posizione di un tracciato nell'elenco non ha alcun significato funzionale, quindi è semplicemente una comodità per aiutare a tenere le cose organizzate.
- Abbassa tracciati
-
Abbassa tracciati sposta i tracciati selezionati di una posizione più in basso nell'elenco della finestra Tracciati.
La posizione di un tracciato nell'elenco non ha alcun significato funzionale, quindi è semplicemente una comodità per aiutare a tenere le cose organizzate.
- Duplica tracciati
-
Duplica tracciati crea una copia dei tracciati selezionati, vi assegna dei nomi univoci, li aggiunge alla lista nella finestra dei tracciati e li rende i tracciati selezionati dell'immagine. Le copie saranno visibili solo se i tracciati originali erano visibili.
- Cancella tracciati
-
Cancella tracciati elimina i tracciati correntemente selezionati.
- Fondi tracciati visibili
-
Fondi tracciati visibili prende tutti i tracciati dell'immagine che sono visibili (cioè quelli vicino ai quali nella finestra dei tracciati è visualizzata l'icona con l'occhio), e li trasforma nei componenti di un unico tracciato. Questo può essere utili se si vuole delinearli allo stesso modo, ecc.
- Tracciati a selezione, Aggiungi tracciati a selezione, Sottrai tracciati da selezione, Interseca tracciati con selezione.
-
Tutti questi comandi convertono i tracciati attivi in una selezione, e la combinano con la selezione esistente nei modi specificati. (Tracciati a selezione elimina la selezione esistente e la sostituisce con quella creata dai tracciati.) Se è necessario, ogni componente non chiuso del tracciato viene chiuso collegando con una linea retta l'ultimo punto di ancoraggio con il primo. Le «formiche in marcia» (N.d.T. la selezione lampeggiante) della selezione risultante, dovrebbero seguire esattamente il tracciato, ma non bisogna aspettarsi una corrispondenza perfetta.
- Selezione a tracciato
-
Si può accedere a questa operazione in diversi modi:
-
Dal menu principale con →
-
Dal menu della finestra dei tracciati, con .
-
Dal pulsante Selezione a tracciato
nella parte inferiore della finestra dei tracciati.
La selezione a tracciato crea un nuovo tracciato a partire dalla selezione presente nell'immagine. Nella maggior parte dei casi il tracciato risultante seguirà esattamente le «formiche in marcia» (N.d.T: la selezione lampeggiante) della selezione, ma solitamente la corrispondenza non sarà proprio perfetta.
Convertire una maschera di selezione bi-dimensionale in un tracciato mono-dimensionale comporta l'utilizzo di algoritmi piuttosto complicati: è possibile modificare le modalità con cui ciò viene fatto usando le opzioni avanzate, accessibili tenendo premuto il tasto Maiusc mentre si fa clic sul pulsante Selezione a tracciato
in fondo alla finestra dei tracciati. Ciò fa apparire la finestra delle opzioni avanzate, che permette di impostare molte differenti opzioni. Nella maggior parte dei casi la Selezione a tracciato fa ciò che ci si aspetta senza il bisogno di regolare alcuna opzione avanzata. -
- Riempi tracciati
-
Si può accedere a questa operazione in diversi modi:
-
Dal menu principale, con →
-
Dal menu della finestra dei tracciati, con .
-
Dal pulsante Riempi il tracciato nella finestra delle opzioni dello strumento tracciati.
Riempi i tracciati riempie tutte le aree delimitate dai tracciati selezionati con il colore di primo piano o con il motivo selezionati. Vedere la sezione sul Riempimento tracciati per ulteriori informazioni.
-
- Delinea tracciati...
-
Si può accedere a questa operazione in diversi modi:
-
Dal menu principale con →
-
Dal menu della finestra dei tracciati con .
-
Dal pulsante Disegna lungo il tracciato
in fondo alla finestra dei tracciati. -
Dal pulsante Delinea tracciato nella finestra delle opzioni dello strumento tracciati.
Delinea tracciati disegna nel livello attivo dell'immagine i contorni dei tracciati selezionati, consentendo l'uso di un ampia varietà di stili per la linea usata e di opzioni per l'operazione. Per maggiori informazioni vedere Delineare e Delineatura
-
- Copia tracciati
-
Copia tracciati copia i tracciati selezionati negli Appunti dei tracciati, consentendo di incollarli in un'immagine diversa.
![[Suggerimento]](images/tip.png)
Suggerimento È possibile copiare ed incollare tracciati anche trascinando la loro icona dalla finestra dei tracciati e portandola sull'immagine di destinazione.
![[Nota]](images/note.png)
Nota Quando si copia un tracciato in un'immagine, esso non è visibile. È necessario renderlo visibile tramite la finestra di dialogo tracciati.
- Incolla tracciato
-
Incolla tracciato crea un nuovo tracciato a partire dal contenuto degli appunti dei tracciati, lo aggiunge alla lista nella finestra dei tracciati e lo rende il tracciato attivo nell'immagine. Se nessun tracciato è stato in precedenza copiato in memoria la voce di menu sarà disabilitata.
- Esporta tracciati
-
Esporta tracciati permette di salvare un tracciato in un file: fa apparire una finestra che permette di specificare il nome ed il percorso per il file. In seguito è possibile aggiungere questo tracciato a qualsiasi immagine di GIMP usando il comando Importa tracciato. Il formato usato per salvare i tracciati è SVG: questo significa che anche programmi di grafica vettoriale come Inkscape potranno importare i tracciati salvati. Vedere la sezione Tracciati per maggiori informazioni sui file SVG e sul loro legame con i tracciati di GIMP.
- Importa tracciato
-
«Importa tracciato...» crea un nuovo tracciato a partire da un file SVG: fa apparire una finestra che permette di navigare per selezionare il file. Vedere la sezione Tracciati per maggiori informazioni sui file SVG e sul loro legame con i tracciati in GIMP.


