The Scissors Select tool is an interesting piece of equipment: it has some features in common with Free Select, some features in common with the Path tool, and some features all its own. It is useful when you are trying to select a region defined by strong color-changes at the edges. To use the Scissors, you click to create a set of "control nodes", also referred to as anchors or control points, at the edges of the region you are trying to select. The tool produces a continuous curve passing through these control nodes, following any high-contrast edges it can find. If you are lucky, the path that the tool finds will correspond to the contour you are trying to select.
Unfortunately, there seem to be some problems with the edge-following logic for this tool, with the result that the selections it creates tend to be pretty crude in a lot of cases. A good way to clean them up is to switch to Quick Mask mode, and use paint tools to paint in the problematic parts. On the whole, most people find the Path tool to be more useful than the Scissors, because, even though it does not have the intelligent edge-finding capability, the paths it produces persist until you delete them, and can be altered at any time.
There are different possibilities to activate the tool:
-
From the main menu: → → .
-
By clicking the tool icon
 in the Toolbox.
-
By pressing the I keyboard shortcut.
Shift キー、 Ctrl キー、 Alt キーの既定での使い方は、 選択ツール共通の説明 「キー修飾」 をご覧ください。
ただし選択範囲を編集する段になって使える特有の修飾キーがあります。 これは最初のノードを置いた 後から 有効です。
- Shift
-
既定では 自動的に形象の輪郭線に貼り付く機能 が有効になっています。 マウスポインターでクリックしてドラッグする際、 電脳はさみツールは最大のグラデーション (色変化の最も大きな位置) をその付近に探り当て、 新たに置かれたコントロールノードや既存のノードをそこに強制移動します。
クリックしてドラッグするときにこのキーを押していると、 上に述べた機能は無効になり、 マウスポインターで指定したそのままの位置にノードが置かれます。
Backspace removes last segment drawn, Escape cancels all selection segments.
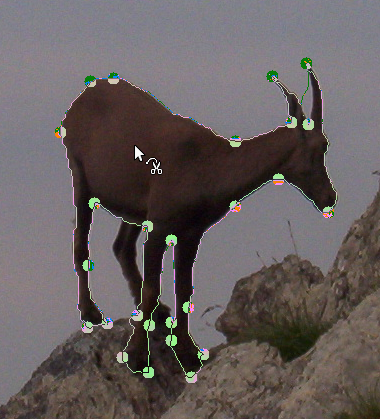
Each time you left-click with the mouse, you create a new control point, which is connected to the last control point by a curve that tries to follow edges in the image. To finish, click on the first point (the cursor changes to indicate when you are in the right spot) or press the Enter key. You can adjust the curve by dragging the control points, or by clicking on the boundary of the curve to create new control points. When you are satisfied and want to convert the curve to a selection, click anywhere inside the curve or press the Enter key.
As said above when you click with this tool you drop points. The
selection boundary is driven by these control points. During creation you
can move each one by clicking and dragging, except the first and the last
one. The selection is closed when you are clicking the last point over
the first one. When the selection is closed the pointer shape
changes according to its position: inside
 ,
on the boundary
,
on the boundary
 ,
and outside
,
and outside
 .
You can adjust the selection creating new points by clicking on the
boundary or by moving each control points (merged first and last
point). The selection is validated when you click inside.
.
You can adjust the selection creating new points by clicking on the
boundary or by moving each control points (merged first and last
point). The selection is validated when you click inside.
一度にひとつの選択範囲しか作れないことにご注意ください。 次の選択をつくるとき、 修飾キーなどを用いてモードを切り替えなければ、 新たな輪郭内でクリックした途端にそれまでの選択範囲は破棄されます。 [でもこの失敗は取り消せます。]
![[警告]](images/warning.png)
|
警告 |
|---|---|
|
輪郭が完全に整うまでは、 輪郭内をクリックしないでください。 ひとたび選択範囲が確定されたなら、 変更しようとして「やり直す」と何も無い状態に戻され、 曲線を再び振り出しから作らなければならなくなります。 それともう一つ、 途中で他のツールを呼び出さないでください。 それまでに置いたコントロールノードはすべて失われてしまいます。 (ただし選択範囲をパスに変換してしまえば、 パスツールを呼び出して作業を続行できます。) |
選択範囲の移動の方法は、 選択領域の移動 をご覧ください。
Normally, tool options are displayed in a window attached under the Toolbox as soon as you activate a tool. If they are not, you can access them from the main menu through → → which opens the option window of the selected tool. The available tool options can also be accessed by double clicking the corresponding tool icon in the Toolbox.
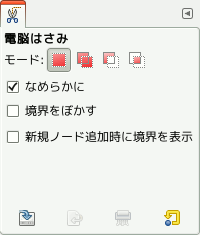
- モード, なめらかに, Feather edges
-
![[注記]](images/note.png)
注記 See Selection Tools Options for help with options that are common to all these tools. Only options that are specific to this tool are explained here.
- 新規ノード追加時に境界を表示
-
このオプションが有効な場合は、 境界線の再配置の段階でコントロールノードをドラッグして移動する最中にも選択範囲の境界が再描画されます。 無効な場合は、 ノードをドラッグしている間はノードの移動前の位置から現在地へ直線が引かれるのみで、 ポインターを放して移動を終えるまでは境界線の結果が見られません。 システムが遅い場合やコントロールノードが互いに離れている場合には、 このオプションを無効にするとわずかに処理が早くなります。


