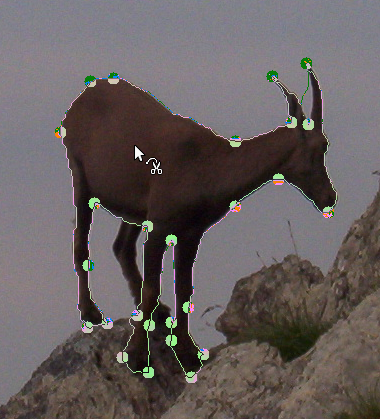
Het gereedschap Schaar is een interessant stukje gereedschap: het heeft enkele mogelijkheden gemeen met Vrije selectie, enkele mogelijkheden met het gereedschap Paden en enkele mogelijkheden helemaal van zichzelf. Het is nuttig als u probeert een gebied te selecteren dat wordt gedefinieerd door sterke wijzigingen in kleuren aan de randen. Met de Schaar klikt u om een set "controleknopen" te maken, ook wel ankers of controlepunten genoemd, aan de randen van het gebied dat u probeert te selecteren. Het gereedschap produceert een doorlopende boog door deze controleknopen, randen met hoog contrast volgend als het die kan vinden. Als u geluk hebt, zal het pad dat het gereedschap vindt, corresponderen met de omtrek van wat u probeert te selecteren.
Helaas lijken er enkele problemen te zijn met de logica voor het volgen van de randen voor dit gereedschap, met als resultaat dat de selecties die het maakt, in veel gevallen, nogal behoorlijk ruw neigen te zijn. Een goede manier, om ze op te schonen, is om te schakelen naar de modus Snelmasker en tekengereedschap gebruiken om in de problematische delen te tekenen. Over het geheel vinden de meeste mensen het gereedschap Paden meer nuttiger dan de Schaar, omdat, zelfs hoewel het niet de intelligente rand zoekende mogelijkheden heeft, de paden die het produceert bestaan totdat u ze verwijdert en ze kunnen op elk moment worden gewijzigd.
U kunt het gereedschap op verschillende manieren activeren:
-
Vanuit het hoofdmenu: → → ,
-
Door te klikken op het pictogram van het gereedschap
in de Gereedschapskist.
-
Door te drukken op de sneltoets I.
Het standaardgedrag van de toetsen Shift, Ctrl en Alt wordt beschreven in Paragraaf 2.1.1, “Hulptoetsen” voor alle selectiegereedschappen.
Maar er is één hulptoets die een speciaal gedrag heeft als u deze gebruikt tijdens het bewerken van een selectie, dat is nadat u het eerste knooppunt hebt gemaakt:
- Shift
-
Standaard is de functie automatisch uitlijnen ingeschakeld: telkens wanneer u op de muisaanwijzer klikt en sleept, vindt het gereedschap Schaar het punt met het maximale verloop (waarbij de kleurverandering maximaal is) voor het plaatsen van een nieuw besturingsknooppunt of het verplaatsen van een bestaand knooppunt.
Als u deze toets ingedrukt houdt tijdens het klikken en slepen, wordt deze functie uitgeschakeld en wordt het knooppunt precies op de positie van de muisaanwijzer geplaatst.
Backspace verwijdert het laatst getekende segment, Escape annuleert alle selectiesegmenten.
Each time you left-click with the mouse, you create a new control point, which is connected to the last control point by a curve that tries to follow edges in the image. To finish, click on the first point (the cursor changes to indicate when you are in the right spot) or press the Enter key. You can adjust the curve by dragging the control points, or by clicking on the boundary of the curve to create new control points. When you are satisfied and want to convert the curve to a selection, click anywhere inside the curve or press the Enter key.
Zoals hierboven al gezegd, als u klikt met dit gereedschap, zet u punten neer. De begrenzing van de selectie wordt gevormd door deze controlepunten. Tijdens het maken kunt u elk ervan verplaatsen door te klikken en slepen, met uitzondering van het eerste en laatste. De selectie wordt gesloten als u het laatste punt klikt, bovenop het eerste punt. Als de selectie wordt gesloten wijzigt de vorm van de aanwijzer overeenkomstig zijn positie: binnen
 , op de begrenzing
 en buiten
 . U kunt de selectie aanpassen door nieuwe punten te maken door te klikken op de begrenzing of door elk controlepunt te verplaatsen (samengevoegd eerste en laatste punt). De selectie wordt gevalideerd als u erin klikt.
Merk op dat u maar één selectie kunt maken; als u een tweede selectie probeert te maken wordt de eerste selectie gewist.
![[Waarschuwing]](images/warning.png)
|
Waarschuwing |
|---|---|
|
Zorg ervoor niet te klikken binnen de boog totdat u volledig gereed bent met het aanpassen ervan. Als u het eenmaal hebt geconverteerd naar een selectie, brengt ongedaan maken u terug naar nul en zult u opnieuw moeten beginnen met het beginnen construeren van de boog vanaf het begin, als u het wil wijzigen. Zorg er ook voor niet te wisselen naar een ander gereedschap, want ook dan zullen al uw zorgvuldig gemaakte controleknopen verloren gaan. (Maar u kunt nog steeds uw selectie transformeren naar een pad en ermee werken met het gereedschap Paden.) |
Als u de selectie wilt verplaatsen raadpleegt u Selecties verplaatsen.
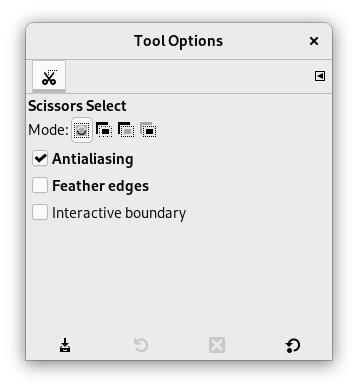
Normaal gesproken worden gereedschapsopties weergegeven in een venster dat is gekoppeld onder de Gereedschapskist, zodra u een gereedschap activeert. Als dat niet zo is, kunt u er toegang toe krijgen vanuit het hoofdmenu met → → , dat het venster met de gereedschapsopties voor het geselecteerde gereedschap opent. De beschikbare gereedschapsopties kunnen ook worden bereikt door te dubbelklikken op het corresponderende pictogram van het gereedschap in de Gereedschapskist.
- Modus, Randen glad maken, Randen verzachten
-
![[Opmerking]](images/note.png)
Opmerking Bekijk Gereedschapsopties Selectie voor hulp met opties die voor al deze gereedschappen gemeenschappelijk zijn. Alleen opties die specifiek voor dit gereedschap zijn, worden hier uitgelegd.
- Interactieve grens
-
Als deze optie is ingeschakeld, zal het slepen aan een controleknoop gedurende de plaatsing het pad aangeven dat door de grens van de selectie zal worden genomen. Als dit niet is ingeschakeld, zal de knoop worden weergegeven, verbonden door een rechte lijn met de vorige knoop, terwijl u hem versleept en u zult het resulterende pad niet zien, totdat u de knop van de aanwijzer loslaat. Op trage systemen, als uw controleknopen ver uit elkaar liggen, zou dit een en ander iets kunnen versnellen.


