Это достаточно интересный инструмент, объединяющий в себе возможности инструментов произвольного выделения и рисования контуров. Он полезен в тех случаях, когда необходимо выделить область, за границей которой совершенно другие цвета. При использовании инструмента вы создаёте серию контрольных точек по краям области, которую хотите выделить. Инструмент создаёт сплошную кривую, которая следует любому контрастному краю, который найдёт. При некоторой удаче эта кривая выделит ту область, которую вы хотели выделить.
К сожалению, в логике следования за краем есть ошибки, и результат зачастую получается неаккуратным. Чтобы поправить неудачные помехи в выделении, переключитесь в режим быстрой маски и используйте инструменты рисования на проблематичных частях. В общем, пользователи находят, что инструмент «Контур» более полезен, чем ножницы, потому что, хотя контур и не находит края самостоятельно, но контур сохраняется пока его не удалить, и его всегда можно изменить.
Есть несколько способов активации инструмента:
-
через главное меню → → ;
-
щелчком по значку инструмента
 на панели инструментов;
 -
нажатием клавиши быстрого доступа I.
Поведение клавиш Shift, Ctrl и Alt по умолчанию описано в Раздел 2.1.1, «Клавиши-модификаторы» для всех инструментов выделения.
Тем не менее, один из модификаторов ведёт себя особо при редактировании выделения, т. е. после того как вы добавили первый узел:
- Shift
-
По умолчанию используется функция автоматического прилипания к краям: каждый раз когда вы щелкаете курсором мыши по изображению и тащите его, Умные ножницы находят точку максимального градиента (где изменение цвета максимально), чтобы разместить там новую контрольную точку или переместить существующую.
Если держать эту клавишу нажатой при щелчке и перетаскивании, эта функция отключается, и контрольная точка будет расположена точно там, куда указал курсор мыши.
Клавиша Backspace удаляет последний нарисованный сегмент, а клавиша Escape отменяет все сегменты выделения.
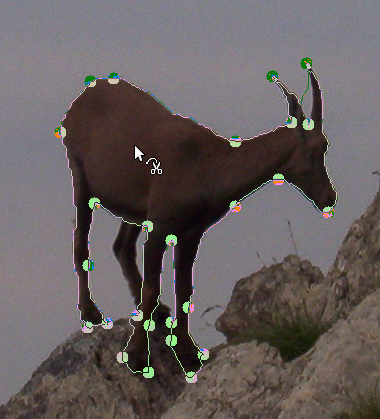
Each time you left-click with the mouse, you create a new control point, which is connected to the last control point by a curve that tries to follow edges in the image. To finish, click on the first point (the cursor changes to indicate when you are in the right spot) or press the Enter key. You can adjust the curve by dragging the control points, or by clicking on the boundary of the curve to create new control points. When you are satisfied and want to convert the curve to a selection, click anywhere inside the curve or press the Enter key.
Как уже сказано выше, щелчки этим инструментом создают контрольные точки, которые определяют границу выделения. При создании можно двигать любые из этих точек кроме первой и последней. Выделение закрывается щелчком последней точки над первой. Когда выделение закрывается, курсор меняет форму: внутри —
 , на границе —
 , а снаружи —
 . Выделение можно изменить перемещением границы или контрольных точек. Контур становится выделением после щелчка внутри контура.
Только одно выделение можно создать таким образом. При создании нового старое удаляется.
![[Предупреждение]](images/warning.png)
|
Предупреждение |
|---|---|
|
Не нажимайте внутри кривой, пока не закончили работать с ней. После создания выделения отмена удаляет и выделение, и кривую. Не переключайтесь на другой инструмент, иначе кривая удалится. (Но выделение можно преобразовать в контур и работать с инструментом контура.) |
За описанием перемещения выделения обратитесь к главе Перемещение выделений.
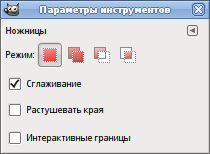
Обычно параметры инструмента отображаются в окне, прикреплённом под панелью инструментов, как только вы активируете инструмент. Если это не так, вы можете получить к ним доступ с помощью пункта главного меню → → , что откроет окно параметров выбранного инструмента. Доступ к параметрам инструмента также можно получить, дважды щёлкнув по соответствующему значку инструмента на панели инструментов.
- Режим, Сглаживание, Растушевать края
-
![[Примечание]](images/note.png)
Примечание Обратитесь к параметрам инструментов выделения за справкой об параметрах, общих для всех инструментов выделения. Здесь описаны только параметры, присущие этому инструменту выделения.
- Интерактивные границы
-
При выборе этого параметра перемещение контрольного узла во время помещения укажет контур выделения. Если параметр не выбран, то узлы соединяются прямой линией во время перемещения, и конечная кривая появится только после отпускания кнопки мышки. Это помогает на медленных компьютерах.


